Compare commits
92 Commits
release-12
...
release-12
| Author | SHA1 | Date | |
|---|---|---|---|
|
|
a184de2091 | ||
|
|
d3003d1978 | ||
|
|
081a4ce56a | ||
|
|
599911b414 | ||
|
|
9f1ad2f357 | ||
|
|
bfd714e657 | ||
|
|
a4edabe99c | ||
|
|
a6e6c019cc | ||
|
|
a2be46a154 | ||
|
|
b2f2cda3db | ||
|
|
b3bdbb4bf6 | ||
|
|
ee5bc90830 | ||
|
|
cf2ff7cc4b | ||
|
|
bc460406ea | ||
|
|
15c92827ae | ||
|
|
b09796f50c | ||
|
|
93c1372530 | ||
|
|
0755c91e9c | ||
|
|
4bd77ff7bb | ||
|
|
8b83e016ec | ||
|
|
f8fcd6b2fb | ||
|
|
20c14c48f4 | ||
|
|
231224f017 | ||
|
|
4c0f4d4255 | ||
|
|
1684e10789 | ||
|
|
74ead49ccb | ||
|
|
52ecba092c | ||
|
|
fb80e2d4bf | ||
|
|
d6e4707bf3 | ||
|
|
007b734596 | ||
|
|
38958ee7b7 | ||
|
|
845f7efd02 | ||
|
|
9614267c47 | ||
|
|
104a98b98d | ||
|
|
e8b765f8c7 | ||
|
|
8dc525a4f5 | ||
|
|
e5b4036d49 | ||
|
|
1dc715cf81 | ||
|
|
0428ec33f3 | ||
|
|
3dd9a04b1b | ||
|
|
02651fbf4a | ||
|
|
5a27449bd1 | ||
|
|
0a2cda1a4e | ||
|
|
4f90459ce8 | ||
|
|
3e4ec66706 | ||
|
|
173f09ce0c | ||
|
|
0296c41a9d | ||
|
|
af62210f7d | ||
|
|
2ab8fdb0df | ||
|
|
467392cde3 | ||
|
|
34907a5453 | ||
|
|
26a7187dcd | ||
|
|
6e03c4649e | ||
|
|
1e6f0d5af2 | ||
|
|
5389f19fbb | ||
|
|
3ae140cc19 | ||
|
|
df5de8219b | ||
|
|
3b64a0b431 | ||
|
|
5130b3c704 | ||
|
|
1c3628f3c6 | ||
|
|
add798f9be | ||
|
|
2966c2b41f | ||
|
|
8c70b0b4eb | ||
|
|
a844040faf | ||
|
|
93605ed4ee | ||
|
|
15d4d230cb | ||
|
|
cd3523db68 | ||
|
|
566460f4fe | ||
|
|
b582b64026 | ||
|
|
5ba62c974d | ||
|
|
83d11f0a57 | ||
|
|
207a7c81c3 | ||
|
|
5d5fa03cf6 | ||
|
|
7ff801727c | ||
|
|
6211301d09 | ||
|
|
a3ac4c50c9 | ||
|
|
e0f1535806 | ||
|
|
4d9705cb04 | ||
|
|
87e16f2266 | ||
|
|
60990ea070 | ||
|
|
38b5ba191c | ||
|
|
302e95684d | ||
|
|
9c3ae92722 | ||
|
|
0e2194e4b8 | ||
|
|
31c9ac9e3e | ||
|
|
527925ece5 | ||
|
|
bdeda62175 | ||
|
|
0944b9eab8 | ||
|
|
b60d5d502c | ||
|
|
7c8d3f7e51 | ||
|
|
0f159d1541 | ||
|
|
99f4aabbc5 |
@@ -42,7 +42,7 @@ require (
|
||||
github.com/yalue/merged_fs v1.3.0 // indirect
|
||||
golang.org/x/mod v0.24.0 // indirect
|
||||
golang.org/x/net v0.40.0 // indirect
|
||||
golang.org/x/oauth2 v0.26.0 // indirect
|
||||
golang.org/x/oauth2 v0.27.0 // indirect
|
||||
golang.org/x/sync v0.14.0 // indirect
|
||||
golang.org/x/text v0.25.0 // indirect
|
||||
golang.org/x/tools v0.33.0 // indirect
|
||||
|
||||
@@ -89,8 +89,8 @@ golang.org/x/mod v0.24.0 h1:ZfthKaKaT4NrhGVZHO1/WDTwGES4De8KtWO0SIbNJMU=
|
||||
golang.org/x/mod v0.24.0/go.mod h1:IXM97Txy2VM4PJ3gI61r1YEk/gAj6zAHN3AdZt6S9Ww=
|
||||
golang.org/x/net v0.40.0 h1:79Xs7wF06Gbdcg4kdCCIQArK11Z1hr5POQ6+fIYHNuY=
|
||||
golang.org/x/net v0.40.0/go.mod h1:y0hY0exeL2Pku80/zKK7tpntoX23cqL3Oa6njdgRtds=
|
||||
golang.org/x/oauth2 v0.26.0 h1:afQXWNNaeC4nvZ0Ed9XvCCzXM6UHJG7iCg0W4fPqSBE=
|
||||
golang.org/x/oauth2 v0.26.0/go.mod h1:XYTD2NtWslqkgxebSiOHnXEap4TF09sJSc7H1sXbhtI=
|
||||
golang.org/x/oauth2 v0.27.0 h1:da9Vo7/tDv5RH/7nZDz1eMGS/q1Vv1N/7FCrBhI9I3M=
|
||||
golang.org/x/oauth2 v0.27.0/go.mod h1:onh5ek6nERTohokkhCD/y2cV4Do3fxFHFuAejCkRWT8=
|
||||
golang.org/x/sync v0.14.0 h1:woo0S4Yywslg6hp4eUFjTVOyKt0RookbpAHG4c1HmhQ=
|
||||
golang.org/x/sync v0.14.0/go.mod h1:1dzgHSNfp02xaA81J2MS99Qcpr2w7fw1gpm99rleRqA=
|
||||
golang.org/x/sys v0.33.0 h1:q3i8TbbEz+JRD9ywIRlyRAQbM0qF7hu24q3teo2hbuw=
|
||||
|
||||
@@ -27,7 +27,7 @@ require (
|
||||
github.com/tetratelabs/wazero v1.6.0 // indirect
|
||||
golang.org/x/mod v0.24.0 // indirect
|
||||
golang.org/x/net v0.40.0 // indirect
|
||||
golang.org/x/oauth2 v0.26.0 // indirect
|
||||
golang.org/x/oauth2 v0.27.0 // indirect
|
||||
golang.org/x/sync v0.14.0 // indirect
|
||||
golang.org/x/sys v0.33.0 // indirect
|
||||
golang.org/x/text v0.25.0 // indirect
|
||||
|
||||
@@ -57,8 +57,8 @@ golang.org/x/mod v0.24.0 h1:ZfthKaKaT4NrhGVZHO1/WDTwGES4De8KtWO0SIbNJMU=
|
||||
golang.org/x/mod v0.24.0/go.mod h1:IXM97Txy2VM4PJ3gI61r1YEk/gAj6zAHN3AdZt6S9Ww=
|
||||
golang.org/x/net v0.40.0 h1:79Xs7wF06Gbdcg4kdCCIQArK11Z1hr5POQ6+fIYHNuY=
|
||||
golang.org/x/net v0.40.0/go.mod h1:y0hY0exeL2Pku80/zKK7tpntoX23cqL3Oa6njdgRtds=
|
||||
golang.org/x/oauth2 v0.26.0 h1:afQXWNNaeC4nvZ0Ed9XvCCzXM6UHJG7iCg0W4fPqSBE=
|
||||
golang.org/x/oauth2 v0.26.0/go.mod h1:XYTD2NtWslqkgxebSiOHnXEap4TF09sJSc7H1sXbhtI=
|
||||
golang.org/x/oauth2 v0.27.0 h1:da9Vo7/tDv5RH/7nZDz1eMGS/q1Vv1N/7FCrBhI9I3M=
|
||||
golang.org/x/oauth2 v0.27.0/go.mod h1:onh5ek6nERTohokkhCD/y2cV4Do3fxFHFuAejCkRWT8=
|
||||
golang.org/x/sync v0.14.0 h1:woo0S4Yywslg6hp4eUFjTVOyKt0RookbpAHG4c1HmhQ=
|
||||
golang.org/x/sync v0.14.0/go.mod h1:1dzgHSNfp02xaA81J2MS99Qcpr2w7fw1gpm99rleRqA=
|
||||
golang.org/x/sys v0.33.0 h1:q3i8TbbEz+JRD9ywIRlyRAQbM0qF7hu24q3teo2hbuw=
|
||||
|
||||
@@ -65,7 +65,7 @@ require (
|
||||
github.com/go-toolsmith/astp v1.1.0 // indirect
|
||||
github.com/go-toolsmith/strparse v1.1.0 // indirect
|
||||
github.com/go-toolsmith/typep v1.1.0 // indirect
|
||||
github.com/go-viper/mapstructure/v2 v2.3.0 // indirect
|
||||
github.com/go-viper/mapstructure/v2 v2.4.0 // indirect
|
||||
github.com/go-xmlfmt/xmlfmt v1.1.3 // indirect
|
||||
github.com/gobwas/glob v0.2.3 // indirect
|
||||
github.com/gofrs/flock v0.12.1 // indirect
|
||||
|
||||
@@ -142,8 +142,8 @@ github.com/go-toolsmith/strparse v1.1.0 h1:GAioeZUK9TGxnLS+qfdqNbA4z0SSm5zVNtCQi
|
||||
github.com/go-toolsmith/strparse v1.1.0/go.mod h1:7ksGy58fsaQkGQlY8WVoBFNyEPMGuJin1rfoPS4lBSQ=
|
||||
github.com/go-toolsmith/typep v1.1.0 h1:fIRYDyF+JywLfqzyhdiHzRop/GQDxxNhLGQ6gFUNHus=
|
||||
github.com/go-toolsmith/typep v1.1.0/go.mod h1:fVIw+7zjdsMxDA3ITWnH1yOiw1rnTQKCsF/sk2H/qig=
|
||||
github.com/go-viper/mapstructure/v2 v2.3.0 h1:27XbWsHIqhbdR5TIC911OfYvgSaW93HM+dX7970Q7jk=
|
||||
github.com/go-viper/mapstructure/v2 v2.3.0/go.mod h1:oJDH3BJKyqBA2TXFhDsKDGDTlndYOZ6rGS0BRZIxGhM=
|
||||
github.com/go-viper/mapstructure/v2 v2.4.0 h1:EBsztssimR/CONLSZZ04E8qAkxNYq4Qp9LvH92wZUgs=
|
||||
github.com/go-viper/mapstructure/v2 v2.4.0/go.mod h1:oJDH3BJKyqBA2TXFhDsKDGDTlndYOZ6rGS0BRZIxGhM=
|
||||
github.com/go-xmlfmt/xmlfmt v1.1.3 h1:t8Ey3Uy7jDSEisW2K3somuMKIpzktkWptA0iFCnRUWY=
|
||||
github.com/go-xmlfmt/xmlfmt v1.1.3/go.mod h1:aUCEOzzezBEjDBbFBoSiya/gduyIiWYRP6CnSFIV8AM=
|
||||
github.com/gobwas/glob v0.2.3 h1:A4xDbljILXROh+kObIiy5kIaPYD8e96x1tgBhUI5J+Y=
|
||||
|
||||
@@ -18,7 +18,7 @@ require (
|
||||
github.com/evilmartians/lefthook v1.4.8 // indirect
|
||||
github.com/fatih/color v1.18.0 // indirect
|
||||
github.com/fsnotify/fsnotify v1.8.0 // indirect
|
||||
github.com/go-viper/mapstructure/v2 v2.3.0 // indirect
|
||||
github.com/go-viper/mapstructure/v2 v2.4.0 // indirect
|
||||
github.com/gobwas/glob v0.2.3 // indirect
|
||||
github.com/google/go-cmp v0.7.0 // indirect
|
||||
github.com/inconshreveable/mousetrap v1.1.0 // indirect
|
||||
|
||||
@@ -29,8 +29,8 @@ github.com/frankban/quicktest v1.14.6 h1:7Xjx+VpznH+oBnejlPUj8oUpdxnVs4f8XU8WnHk
|
||||
github.com/frankban/quicktest v1.14.6/go.mod h1:4ptaffx2x8+WTWXmUCuVU6aPUX1/Mz7zb5vbUoiM6w0=
|
||||
github.com/fsnotify/fsnotify v1.8.0 h1:dAwr6QBTBZIkG8roQaJjGof0pp0EeF+tNV7YBP3F/8M=
|
||||
github.com/fsnotify/fsnotify v1.8.0/go.mod h1:8jBTzvmWwFyi3Pb8djgCCO5IBqzKJ/Jwo8TRcHyHii0=
|
||||
github.com/go-viper/mapstructure/v2 v2.3.0 h1:27XbWsHIqhbdR5TIC911OfYvgSaW93HM+dX7970Q7jk=
|
||||
github.com/go-viper/mapstructure/v2 v2.3.0/go.mod h1:oJDH3BJKyqBA2TXFhDsKDGDTlndYOZ6rGS0BRZIxGhM=
|
||||
github.com/go-viper/mapstructure/v2 v2.4.0 h1:EBsztssimR/CONLSZZ04E8qAkxNYq4Qp9LvH92wZUgs=
|
||||
github.com/go-viper/mapstructure/v2 v2.4.0/go.mod h1:oJDH3BJKyqBA2TXFhDsKDGDTlndYOZ6rGS0BRZIxGhM=
|
||||
github.com/gobwas/glob v0.2.3 h1:A4xDbljILXROh+kObIiy5kIaPYD8e96x1tgBhUI5J+Y=
|
||||
github.com/gobwas/glob v0.2.3/go.mod h1:d3Ez4x06l9bZtSvzIay5+Yzi0fmZzPgnTbPcKjJAkT8=
|
||||
github.com/google/go-cmp v0.7.0 h1:wk8382ETsv4JYUZwIsn6YpYiWiBsYLSJiTsyBybVuN8=
|
||||
|
||||
@@ -24,7 +24,7 @@ require (
|
||||
github.com/go-openapi/swag v0.23.0 // indirect
|
||||
github.com/go-openapi/validate v0.24.0 // indirect
|
||||
github.com/go-swagger/go-swagger v0.30.6-0.20240310114303-db51e79a0e37 // indirect
|
||||
github.com/go-viper/mapstructure/v2 v2.3.0 // indirect
|
||||
github.com/go-viper/mapstructure/v2 v2.4.0 // indirect
|
||||
github.com/google/go-cmp v0.7.0 // indirect
|
||||
github.com/google/uuid v1.6.0 // indirect
|
||||
github.com/gorilla/handlers v1.5.2 // indirect
|
||||
|
||||
@@ -41,8 +41,8 @@ github.com/go-openapi/validate v0.24.0 h1:LdfDKwNbpB6Vn40xhTdNZAnfLECL81w+VX3Bum
|
||||
github.com/go-openapi/validate v0.24.0/go.mod h1:iyeX1sEufmv3nPbBdX3ieNviWnOZaJ1+zquzJEf2BAQ=
|
||||
github.com/go-swagger/go-swagger v0.30.6-0.20240310114303-db51e79a0e37 h1:KFcZmKdZmapAog2+eL1buervAYrYolBZk7fMecPPDmo=
|
||||
github.com/go-swagger/go-swagger v0.30.6-0.20240310114303-db51e79a0e37/go.mod h1:i1/E+d8iPNReSE7y04FaVu5OPKB3il5cn+T1Egogg3I=
|
||||
github.com/go-viper/mapstructure/v2 v2.3.0 h1:27XbWsHIqhbdR5TIC911OfYvgSaW93HM+dX7970Q7jk=
|
||||
github.com/go-viper/mapstructure/v2 v2.3.0/go.mod h1:oJDH3BJKyqBA2TXFhDsKDGDTlndYOZ6rGS0BRZIxGhM=
|
||||
github.com/go-viper/mapstructure/v2 v2.4.0 h1:EBsztssimR/CONLSZZ04E8qAkxNYq4Qp9LvH92wZUgs=
|
||||
github.com/go-viper/mapstructure/v2 v2.4.0/go.mod h1:oJDH3BJKyqBA2TXFhDsKDGDTlndYOZ6rGS0BRZIxGhM=
|
||||
github.com/google/go-cmp v0.7.0 h1:wk8382ETsv4JYUZwIsn6YpYiWiBsYLSJiTsyBybVuN8=
|
||||
github.com/google/go-cmp v0.7.0/go.mod h1:pXiqmnSA92OHEEa9HXL2W4E7lf9JzCmGVUdgjX3N/iU=
|
||||
github.com/google/uuid v1.6.0 h1:NIvaJDMOsjHA8n1jAhLSgzrAzy1Hgr+hNrb57e+94F0=
|
||||
|
||||
54
.drone.yml
54
.drone.yml
@@ -25,7 +25,7 @@ steps:
|
||||
depends_on: []
|
||||
environment:
|
||||
CGO_ENABLED: 0
|
||||
image: golang:1.24.4-alpine
|
||||
image: golang:1.24.6-alpine
|
||||
name: compile-build-cmd
|
||||
- commands:
|
||||
- ./bin/build verify-drone
|
||||
@@ -75,7 +75,7 @@ steps:
|
||||
- go install github.com/bazelbuild/buildtools/buildifier@latest
|
||||
- buildifier --lint=warn -mode=check -r .
|
||||
depends_on: []
|
||||
image: golang:1.24.4-alpine
|
||||
image: golang:1.24.6-alpine
|
||||
name: lint-starlark
|
||||
trigger:
|
||||
event:
|
||||
@@ -140,7 +140,7 @@ steps:
|
||||
depends_on: []
|
||||
environment:
|
||||
CGO_ENABLED: 0
|
||||
image: golang:1.24.4-alpine
|
||||
image: golang:1.24.6-alpine
|
||||
name: compile-build-cmd
|
||||
- commands:
|
||||
- '# It is required that code generated from Thema/CUE be committed and in sync
|
||||
@@ -150,7 +150,7 @@ steps:
|
||||
- apk add --update make
|
||||
- CODEGEN_VERIFY=1 make gen-cue
|
||||
depends_on: []
|
||||
image: golang:1.24.4-alpine
|
||||
image: golang:1.24.6-alpine
|
||||
name: verify-gen-cue
|
||||
- commands:
|
||||
- '# It is required that generated jsonnet is committed and in sync with its inputs.'
|
||||
@@ -159,7 +159,7 @@ steps:
|
||||
- apk add --update make
|
||||
- CODEGEN_VERIFY=1 make gen-jsonnet
|
||||
depends_on: []
|
||||
image: golang:1.24.4-alpine
|
||||
image: golang:1.24.6-alpine
|
||||
name: verify-gen-jsonnet
|
||||
- commands:
|
||||
- yarn install --immutable || yarn install --immutable
|
||||
@@ -210,7 +210,7 @@ steps:
|
||||
environment:
|
||||
_EXPERIMENTAL_DAGGER_CLOUD_TOKEN:
|
||||
from_secret: dagger_token
|
||||
image: golang:1.24.4-alpine
|
||||
image: golang:1.24.6-alpine
|
||||
name: rgm-package
|
||||
pull: always
|
||||
volumes:
|
||||
@@ -472,7 +472,7 @@ steps:
|
||||
- apk add --update make
|
||||
- CODEGEN_VERIFY=1 make gen-cue
|
||||
depends_on: []
|
||||
image: golang:1.24.4-alpine
|
||||
image: golang:1.24.6-alpine
|
||||
name: verify-gen-cue
|
||||
trigger:
|
||||
event:
|
||||
@@ -542,7 +542,7 @@ steps:
|
||||
- apk add --update make
|
||||
- CODEGEN_VERIFY=1 make gen-cue
|
||||
depends_on: []
|
||||
image: golang:1.24.4-alpine
|
||||
image: golang:1.24.6-alpine
|
||||
name: verify-gen-cue
|
||||
trigger:
|
||||
branch: main
|
||||
@@ -609,7 +609,7 @@ steps:
|
||||
depends_on: []
|
||||
environment:
|
||||
CGO_ENABLED: 0
|
||||
image: golang:1.24.4-alpine
|
||||
image: golang:1.24.6-alpine
|
||||
name: compile-build-cmd
|
||||
- commands:
|
||||
- '# It is required that code generated from Thema/CUE be committed and in sync
|
||||
@@ -619,7 +619,7 @@ steps:
|
||||
- apk add --update make
|
||||
- CODEGEN_VERIFY=1 make gen-cue
|
||||
depends_on: []
|
||||
image: golang:1.24.4-alpine
|
||||
image: golang:1.24.6-alpine
|
||||
name: verify-gen-cue
|
||||
- commands:
|
||||
- '# It is required that generated jsonnet is committed and in sync with its inputs.'
|
||||
@@ -628,7 +628,7 @@ steps:
|
||||
- apk add --update make
|
||||
- CODEGEN_VERIFY=1 make gen-jsonnet
|
||||
depends_on: []
|
||||
image: golang:1.24.4-alpine
|
||||
image: golang:1.24.6-alpine
|
||||
name: verify-gen-jsonnet
|
||||
- commands:
|
||||
- yarn install --immutable || yarn install --immutable
|
||||
@@ -678,7 +678,7 @@ steps:
|
||||
environment:
|
||||
_EXPERIMENTAL_DAGGER_CLOUD_TOKEN:
|
||||
from_secret: dagger_token
|
||||
image: golang:1.24.4-alpine
|
||||
image: golang:1.24.6-alpine
|
||||
name: rgm-package
|
||||
pull: always
|
||||
volumes:
|
||||
@@ -1156,7 +1156,7 @@ steps:
|
||||
depends_on: []
|
||||
environment:
|
||||
CGO_ENABLED: 0
|
||||
image: golang:1.24.4-alpine
|
||||
image: golang:1.24.6-alpine
|
||||
name: compile-build-cmd
|
||||
- commands:
|
||||
- ./bin/build artifacts docker fetch --edition oss
|
||||
@@ -1286,7 +1286,7 @@ steps:
|
||||
depends_on: []
|
||||
environment:
|
||||
CGO_ENABLED: 0
|
||||
image: golang:1.24.4-alpine
|
||||
image: golang:1.24.6-alpine
|
||||
name: compile-build-cmd
|
||||
- commands:
|
||||
- ./bin/build artifacts docker fetch --edition oss
|
||||
@@ -1427,7 +1427,7 @@ steps:
|
||||
depends_on: []
|
||||
environment:
|
||||
CGO_ENABLED: 0
|
||||
image: golang:1.24.4-alpine
|
||||
image: golang:1.24.6-alpine
|
||||
name: compile-build-cmd
|
||||
- commands:
|
||||
- ./bin/build artifacts packages --artifacts-editions=oss --tag $${DRONE_TAG} --src-bucket
|
||||
@@ -1519,7 +1519,7 @@ steps:
|
||||
depends_on: []
|
||||
environment:
|
||||
CGO_ENABLED: 0
|
||||
image: golang:1.24.4-alpine
|
||||
image: golang:1.24.6-alpine
|
||||
name: compile-build-cmd
|
||||
- commands:
|
||||
- yarn install --immutable || yarn install --immutable
|
||||
@@ -1619,7 +1619,7 @@ steps:
|
||||
depends_on: []
|
||||
environment:
|
||||
CGO_ENABLED: 0
|
||||
image: golang:1.24.4-alpine
|
||||
image: golang:1.24.6-alpine
|
||||
name: compile-build-cmd
|
||||
- depends_on:
|
||||
- compile-build-cmd
|
||||
@@ -1716,7 +1716,7 @@ steps:
|
||||
depends_on: []
|
||||
environment:
|
||||
CGO_ENABLED: 0
|
||||
image: golang:1.24.4-alpine
|
||||
image: golang:1.24.6-alpine
|
||||
name: compile-build-cmd
|
||||
- commands:
|
||||
- ./bin/build publish grafana-com --edition oss ${DRONE_TAG}
|
||||
@@ -1790,7 +1790,7 @@ steps:
|
||||
STORYBOOK_DESTINATION:
|
||||
from_secret: rgm_storybook_destination
|
||||
UBUNTU_BASE: ubuntu:22.04
|
||||
image: golang:1.24.4-alpine
|
||||
image: golang:1.24.6-alpine
|
||||
name: rgm-build
|
||||
pull: always
|
||||
volumes:
|
||||
@@ -1884,7 +1884,7 @@ steps:
|
||||
STORYBOOK_DESTINATION:
|
||||
from_secret: rgm_storybook_destination
|
||||
UBUNTU_BASE: ubuntu:22.04
|
||||
image: golang:1.24.4-alpine
|
||||
image: golang:1.24.6-alpine
|
||||
name: rgm-build
|
||||
pull: always
|
||||
volumes:
|
||||
@@ -2007,7 +2007,7 @@ steps:
|
||||
STORYBOOK_DESTINATION:
|
||||
from_secret: rgm_storybook_destination
|
||||
UBUNTU_BASE: ubuntu:22.04
|
||||
image: golang:1.24.4-alpine
|
||||
image: golang:1.24.6-alpine
|
||||
name: rgm-build
|
||||
pull: always
|
||||
volumes:
|
||||
@@ -2114,7 +2114,7 @@ steps:
|
||||
STORYBOOK_DESTINATION:
|
||||
from_secret: rgm_storybook_destination
|
||||
UBUNTU_BASE: ubuntu:22.04
|
||||
image: golang:1.24.4-alpine
|
||||
image: golang:1.24.6-alpine
|
||||
name: rgm-build
|
||||
pull: always
|
||||
volumes:
|
||||
@@ -2260,7 +2260,7 @@ steps:
|
||||
STORYBOOK_DESTINATION:
|
||||
from_secret: rgm_storybook_destination
|
||||
UBUNTU_BASE: ubuntu:22.04
|
||||
image: golang:1.24.4-alpine
|
||||
image: golang:1.24.6-alpine
|
||||
name: rgm-publish
|
||||
pull: always
|
||||
volumes:
|
||||
@@ -2390,7 +2390,7 @@ steps:
|
||||
STORYBOOK_DESTINATION:
|
||||
from_secret: rgm_storybook_destination
|
||||
UBUNTU_BASE: ubuntu:22.04
|
||||
image: golang:1.24.4-alpine
|
||||
image: golang:1.24.6-alpine
|
||||
name: rgm-build
|
||||
pull: always
|
||||
volumes:
|
||||
@@ -2732,7 +2732,7 @@ steps:
|
||||
- commands:
|
||||
- trivy --exit-code 0 --severity UNKNOWN,LOW,MEDIUM docker:27-cli
|
||||
- trivy --exit-code 0 --severity UNKNOWN,LOW,MEDIUM alpine/git:2.40.1
|
||||
- trivy --exit-code 0 --severity UNKNOWN,LOW,MEDIUM golang:1.24.4-alpine
|
||||
- trivy --exit-code 0 --severity UNKNOWN,LOW,MEDIUM golang:1.24.6-alpine
|
||||
- trivy --exit-code 0 --severity UNKNOWN,LOW,MEDIUM node:22.16.0-alpine
|
||||
- trivy --exit-code 0 --severity UNKNOWN,LOW,MEDIUM node:22-bookworm
|
||||
- trivy --exit-code 0 --severity UNKNOWN,LOW,MEDIUM google/cloud-sdk:431.0.0
|
||||
@@ -2760,7 +2760,7 @@ steps:
|
||||
- commands:
|
||||
- trivy --exit-code 1 --severity HIGH,CRITICAL docker:27-cli
|
||||
- trivy --exit-code 1 --severity HIGH,CRITICAL alpine/git:2.40.1
|
||||
- trivy --exit-code 1 --severity HIGH,CRITICAL golang:1.24.4-alpine
|
||||
- trivy --exit-code 1 --severity HIGH,CRITICAL golang:1.24.6-alpine
|
||||
- trivy --exit-code 1 --severity HIGH,CRITICAL node:22.16.0-alpine
|
||||
- trivy --exit-code 1 --severity HIGH,CRITICAL node:22-bookworm
|
||||
- trivy --exit-code 1 --severity HIGH,CRITICAL google/cloud-sdk:431.0.0
|
||||
@@ -3007,6 +3007,6 @@ kind: secret
|
||||
name: gcr_credentials
|
||||
---
|
||||
kind: signature
|
||||
hmac: dce4ef9b8d45f32e1b2153b8418f668144325ed9fc0c51f2f8245fb091a4cba2
|
||||
hmac: e7227aeb1bbea13606266ce540b5f0e0a63f05f56a3eb072954d54527dcc5a11
|
||||
|
||||
...
|
||||
|
||||
1
.github/actions/build-package/action.yml
vendored
1
.github/actions/build-package/action.yml
vendored
@@ -139,6 +139,7 @@ runs:
|
||||
with:
|
||||
verb: run
|
||||
dagger-flags: --verbose=0
|
||||
version: 0.18.8
|
||||
args: go run -C ${GRAFANA_PATH} ./pkg/build/cmd artifacts --artifacts ${ARTIFACTS} --grafana-dir=${GRAFANA_PATH} --alpine-base=${ALPINE_BASE} --ubuntu-base=${UBUNTU_BASE} --enterprise-dir=${ENTERPRISE_PATH} --version=${VERSION} --patches-repo=${PATCHES_REPO} --patches-ref=${PATCHES_REF} --patches-path=${PATCHES_PATH} --build-id=${BUILD_ID} --tag-format="${TAG_FORMAT}" --ubuntu-tag-format="${UBUNTU_TAG_FORMAT}" --org=${DOCKER_ORG} --registry=${DOCKER_REGISTRY} --checksum=${CHECKSUM} --verify=${VERIFY} > $OUTFILE
|
||||
- id: output
|
||||
shell: bash
|
||||
|
||||
28
.github/workflows/bump-version.yml
vendored
28
.github/workflows/bump-version.yml
vendored
@@ -13,17 +13,29 @@ on:
|
||||
required: false
|
||||
|
||||
permissions:
|
||||
contents: write
|
||||
pull-requests: write
|
||||
id-token: write
|
||||
contents: read
|
||||
|
||||
jobs:
|
||||
bump-version:
|
||||
runs-on: ubuntu-latest
|
||||
steps:
|
||||
- name: Checkout Grafana
|
||||
uses: actions/checkout@v4
|
||||
- uses: grafana/shared-workflows/actions/get-vault-secrets@main
|
||||
with:
|
||||
persist-credentials: false
|
||||
repo_secrets: |
|
||||
GRAFANA_DELIVERY_BOT_APP_PEM=delivery-bot-app:PRIVATE_KEY
|
||||
- name: Generate token
|
||||
id: generate_token
|
||||
uses: tibdex/github-app-token@3beb63f4bd073e61482598c45c71c1019b59b73a
|
||||
with:
|
||||
app_id: ${{ vars.DELIVERY_BOT_APP_ID }}
|
||||
private_key: ${{ env.GRAFANA_DELIVERY_BOT_APP_PEM }}
|
||||
repositories: '["grafana"]'
|
||||
permissions: '{"contents": "write", "pull_requests": "write", "workflows": "write"}'
|
||||
- name: Checkout Grafana
|
||||
uses: actions/checkout@v5
|
||||
with:
|
||||
token: ${{ steps.generate_token.outputs.token }}
|
||||
- name: Update package.json versions
|
||||
uses: ./pkg/build/actions/bump-version
|
||||
with:
|
||||
@@ -35,10 +47,10 @@ jobs:
|
||||
DRY_RUN: ${{ inputs.dry_run }}
|
||||
REF_NAME: ${{ github.ref_name }}
|
||||
RUN_ID: ${{ github.run_id }}
|
||||
GH_TOKEN: ${{ secrets.GITHUB_TOKEN }}
|
||||
GH_TOKEN: ${{ steps.generate_token.outputs.token }}
|
||||
run: |
|
||||
git config --local user.name "github-actions[bot]"
|
||||
git config --local user.email "github-actions[bot]@users.noreply.github.com"
|
||||
git config --local user.name "grafana-delivery-bot[bot]"
|
||||
git config --local user.email "grafana-delivery-bot[bot]@users.noreply.github.com"
|
||||
git config --local --add --bool push.autoSetupRemote true
|
||||
git checkout -b "bump-version/${RUN_ID}/${VERSION}"
|
||||
git add .
|
||||
|
||||
4
.github/workflows/pr-e2e-tests.yml
vendored
4
.github/workflows/pr-e2e-tests.yml
vendored
@@ -48,6 +48,7 @@ jobs:
|
||||
persist-credentials: false
|
||||
- uses: dagger/dagger-for-github@e47aba410ef9bb9ed81a4d2a97df31061e5e842e
|
||||
with:
|
||||
version: 0.18.8
|
||||
verb: run
|
||||
args: go -C grafana run ./pkg/build/cmd artifacts -a targz:grafana:linux/amd64 --grafana-dir="${PWD}/grafana" > out.txt
|
||||
- run: mv "$(cat out.txt)" grafana.tar.gz
|
||||
@@ -140,6 +141,7 @@ jobs:
|
||||
- name: Run E2E tests
|
||||
uses: dagger/dagger-for-github@e47aba410ef9bb9ed81a4d2a97df31061e5e842e
|
||||
with:
|
||||
version: 0.18.8
|
||||
verb: run
|
||||
args: go run ./pkg/build/e2e --package=grafana.tar.gz
|
||||
--suite=${{ matrix.path }}
|
||||
@@ -178,12 +180,14 @@ jobs:
|
||||
if: github.event_name == 'pull_request'
|
||||
uses: dagger/dagger-for-github@e47aba410ef9bb9ed81a4d2a97df31061e5e842e
|
||||
with:
|
||||
version: 0.18.8
|
||||
verb: run
|
||||
args: go run ./pkg/build/a11y --package=grafana.tar.gz
|
||||
- name: Run non-PR a11y test
|
||||
if: github.event_name != 'pull_request'
|
||||
uses: dagger/dagger-for-github@e47aba410ef9bb9ed81a4d2a97df31061e5e842e
|
||||
with:
|
||||
version: 0.18.8
|
||||
verb: run
|
||||
args: go run ./pkg/build/a11y --package=grafana.tar.gz --no-threshold-fail
|
||||
|
||||
|
||||
163
.github/workflows/release-build.yml
vendored
163
.github/workflows/release-build.yml
vendored
@@ -1,6 +1,16 @@
|
||||
name: Build Release Packages
|
||||
on:
|
||||
workflow_dispatch:
|
||||
inputs:
|
||||
source-event:
|
||||
description: If this workflow was triggered by another workflow, this value should be set to the GITHUB_EVENT_NAME of that source workflow.
|
||||
type: string
|
||||
required: false
|
||||
default: workflow_dispatch
|
||||
schedule:
|
||||
# Every weeknight at midnight
|
||||
# "Scheduled workflows will only run on the default branch." (docs.github.com)
|
||||
- cron: '0 0 * * 1-5'
|
||||
push:
|
||||
branches:
|
||||
- release-*.*.*
|
||||
@@ -39,14 +49,14 @@ jobs:
|
||||
setup:
|
||||
name: setup
|
||||
runs-on: github-hosted-ubuntu-x64-small
|
||||
if: github.repository == 'grafana/grafana'
|
||||
if: (github.repository == 'grafana/grafana') || (github.repository == 'grafana/grafana-security-mirror' && contains(github.ref_name, '+security'))
|
||||
outputs:
|
||||
version: ${{ steps.output.outputs.version }}
|
||||
grafana-commit: ${{ steps.output.outputs.grafana_commit }}
|
||||
permissions:
|
||||
contents: read
|
||||
steps:
|
||||
- uses: actions/checkout@v4
|
||||
- uses: actions/checkout@v5
|
||||
with:
|
||||
persist-credentials: false
|
||||
- name: Set up version (Release Branches)
|
||||
@@ -93,10 +103,12 @@ jobs:
|
||||
BUILD_ID: ${{ github.run_id }}
|
||||
BUCKET: grafana-prerelease
|
||||
GRAFANA_COMMIT: ${{ needs.setup.outputs.grafana-commit }}
|
||||
SOURCE_EVENT: ${{ inputs.source-event || github.event_name }}
|
||||
REPO: ${{ github.repository }}
|
||||
with:
|
||||
github-token: ${{ steps.generate_token.outputs.token }}
|
||||
script: |
|
||||
const {REF, VERSION, BUILD_ID, BUCKET, GRAFANA_COMMIT} = process.env;
|
||||
const {REF, VERSION, BUILD_ID, BUCKET, GRAFANA_COMMIT, SOURCE_EVENT, REPO} = process.env;
|
||||
|
||||
await github.rest.actions.createWorkflowDispatch({
|
||||
owner: 'grafana',
|
||||
@@ -108,6 +120,8 @@ jobs:
|
||||
"build-id": String(BUILD_ID),
|
||||
"bucket": BUCKET,
|
||||
"grafana-commit": GRAFANA_COMMIT,
|
||||
"source-event": SOURCE_EVENT,
|
||||
"upstream": REPO,
|
||||
}
|
||||
})
|
||||
|
||||
@@ -126,27 +140,36 @@ jobs:
|
||||
# The downside to this is that the frontend will be built for each one when it could be reused for all of them.
|
||||
# This could be a future improvement.
|
||||
include:
|
||||
- name: linux-amd64
|
||||
- name: linux-amd64 # publish-npm relies on this step building npm packages
|
||||
artifacts: targz:grafana:linux/amd64,deb:grafana:linux/amd64,rpm:grafana:linux/amd64,docker:grafana:linux/amd64,docker:grafana:linux/amd64:ubuntu,npm:grafana,storybook
|
||||
verify: true
|
||||
- name: linux-arm64
|
||||
artifacts: targz:grafana:linux/arm64,deb:grafana:linux/arm64,rpm:grafana:linux/arm64,docker:grafana:linux/arm64,docker:grafana:linux/arm64:ubuntu
|
||||
verify: false
|
||||
- name: linux-s390x
|
||||
artifacts: targz:grafana:linux/s390x,deb:grafana:linux/s390x,rpm:grafana:linux/s390x,docker:grafana:linux/s390x,docker:grafana:linux/s390x:ubuntu
|
||||
verify: true
|
||||
- name: linux-armv7
|
||||
artifacts: targz:grafana:linux/arm/v7,deb:grafana:linux/arm/v7,docker:grafana:linux/arm/v7,docker:grafana:linux/arm/v7:ubuntu
|
||||
verify: true
|
||||
- name: linux-armv6
|
||||
artifacts: targz:grafana:linux/arm/v6,deb:grafana:linux/arm/v6
|
||||
verify: true
|
||||
- name: windows-amd64
|
||||
artifacts: targz:grafana:windows/amd64,zip:grafana:windows/amd64,msi:grafana:windows/amd64
|
||||
verify: true
|
||||
- name: windows-arm64
|
||||
artifacts: targz:grafana:windows/arm64,zip:grafana:windows/arm64
|
||||
verify: true
|
||||
- name: darwin-amd64
|
||||
artifacts: targz:grafana:darwin/amd64
|
||||
verify: true
|
||||
- name: darwin-arm64
|
||||
artifacts: targz:grafana:darwin/arm64
|
||||
verify: true
|
||||
steps:
|
||||
- uses: grafana/shared-workflows/actions/dockerhub-login@main
|
||||
- uses: actions/checkout@v4
|
||||
- uses: grafana/shared-workflows/actions/dockerhub-login@dockerhub-login/v1.0.2
|
||||
- uses: actions/checkout@v5
|
||||
with:
|
||||
persist-credentials: false
|
||||
- name: Set up QEMU
|
||||
@@ -162,7 +185,7 @@ jobs:
|
||||
github-token: ${{ secrets.GITHUB_TOKEN }}
|
||||
version: ${{ needs.setup.outputs.version }}
|
||||
output: artifacts-${{ matrix.name }}.txt
|
||||
verify: true
|
||||
verify: ${{ matrix.verify }}
|
||||
build-id: ${{ github.run_id }}
|
||||
- uses: actions/upload-artifact@ea165f8d65b6e75b540449e92b4886f43607fa02
|
||||
with:
|
||||
@@ -174,6 +197,7 @@ jobs:
|
||||
name: artifacts-${{ matrix.name }}
|
||||
path: ${{ steps.build.outputs.dist-dir }}
|
||||
retention-days: 1
|
||||
|
||||
publish-artifacts:
|
||||
name: Upload artifacts
|
||||
uses: grafana/grafana/.github/workflows/publish-artifact.yml@main
|
||||
@@ -186,5 +210,128 @@ jobs:
|
||||
bucket: grafana-prerelease
|
||||
pattern: artifacts-*
|
||||
run-id: ${{ github.run_id }}
|
||||
bucket-path: ${{ needs.setup.outputs.version }}
|
||||
bucket-path: ${{ needs.setup.outputs.version }}_${{ github.run_id }}
|
||||
environment: prod
|
||||
|
||||
publish-dockerhub:
|
||||
if: github.ref_name == 'main'
|
||||
permissions:
|
||||
contents: read
|
||||
id-token: write
|
||||
runs-on: ubuntu-x64-small
|
||||
needs:
|
||||
- setup
|
||||
- build
|
||||
steps:
|
||||
- uses: grafana/shared-workflows/actions/dockerhub-login@dockerhub-login/v1.0.2
|
||||
- uses: actions/download-artifact@d3f86a106a0bac45b974a628896c90dbdf5c8093
|
||||
with:
|
||||
name: artifacts-list-linux-amd64
|
||||
path: .
|
||||
- uses: actions/download-artifact@d3f86a106a0bac45b974a628896c90dbdf5c8093
|
||||
with:
|
||||
name: artifacts-list-linux-arm64
|
||||
path: .
|
||||
- uses: actions/download-artifact@d3f86a106a0bac45b974a628896c90dbdf5c8093
|
||||
with:
|
||||
name: artifacts-list-linux-armv7
|
||||
path: .
|
||||
- uses: actions/download-artifact@d3f86a106a0bac45b974a628896c90dbdf5c8093
|
||||
with:
|
||||
name: artifacts-linux-amd64
|
||||
path: dist
|
||||
- uses: actions/download-artifact@d3f86a106a0bac45b974a628896c90dbdf5c8093
|
||||
with:
|
||||
name: artifacts-linux-arm64
|
||||
path: dist
|
||||
- uses: actions/download-artifact@d3f86a106a0bac45b974a628896c90dbdf5c8093
|
||||
with:
|
||||
name: artifacts-linux-armv7
|
||||
path: dist
|
||||
- name: Push to Docker Hub
|
||||
env:
|
||||
VERSION: ${{ needs.setup.outputs.version }}
|
||||
run: |
|
||||
# grep can use a wildcard but then it includes the filename as part of the result and that gets complicated.
|
||||
# It's easier to use cat to combine the artifact lists
|
||||
cat artifacts-*.txt > artifacts.txt
|
||||
grep 'grafana_.*docker.tar.gz$' artifacts.txt | xargs -I % docker load -i % | sed 's/Loaded image: //g' | tee docker_images
|
||||
while read -r line; do
|
||||
# This tag will be `grafana/grafana-image-tags:...`
|
||||
docker push "$line"
|
||||
done < docker_images
|
||||
|
||||
docker manifest create grafana/grafana:main "grafana/grafana-image-tags:${VERSION}-amd64" "grafana/grafana-image-tags:${VERSION}-arm64" "grafana/grafana-image-tags:${VERSION}-armv7"
|
||||
docker manifest create grafana/grafana:main-ubuntu "grafana/grafana-image-tags:${VERSION}-ubuntu-amd64" "grafana/grafana-image-tags:${VERSION}-ubuntu-arm64" "grafana/grafana-image-tags:${VERSION}-ubuntu-armv7"
|
||||
docker manifest create "grafana/grafana-dev:${VERSION}" "grafana/grafana-image-tags:${VERSION}-amd64" "grafana/grafana-image-tags:${VERSION}-arm64" "grafana/grafana-image-tags:${VERSION}-armv7"
|
||||
docker manifest create "grafana/grafana-dev:${VERSION}-ubuntu" "grafana/grafana-image-tags:${VERSION}-ubuntu-amd64" "grafana/grafana-image-tags:${VERSION}-ubuntu-arm64" "grafana/grafana-image-tags:${VERSION}-ubuntu-armv7"
|
||||
|
||||
docker manifest push grafana/grafana:main
|
||||
docker manifest push grafana/grafana:main-ubuntu
|
||||
docker manifest push "grafana/grafana-dev:${VERSION}"
|
||||
docker manifest push "grafana/grafana-dev:${VERSION}-ubuntu"
|
||||
|
||||
publish-npm-canaries:
|
||||
if: github.ref_name == 'main'
|
||||
name: Publish NPM canaries
|
||||
uses: ./.github/workflows/release-npm.yml
|
||||
permissions:
|
||||
contents: read
|
||||
id-token: write
|
||||
needs:
|
||||
- setup
|
||||
- build
|
||||
with:
|
||||
grafana_commit: ${{ needs.setup.outputs.grafana-commit }}
|
||||
version: ${{ needs.setup.outputs.version }}
|
||||
build_id: ${{ github.run_id }}
|
||||
version_type: "canary"
|
||||
|
||||
# notify-pr creates (or updates) a comment in a pull request to link to this workflow where the release artifacts are
|
||||
# being built.
|
||||
notify-pr:
|
||||
runs-on: ubuntu-x64-small
|
||||
permissions:
|
||||
contents: read
|
||||
id-token: write
|
||||
needs:
|
||||
- setup
|
||||
steps:
|
||||
- id: vault-secrets
|
||||
uses: grafana/shared-workflows/actions/get-vault-secrets@main
|
||||
with:
|
||||
repo_secrets: |
|
||||
GRAFANA_DELIVERY_BOT_APP_PEM=delivery-bot-app:PRIVATE_KEY
|
||||
- name: Generate token
|
||||
id: generate_token
|
||||
uses: tibdex/github-app-token@3beb63f4bd073e61482598c45c71c1019b59b73a
|
||||
with:
|
||||
app_id: ${{ vars.DELIVERY_BOT_APP_ID }}
|
||||
private_key: ${{ env.GRAFANA_DELIVERY_BOT_APP_PEM }}
|
||||
repositories: '["grafana"]'
|
||||
permissions: '{"issues": "write", "pull_requests": "write", "contents": "read"}'
|
||||
- name: Find PR
|
||||
env:
|
||||
GITHUB_TOKEN: ${{ steps.generate_token.outputs.token }}
|
||||
GRAFANA_COMMIT: ${{ needs.setup.outputs.grafana-commit }}
|
||||
run: echo "ISSUE_NUMBER=$(gh api "/repos/grafana/grafana/commits/${GRAFANA_COMMIT}/pulls" | jq -r '.[0].number')" >> "$GITHUB_ENV"
|
||||
- name: Find Comment
|
||||
uses: peter-evans/find-comment@3eae4d37986fb5a8592848f6a574fdf654e61f9e # v3
|
||||
id: fc
|
||||
with:
|
||||
issue-number: ${{ env.ISSUE_NUMBER }}
|
||||
comment-author: 'grafana-delivery-bot[bot]'
|
||||
body-includes: GitHub Actions Build
|
||||
token: ${{ steps.generate_token.outputs.token }}
|
||||
- name: Create or update comment
|
||||
uses: peter-evans/create-or-update-comment@71345be0265236311c031f5c7866368bd1eff043 # v4
|
||||
with:
|
||||
token: ${{ steps.generate_token.outputs.token }}
|
||||
comment-id: ${{ steps.fc.outputs.comment-id }}
|
||||
issue-number: ${{ env.ISSUE_NUMBER }}
|
||||
body: |
|
||||
:rocket: Your submission is now being built and packaged.
|
||||
|
||||
- [GitHub Actions Build](https://github.com/grafana/grafana/actions/runs/${{ github.run_id }})
|
||||
- Version: ${{ needs.setup.outputs.version }}
|
||||
edit-mode: replace
|
||||
|
||||
146
.github/workflows/release-npm.yml
vendored
Normal file
146
.github/workflows/release-npm.yml
vendored
Normal file
@@ -0,0 +1,146 @@
|
||||
name: Release NPM packages
|
||||
run-name: Publish NPM ${{ inputs.version_type }} ${{ inputs.version }}
|
||||
on:
|
||||
workflow_call:
|
||||
inputs:
|
||||
grafana_commit:
|
||||
description: 'Grafana commit SHA to build against'
|
||||
required: true
|
||||
type: string
|
||||
version:
|
||||
description: 'Version to publish as'
|
||||
required: true
|
||||
type: string
|
||||
build_id:
|
||||
description: 'Run ID from the original release-build workflow'
|
||||
required: true
|
||||
type: string
|
||||
version_type:
|
||||
description: 'Version type (canary, nightly, stable)'
|
||||
required: true
|
||||
type: string
|
||||
|
||||
workflow_dispatch:
|
||||
inputs:
|
||||
grafana_commit:
|
||||
description: 'Grafana commit SHA to build against'
|
||||
required: true
|
||||
version:
|
||||
description: 'Version to publish as'
|
||||
required: true
|
||||
build_id:
|
||||
description: 'Run ID from the original release-build workflow'
|
||||
required: true
|
||||
version_type:
|
||||
description: 'Version type (canary, nightly, stable)'
|
||||
required: true
|
||||
|
||||
permissions: {}
|
||||
|
||||
jobs:
|
||||
# If called with version_type 'canary' or 'stable', build + publish to NPM
|
||||
# If called with version_type 'nightly', just tag the given version with nightly tag. It was already published by the canary build.
|
||||
|
||||
publish:
|
||||
name: Publish NPM packages
|
||||
runs-on: github-hosted-ubuntu-x64-small
|
||||
if: inputs.version_type == 'canary' || inputs.version_type == 'stable'
|
||||
permissions:
|
||||
contents: read
|
||||
id-token: write
|
||||
steps:
|
||||
- name: Info
|
||||
env:
|
||||
GITHUB_REF: ${{ github.ref }}
|
||||
GRAFANA_COMMIT: ${{ inputs.grafana_commit }}
|
||||
run: |
|
||||
echo "GRAFANA_COMMIT: $GRAFANA_COMMIT"
|
||||
echo "github.ref: $GITHUB_REF"
|
||||
|
||||
- name: Checkout workflow ref
|
||||
uses: actions/checkout@v4
|
||||
with:
|
||||
persist-credentials: false
|
||||
fetch-depth: 100
|
||||
fetch-tags: false
|
||||
|
||||
# this will fail with "{commit} is not a valid commit" if the commit is valid but
|
||||
# not in the last 100 commits.
|
||||
- name: Verify commit is in workflow HEAD
|
||||
env:
|
||||
GIT_COMMIT: ${{ inputs.grafana_commit }}
|
||||
run: ./.github/workflows/scripts/validate-commit-in-head.sh
|
||||
shell: bash
|
||||
|
||||
- name: Map version type to NPM tag
|
||||
id: npm-tag
|
||||
env:
|
||||
VERSION: ${{ inputs.version }}
|
||||
VERSION_TYPE: ${{ inputs.version_type }}
|
||||
REFERENCE_PKG: "@grafana/runtime"
|
||||
run: |
|
||||
TAG=$(./.github/workflows/scripts/determine-npm-tag.sh)
|
||||
echo "NPM_TAG=$TAG" >> "$GITHUB_OUTPUT"
|
||||
shell: bash
|
||||
|
||||
- name: Checkout build commit
|
||||
uses: actions/checkout@v4
|
||||
with:
|
||||
persist-credentials: false
|
||||
ref: ${{ inputs.grafana_commit }}
|
||||
|
||||
- uses: actions/setup-node@v4
|
||||
with:
|
||||
node-version-file: '.nvmrc'
|
||||
cache: 'yarn'
|
||||
cache-dependency-path: 'yarn.lock'
|
||||
|
||||
# Trusted Publishing is only available in npm v11.5.1 and later
|
||||
- name: Update npm
|
||||
run: npm install -g npm@^11.5.1
|
||||
|
||||
- name: Install dependencies
|
||||
run: yarn install --immutable
|
||||
|
||||
- name: Typecheck packages
|
||||
run: yarn run packages:typecheck
|
||||
|
||||
- name: Version, build, and pack packages
|
||||
env:
|
||||
VERSION: ${{ inputs.version }}
|
||||
run: |
|
||||
yarn run packages:build
|
||||
yarn lerna version "$VERSION" \
|
||||
--exact \
|
||||
--no-git-tag-version \
|
||||
--no-push \
|
||||
--force-publish \
|
||||
--yes
|
||||
yarn run packages:pack
|
||||
|
||||
- name: Debug packed files
|
||||
run: tree -a ./npm-artifacts
|
||||
|
||||
- name: Debug OIDC Claims
|
||||
uses: github/actions-oidc-debugger@2e9ba5d3f4bebaad1f91a2cede055115738b7ae8
|
||||
with:
|
||||
audience: '${{ github.server_url }}/${{ github.repository_owner }}'
|
||||
|
||||
- name: Publish packages
|
||||
env:
|
||||
NPM_TAG: ${{ steps.npm-tag.outputs.NPM_TAG }}
|
||||
run: ./scripts/publish-npm-packages.sh --dist-tag "$NPM_TAG" --registry 'https://registry.npmjs.org/'
|
||||
|
||||
# TODO: finish this step
|
||||
tag-nightly:
|
||||
name: Tag nightly release
|
||||
runs-on: github-hosted-ubuntu-x64-small
|
||||
if: inputs.version_type == 'nightly'
|
||||
|
||||
steps:
|
||||
- name: Checkout workflow ref
|
||||
uses: actions/checkout@v4
|
||||
with:
|
||||
persist-credentials: false
|
||||
|
||||
# TODO: tag the given release with nightly
|
||||
1
.github/workflows/release-pr.yml
vendored
1
.github/workflows/release-pr.yml
vendored
@@ -198,6 +198,7 @@ jobs:
|
||||
if: ${{ inputs.bump == true || inputs.bump == 'true' }}
|
||||
uses: dagger/dagger-for-github@e47aba410ef9bb9ed81a4d2a97df31061e5e842e
|
||||
with:
|
||||
version: 0.18.8
|
||||
verb: run
|
||||
args: go run -C .grafana-main ./pkg/build/actions/bump-version -version="patch"
|
||||
|
||||
|
||||
66
.github/workflows/scripts/determine-npm-tag.sh
vendored
Executable file
66
.github/workflows/scripts/determine-npm-tag.sh
vendored
Executable file
@@ -0,0 +1,66 @@
|
||||
#!/usr/bin/env bash
|
||||
set -euo pipefail
|
||||
|
||||
fail() { echo "Error: $*" >&2; exit 1; }
|
||||
|
||||
# Ensure required variables are set
|
||||
if [[ -z "${REFERENCE_PKG}" || -z "${VERSION_TYPE}" || -z "${VERSION}" ]]; then
|
||||
fail "Missing required environment variables: REFERENCE_PKG, VERSION_TYPE, VERSION"
|
||||
fi
|
||||
|
||||
semver_cmp () {
|
||||
IFS='.' read -r -a arr_a <<< "$1"
|
||||
IFS='.' read -r -a arr_b <<< "$2"
|
||||
|
||||
for i in 0 1 2; do
|
||||
local aa=${arr_a[i]:-0}
|
||||
local bb=${arr_b[i]:-0}
|
||||
# shellcheck disable=SC2004
|
||||
if (( 10#$aa > 10#$bb )); then echo gt; return 0; fi
|
||||
if (( 10#$aa < 10#$bb )); then echo lt; return 0; fi
|
||||
done
|
||||
|
||||
echo "eq"
|
||||
}
|
||||
|
||||
|
||||
STABLE_REGEX='^([0-9]+)\.([0-9]+)\.([0-9]+)$' # x.y.z
|
||||
PRE_REGEX='^([0-9]+)\.([0-9]+)\.([0-9]+)-([0-9]+)$' # x.y.z-123456
|
||||
|
||||
# Validate that the VERSION matches VERSION_TYPE
|
||||
# - stable must be x.y.z
|
||||
# - nightly/canary must be x.y.z-123456
|
||||
case "$VERSION_TYPE" in
|
||||
stable)
|
||||
[[ $VERSION =~ $STABLE_REGEX ]] || fail "For 'stable', version must match x.y.z" ;;
|
||||
nightly|canary)
|
||||
[[ $VERSION =~ $PRE_REGEX ]] || fail "For '$VERSION_TYPE', version must match x.y.z-123456" ;;
|
||||
*)
|
||||
fail "Unknown version_type '$VERSION_TYPE'" ;;
|
||||
esac
|
||||
|
||||
# Extract major, minor from VERSION
|
||||
IFS=.- read -r major minor patch _ <<< "$VERSION"
|
||||
|
||||
# Determine NPM tag
|
||||
case "$VERSION_TYPE" in
|
||||
canary) TAG="canary" ;;
|
||||
nightly) TAG="nightly" ;;
|
||||
stable)
|
||||
# Use npm dist-tag "latest" as the reference
|
||||
LATEST="$(npm view --silent "$REFERENCE_PKG" dist-tags.latest 2>/dev/null || true)"
|
||||
echo "Latest for $REFERENCE_PKG is ${LATEST:-<none>}" >&2
|
||||
|
||||
if [[ -z ${LATEST:-} ]]; then
|
||||
TAG="latest" # first ever publish
|
||||
else
|
||||
case "$(semver_cmp "$VERSION" "$LATEST")" in
|
||||
gt) TAG="latest" ;; # newer than reference -> latest
|
||||
lt|eq) TAG="v${major}.${minor}-latest" ;; # older or equal -> vX.Y-latest
|
||||
esac
|
||||
fi
|
||||
;;
|
||||
esac
|
||||
|
||||
echo "Resolved NPM_TAG=$TAG (VERSION=$VERSION, current latest=${LATEST:-none})" 1>&2 # stderr
|
||||
printf '%s' "$TAG"
|
||||
14
.github/workflows/scripts/validate-commit-in-head.sh
vendored
Executable file
14
.github/workflows/scripts/validate-commit-in-head.sh
vendored
Executable file
@@ -0,0 +1,14 @@
|
||||
#!/usr/bin/env bash
|
||||
set -euo pipefail
|
||||
|
||||
if [[ -z "${GIT_COMMIT:-}" ]]; then
|
||||
echo "Error: Environment variable GIT_COMMIT is required"
|
||||
exit 1
|
||||
fi
|
||||
|
||||
if git merge-base --is-ancestor "$GIT_COMMIT" HEAD; then
|
||||
echo "Commit $GIT_COMMIT is contained in HEAD"
|
||||
else
|
||||
echo "Error: Commit $GIT_COMMIT is not contained in HEAD"
|
||||
exit 1
|
||||
fi
|
||||
40
CHANGELOG.md
40
CHANGELOG.md
@@ -1,3 +1,43 @@
|
||||
<!-- 12.1.2 START -->
|
||||
|
||||
# 12.1.2 (2025-09-23)
|
||||
|
||||
### Features and enhancements
|
||||
|
||||
- **Alerting:** Update alerting module [#109999](https://github.com/grafana/grafana/pull/109999), [@yuri-tceretian](https://github.com/yuri-tceretian)
|
||||
- **Auditing:** Add settings to control recording of datasource query request and response body (Enterprise)
|
||||
- **Auditing:** Document new options for recording datasource query request/response body [#109981](https://github.com/grafana/grafana/pull/109981), [@macabu](https://github.com/macabu)
|
||||
- **Chore:** Don't show a "Not found" for public-dashboard fetches if the service is disabled via config [#110144](https://github.com/grafana/grafana/pull/110144), [@mmandrus](https://github.com/mmandrus)
|
||||
- **CloudWatch:** Use default region when query region is unset [#111079](https://github.com/grafana/grafana/pull/111079), [@iwysiu](https://github.com/iwysiu)
|
||||
|
||||
### Bug fixes
|
||||
|
||||
- **Alerting:** Fix bug where rules with identical mute/active intervals produced conflicting routes [#110973](https://github.com/grafana/grafana/pull/110973), [@alexander-akhmetov](https://github.com/alexander-akhmetov)
|
||||
- **Alerting:** Fix copying of recording rule fields [#110312](https://github.com/grafana/grafana/pull/110312), [@moustafab](https://github.com/moustafab)
|
||||
- **Fix:** Fix redirection after login when Grafana is served from subpath [#111097](https://github.com/grafana/grafana/pull/111097), [@mgyongyosi](https://github.com/mgyongyosi)
|
||||
|
||||
### Plugin development fixes & changes
|
||||
|
||||
- **Fix:** Prevent Rollup from treeshaking NPM packages [#108570](https://github.com/grafana/grafana/pull/108570), [@jackw](https://github.com/jackw)
|
||||
|
||||
<!-- 12.1.2 END -->
|
||||
<!-- 12.1.1 START -->
|
||||
|
||||
# 12.1.1 (2025-08-13)
|
||||
|
||||
### Features and enhancements
|
||||
|
||||
- **Alerting:** Add rule group name validation to the Prometheus conversion API [#108767](https://github.com/grafana/grafana/pull/108767), [@alexander-akhmetov](https://github.com/alexander-akhmetov)
|
||||
- **CloudWatch:** Update grafana/aws-sdk-go with STS endpo… [#109357](https://github.com/grafana/grafana/pull/109357), [@iwysiu](https://github.com/iwysiu)
|
||||
- **Go:** Update to 1.24.6 [#109318](https://github.com/grafana/grafana/pull/109318), [@Proximyst](https://github.com/Proximyst)
|
||||
|
||||
### Bug fixes
|
||||
|
||||
- **Alerting:** Fix active time intervals when time interval is renamed [#108547](https://github.com/grafana/grafana/pull/108547), [@yuri-tceretian](https://github.com/yuri-tceretian)
|
||||
- **Alerting:** Fix subpath handling in the alerting package [#109505](https://github.com/grafana/grafana/pull/109505), [@konrad147](https://github.com/konrad147)
|
||||
- **Config:** Fix date_formats options being moved to a different section [#109366](https://github.com/grafana/grafana/pull/109366), [@joshhunt](https://github.com/joshhunt)
|
||||
|
||||
<!-- 12.1.1 END -->
|
||||
<!-- 12.1.0 START -->
|
||||
|
||||
# 12.1.0 (2025-07-23)
|
||||
|
||||
@@ -16,7 +16,7 @@ ARG JS_SRC=js-builder
|
||||
# By using FROM instructions we can delegate dependency updates to dependabot
|
||||
FROM alpine:3.21.3 AS alpine-base
|
||||
FROM ubuntu:22.04 AS ubuntu-base
|
||||
FROM golang:1.24.4-alpine AS go-builder-base
|
||||
FROM golang:1.24.6-alpine AS go-builder-base
|
||||
FROM --platform=${JS_PLATFORM} node:22-alpine AS js-builder-base
|
||||
|
||||
# Javascript build stage
|
||||
|
||||
2
Makefile
2
Makefile
@@ -9,7 +9,7 @@ include .bingo/Variables.mk
|
||||
include .citools/Variables.mk
|
||||
|
||||
GO = go
|
||||
GO_VERSION = 1.24.4
|
||||
GO_VERSION = 1.24.6
|
||||
GO_LINT_FILES ?= $(shell ./scripts/go-workspace/golangci-lint-includes.sh)
|
||||
GO_TEST_FILES ?= $(shell ./scripts/go-workspace/test-includes.sh)
|
||||
SH_FILES ?= $(shell find ./scripts -name *.sh)
|
||||
|
||||
@@ -1,6 +1,6 @@
|
||||
module github.com/grafana/grafana/apps/advisor
|
||||
|
||||
go 1.24.4
|
||||
go 1.24.6
|
||||
|
||||
require (
|
||||
github.com/grafana/grafana-app-sdk v0.39.0
|
||||
@@ -24,7 +24,7 @@ require (
|
||||
github.com/go-openapi/jsonpointer v0.21.0 // indirect
|
||||
github.com/go-openapi/jsonreference v0.21.0 // indirect
|
||||
github.com/go-openapi/swag v0.23.0 // indirect
|
||||
github.com/go-viper/mapstructure/v2 v2.3.0 // indirect
|
||||
github.com/go-viper/mapstructure/v2 v2.4.0 // indirect
|
||||
github.com/gogo/protobuf v1.3.2 // indirect
|
||||
github.com/golang/protobuf v1.5.4 // indirect
|
||||
github.com/google/gnostic-models v0.6.9 // indirect
|
||||
|
||||
@@ -38,6 +38,8 @@ github.com/go-test/deep v1.0.8 h1:TDsG77qcSprGbC6vTN8OuXp5g+J+b5Pcguhf7Zt61VM=
|
||||
github.com/go-test/deep v1.0.8/go.mod h1:5C2ZWiW0ErCdrYzpqxLbTX7MG14M9iiw8DgHncVwcsE=
|
||||
github.com/go-viper/mapstructure/v2 v2.3.0 h1:27XbWsHIqhbdR5TIC911OfYvgSaW93HM+dX7970Q7jk=
|
||||
github.com/go-viper/mapstructure/v2 v2.3.0/go.mod h1:oJDH3BJKyqBA2TXFhDsKDGDTlndYOZ6rGS0BRZIxGhM=
|
||||
github.com/go-viper/mapstructure/v2 v2.4.0 h1:EBsztssimR/CONLSZZ04E8qAkxNYq4Qp9LvH92wZUgs=
|
||||
github.com/go-viper/mapstructure/v2 v2.4.0/go.mod h1:oJDH3BJKyqBA2TXFhDsKDGDTlndYOZ6rGS0BRZIxGhM=
|
||||
github.com/gogo/protobuf v1.3.2 h1:Ov1cvc58UF3b5XjBnZv7+opcTcQFZebYjWzi34vdm4Q=
|
||||
github.com/gogo/protobuf v1.3.2/go.mod h1:P1XiOD3dCwIKUDQYPy72D8LYyHL2YPYrpS2s69NZV8Q=
|
||||
github.com/golang/protobuf v1.5.4 h1:i7eJL8qZTpSEXOPTxNKhASYpMn+8e5Q6AdndVa1dWek=
|
||||
|
||||
@@ -1,6 +1,6 @@
|
||||
module github.com/grafana/grafana/apps/alerting/notifications
|
||||
|
||||
go 1.24.4
|
||||
go 1.24.6
|
||||
|
||||
require (
|
||||
github.com/grafana/grafana-app-sdk v0.39.2
|
||||
|
||||
@@ -1,6 +1,6 @@
|
||||
module github.com/grafana/grafana/apps/dashboard
|
||||
|
||||
go 1.24.4
|
||||
go 1.24.6
|
||||
|
||||
require (
|
||||
cuelang.org/go v0.11.1
|
||||
|
||||
@@ -1,6 +1,6 @@
|
||||
module github.com/grafana/grafana/apps/folder
|
||||
|
||||
go 1.24.4
|
||||
go 1.24.6
|
||||
|
||||
require (
|
||||
github.com/grafana/grafana-app-sdk v0.39.2
|
||||
|
||||
@@ -1,6 +1,6 @@
|
||||
module github.com/grafana/grafana/apps/iam
|
||||
|
||||
go 1.24.4
|
||||
go 1.24.6
|
||||
|
||||
require (
|
||||
github.com/grafana/grafana-app-sdk v0.39.2
|
||||
|
||||
@@ -1,6 +1,6 @@
|
||||
module github.com/grafana/grafana/apps/investigations
|
||||
|
||||
go 1.24.4
|
||||
go 1.24.6
|
||||
|
||||
require (
|
||||
github.com/grafana/grafana-app-sdk v0.39.0
|
||||
@@ -24,7 +24,7 @@ require (
|
||||
github.com/go-openapi/jsonpointer v0.21.0 // indirect
|
||||
github.com/go-openapi/jsonreference v0.21.0 // indirect
|
||||
github.com/go-openapi/swag v0.23.0 // indirect
|
||||
github.com/go-viper/mapstructure/v2 v2.3.0 // indirect
|
||||
github.com/go-viper/mapstructure/v2 v2.4.0 // indirect
|
||||
github.com/gogo/protobuf v1.3.2 // indirect
|
||||
github.com/golang/protobuf v1.5.4 // indirect
|
||||
github.com/google/gnostic-models v0.6.9 // indirect
|
||||
|
||||
@@ -37,6 +37,8 @@ github.com/go-test/deep v1.0.8 h1:TDsG77qcSprGbC6vTN8OuXp5g+J+b5Pcguhf7Zt61VM=
|
||||
github.com/go-test/deep v1.0.8/go.mod h1:5C2ZWiW0ErCdrYzpqxLbTX7MG14M9iiw8DgHncVwcsE=
|
||||
github.com/go-viper/mapstructure/v2 v2.3.0 h1:27XbWsHIqhbdR5TIC911OfYvgSaW93HM+dX7970Q7jk=
|
||||
github.com/go-viper/mapstructure/v2 v2.3.0/go.mod h1:oJDH3BJKyqBA2TXFhDsKDGDTlndYOZ6rGS0BRZIxGhM=
|
||||
github.com/go-viper/mapstructure/v2 v2.4.0 h1:EBsztssimR/CONLSZZ04E8qAkxNYq4Qp9LvH92wZUgs=
|
||||
github.com/go-viper/mapstructure/v2 v2.4.0/go.mod h1:oJDH3BJKyqBA2TXFhDsKDGDTlndYOZ6rGS0BRZIxGhM=
|
||||
github.com/gogo/protobuf v1.3.2 h1:Ov1cvc58UF3b5XjBnZv7+opcTcQFZebYjWzi34vdm4Q=
|
||||
github.com/gogo/protobuf v1.3.2/go.mod h1:P1XiOD3dCwIKUDQYPy72D8LYyHL2YPYrpS2s69NZV8Q=
|
||||
github.com/golang/protobuf v1.5.4 h1:i7eJL8qZTpSEXOPTxNKhASYpMn+8e5Q6AdndVa1dWek=
|
||||
|
||||
@@ -1,6 +1,6 @@
|
||||
module github.com/grafana/grafana/apps/playlist
|
||||
|
||||
go 1.24.4
|
||||
go 1.24.6
|
||||
|
||||
require (
|
||||
github.com/grafana/grafana-app-sdk v0.39.2
|
||||
|
||||
@@ -1997,17 +1997,17 @@ provider = static
|
||||
# instance = "grafana"
|
||||
# version = 11.0.0
|
||||
|
||||
[time_picker]
|
||||
# Custom quick ranges for the time picker. Each quick range has a display name, a from value, and a to value.
|
||||
# Format: [{"from":"now-5m","to":"now","display":"Last 5 minutes"},{"from":"now-15m","to":"now","display":"Last 15 minutes"}]
|
||||
quick_ranges =
|
||||
|
||||
[date_formats]
|
||||
# For information on what formatting patterns that are supported https://momentjs.com/docs/#/displaying/
|
||||
|
||||
# Default system date format used in time range picker and other places where full time is displayed
|
||||
full_date = YYYY-MM-DD HH:mm:ss
|
||||
|
||||
[time_picker]
|
||||
# Custom quick ranges for the time picker. Each quick range has a display name, a from value, and a to value.
|
||||
# Format: [{"from":"now-5m","to":"now","display":"Last 5 minutes"},{"from":"now-15m","to":"now","display":"Last 15 minutes"}]
|
||||
quick_ranges =
|
||||
|
||||
# Used by graph and other places where we only show small intervals
|
||||
interval_second = HH:mm:ss
|
||||
interval_minute = HH:mm
|
||||
|
||||
@@ -1,6 +1,6 @@
|
||||
module high-card
|
||||
|
||||
go 1.24.4
|
||||
go 1.24.6
|
||||
|
||||
require github.com/prometheus/client_golang v1.22.0
|
||||
|
||||
|
||||
@@ -1,6 +1,6 @@
|
||||
module utf8-support
|
||||
|
||||
go 1.24.4
|
||||
go 1.24.6
|
||||
|
||||
require (
|
||||
github.com/prometheus/client_golang v1.22.0
|
||||
|
||||
@@ -7,7 +7,6 @@ labels:
|
||||
- oss
|
||||
- cloud
|
||||
- enterprise
|
||||
stage: experimental
|
||||
keywords:
|
||||
- grafana
|
||||
- grafana advisor
|
||||
@@ -17,7 +16,7 @@ keywords:
|
||||
|
||||
# Grafana Advisor
|
||||
|
||||
{{< docs/experimental product="Grafana Advisor" featureFlag="grafanaAdvisor" >}}
|
||||
{{< docs/public-preview product="Grafana Advisor" featureFlag="grafanaAdvisor" >}}
|
||||
|
||||
## Overview
|
||||
|
||||
|
||||
@@ -193,13 +193,25 @@ The migration assistant can migrate the majority of Grafana Alerting resources t
|
||||
- Notification templates
|
||||
|
||||
{{< admonition type="note">}}
|
||||
The `grafana-default-email` contact point that's provisioned with every new Grafana instance doesn't have a UID by default and won't be migrated unless you edit or update and save it. You do not need to change the contact point for a UID to be generated when saved.
|
||||
The `grafana-default-email` contact point that's provisioned with every new Grafana instance doesn't have a UID by default and won't be migrated unless you edit or update and save it. You don't need to change the contact point for a UID to be generated when saved.
|
||||
{{< /admonition >}}
|
||||
|
||||
This is sufficient to have your Alerting configuration up and running in Grafana Cloud with minimal effort.
|
||||
|
||||
#### Migration assistant limitations on Grafana Alerting resources
|
||||
|
||||
Migration of Silences is not supported by the migration assistant and needs to be configured manually. Alert History is also not available for migration.
|
||||
|
||||
Attempting to migrate a large number of alert rules might result in the following error:
|
||||
|
||||
```
|
||||
Maximum number of alert rule groups reached: Delete some alert rule groups or upgrade your plan and try again.
|
||||
```
|
||||
|
||||
To avoid this, refer to the [Alert rule limits in Grafana Cloud](https://grafana.com/docs/grafana-cloud/alerting-and-irm/alerting/alerting-rules/create-grafana-managed-rule/#alert-rule-limits-in-grafana-cloud) when migrating alert rules.
|
||||
|
||||
#### Prevent duplicated alert notifications
|
||||
|
||||
Successfully migrating Alerting resources to your Grafana Cloud instance could result in 2 sets of notifications being generated:
|
||||
|
||||
1. From your OSS/Enterprise instance
|
||||
|
||||
@@ -293,7 +293,7 @@ The following customizations are available via support:
|
||||
- Enabling [feature toggles](http://www.grafana.com/docs/grafana/latest/setup-grafana/configure-grafana/feature-toggles).
|
||||
- [Single sign-on and team sync using SAML, LDAP, or OAuth](http://www.grafana.com/docs/grafana/latest/setup-grafana/configure-security/configure-authentication).
|
||||
- Enable [embedding Grafana dashboards in other applications](https://grafana.com/docs/grafana/latest/setup-grafana/configure-grafana/#allow_embedding) for Grafana Cloud contracted customers.
|
||||
- [Audit logging](https://grafana.com/docs/grafana/latest/setup-grafana/configure-security/audit-grafana/) ([Usage insights logs and dashboards](https://grafana.com/docs/grafana-cloud/account-management/usage-insights/) are available in Grafana Cloud Pro and Advanced by default).
|
||||
- [Audit logging](https://grafana.com/docs/grafana/latest/setup-grafana/configure-security/audit-grafana/) ([Usage insights logs and dashboards](https://grafana.com/docs/grafana-cloud/account-management/usage-insights/) are available in select Grafana Cloud paid accounts).
|
||||
|
||||
Note that the following custom configurations are not supported in Grafana Cloud:
|
||||
|
||||
|
||||
@@ -16,53 +16,29 @@ weight: 600
|
||||
|
||||
# Plugin management
|
||||
|
||||
You can enhance your Grafana experience with _plugins_, extensions to Grafana beyond the wide range of visualizations and data sources that are built-in.
|
||||
Plugins enhance your Grafana experience with new ways to connect to and visualize data.
|
||||
|
||||
This guide shows you how to [install](#install-a-plugin) plugins that are built by Grafana Labs, commercial partners, our community, or plugins that you have [built yourself](/developers/plugin-tools).
|
||||
Read on for an overview on how to get started with plugins:
|
||||
|
||||
- Plugins are available in the [plugin catalog](#plugin-catalog). They can be built by Grafana Labs, commercial partners, our community, or you can [build a plugin yourself](/developers/plugin-tools).
|
||||
- There are three [types of plugins](#types-of-plugins): panel, data source, and app plugins.
|
||||
- Learn [how to install](#install-a-plugin), [update](#update-a-plugin) and [verify](#verify-your-plugins) your plugins.
|
||||
|
||||
[Advanced options](#advanced-options) allow you to:
|
||||
|
||||
- Customize where app plugin pages appear in the navigation menu.
|
||||
- Configure backend communication between installed plugins.
|
||||
- Improve security by isolating plugins with the Plugin Frontend Sandbox.
|
||||
|
||||
## Types of plugins
|
||||
|
||||
Grafana supports three types of plugins:
|
||||
|
||||
- [Panels](/grafana/plugins/panel-plugins) - These plugins make it easy to create and add any kind of panel, to show your data, or improve your favorite dashboards.
|
||||
- [Panels](/grafana/plugins/panel-plugins) - These plugins make it easy to create and add any kind of visualization, to show your data, or improve your favorite dashboards.
|
||||
- [Data sources](/grafana/plugins/data-source-plugins) - These plugins allow you to pull data from various data sources such as databases, APIs, log files, and so on, and display it in the form of graphs, charts, and dashboards in Grafana.
|
||||
- [Apps](/grafana/plugins/app-plugins) - These plugins enable the bundling of data sources, panels, dashboards, and Grafana pages into a cohesive experience.
|
||||
|
||||
## Panel plugins
|
||||
|
||||
Add new visualizations to your dashboard with panel plugins, such as the [Clock](/grafana/plugins/grafana-clock-panel), [Mosaic](/grafana/plugins/boazreicher-mosaicplot-panel) and [Variable](/grafana/plugins/volkovlabs-variable-panel) panels.
|
||||
|
||||
Use panel plugins when you want to:
|
||||
|
||||
- Visualize data returned by data source queries.
|
||||
- Navigate between dashboards.
|
||||
- Control external systems, such as smart home devices.
|
||||
|
||||
## Data source plugins
|
||||
|
||||
Data source plugins add support for new databases, such as [Google BigQuery](/grafana/plugins/grafana-bigquery-datasource).
|
||||
|
||||
Data source plugins communicate with external sources of data and return the data in a format that Grafana understands. By adding a data source plugin, you can immediately use the data in any of your existing dashboards.
|
||||
|
||||
Use data source plugins when you want to query data from external or third-party systems.
|
||||
|
||||
## App plugins
|
||||
|
||||
Applications, or _app plugins_, bundle data sources and panels to provide a cohesive experience, such as the [Zabbix](/grafana/plugins/alexanderzobnin-zabbix-app) app.
|
||||
|
||||
Apps can also add custom pages for things like control panels.
|
||||
|
||||
Use app plugins when you want an out-of-the-box monitoring experience.
|
||||
|
||||
### Managing access for app plugins
|
||||
|
||||
Customize access to app plugins with [RBAC](../roles-and-permissions/access-control/rbac-for-app-plugins/).
|
||||
|
||||
By default, the Viewer, Editor and Admin roles have access to all app plugins that their Organization role allows them to access. Access is granted by the `fixed:plugins.app:reader` role.
|
||||
|
||||
{{< admonition type="note" >}}
|
||||
To prevent users from seeing an app plugin, refer to [these permissions scenarios](../roles-and-permissions/access-control/plan-rbac-rollout-strategy/#prevent-viewers-from-accessing-an-app-plugin).
|
||||
{{< /admonition >}}
|
||||
Read more in [Types of plugins](plugin-types).
|
||||
|
||||
## Plugin catalog
|
||||
|
||||
@@ -74,96 +50,31 @@ The following access rules apply depending on the user role:
|
||||
- If you are a **Server Admin**, you can't configure app plugins, but you can install, uninstall, or update them.
|
||||
- If you are both **Org Admin** and **Server Admin**, you can configure app plugins and also install, uninstall, or update them.
|
||||
|
||||
{{< admonition type="note" >}}
|
||||
The Grafana plugin catalog is designed to work with a single Grafana server instance only. Support for Grafana clusters is planned for future Grafana releases.
|
||||
{{< /admonition >}}
|
||||
|
||||
<div class="medium-6 columns">
|
||||
<video width="700" height="600" controls>
|
||||
<source src="/static/assets/videos/plugins-catalog-install-9.2.mp4" type="video/mp4">
|
||||
Your browser does not support the video tag.
|
||||
</video>
|
||||
</div>
|
||||
|
||||
_Video shows the Plugin catalog in a previous version of Grafana._
|
||||
|
||||
{{< admonition type="note" >}}
|
||||
If required, the Grafana plugin catalog can be disabled using the `plugin_admin_enabled` flag in the [configuration](../../setup-grafana/configure-grafana/#plugin_admin_enabled) file.
|
||||
{{< /admonition >}}
|
||||
|
||||
<a id="#plugin-catalog-entry"></a>
|
||||
|
||||
### Browse plugins
|
||||
|
||||
To browse for available plugins:
|
||||
|
||||
1. While logged into Grafana as an administrator, click **Administration > Plugins and data > Plugins** in the side menu to view installed and available plugins.
|
||||
1. Use the search to filter based on name, keywords, organization and other metadata.
|
||||
1. Use the search box to filter based on name, keywords, organization and other metadata.
|
||||
1. Click the **Data sources**, **Panels**, or **Applications** buttons to filter by plugin type.
|
||||
|
||||
## Manage your plugins
|
||||
|
||||
We strongly recommend running the latest plugin version. Use [Grafana Advisor](https://grafana.com/docs/grafana/<GRAFANA_VERSION>/administration/grafana-advisor) to check the status of your data sources and plugins.
|
||||
|
||||
### Install a plugin
|
||||
|
||||
The most common way to install a plugin is through the Grafana UI, but alternative methods are also available.
|
||||
The most common way to install a plugin is through the Grafana UI.
|
||||
|
||||
1. In Grafana, click **Administration > Plugins and data > Plugins** in the side navigation menu to view all plugins.
|
||||
1. Browse and find a plugin.
|
||||
1. Click the plugin's logo.
|
||||
1. Click **Install**.
|
||||
|
||||
There are also additional ways to install plugins depending on your setup.
|
||||
|
||||
#### Install a plugin using Grafana CLI
|
||||
|
||||
Grafana CLI allows you to install, upgrade, and manage your Grafana plugins using a command line. For more information about Grafana CLI plugin commands, refer to [Plugin commands](../../cli/#plugins-commands).
|
||||
|
||||
#### Install a plugin from a ZIP file
|
||||
|
||||
This method is typically used for plugins not available in the Plugin Catalog or in environments without internet access.
|
||||
|
||||
Download the archive containing the plugin assets, and install it by extracting the archive into the plugin directory. For example:
|
||||
|
||||
```bash
|
||||
unzip my-plugin-0.2.0.zip -d YOUR_PLUGIN_DIR/my-plugin
|
||||
```
|
||||
|
||||
The path to the plugin directory is defined in the configuration file. For more information, refer to [Configuration](../../setup-grafana/configure-grafana/#plugins).
|
||||
|
||||
#### Install a plugin using Grafana configuration
|
||||
|
||||
{{< admonition type="note" >}}
|
||||
This feature requires Grafana 11.5.0 or later.
|
||||
To see additional ways to install plugins refer to [Install a plugin](plugin-install).
|
||||
{{< /admonition >}}
|
||||
|
||||
You can install plugins by adding the plugin ID to the `plugins.preinstall` section in the Grafana configuration file. This prevents the plugin from being accidentally uninstalled and can be auto-updated. For more information, refer to [Configuration](../../setup-grafana/configure-grafana/#plugins).
|
||||
|
||||
#### Install a plugin in air-gapped environment
|
||||
|
||||
Plugin installation usually requires an internet connection. You can check which endpoints are used during the installation on your instance and add them to your instance’s allowlist.
|
||||
|
||||
If this is not possible you can go via installing a plugin using [Grafana CLI](#install-a-plugin-using-grafana-cli) or as a [ZIP file](#install-a-plugin-from-a-zip-file).
|
||||
|
||||
You can fetch any plugin from Grafana.com API following the download link referenced in the API.
|
||||
Here is an example based on `grafana-lokiexplore-app` plugins.
|
||||
|
||||
1. Open `https://grafana.com/api/plugins/grafana-lokiexplore-app` and look for `links` section
|
||||
1. Find a `download` url which looks something like `https://grafana.com/api/plugins/grafana-lokiexplore-app/versions/1.0.2/download`
|
||||
1. Use this URL to download the plugin ZIP file, which you can then install as described above.
|
||||
|
||||
#### Install plugins using the Grafana Helm chart
|
||||
|
||||
With the Grafana Helm chart, add the plugins you want to install as a list using the `plugins` field in the your values file. For more information about the configuration, refer to [the Helm chart configuration reference](https://github.com/grafana/helm-charts/tree/main/charts/grafana#configuration).
|
||||
|
||||
The following YAML snippet installs v1.9.0 of the Grafana OnCall App plugin and the Redis data source plugin.
|
||||
You must incorporate this snippet within your Helm values file.
|
||||
|
||||
```yaml
|
||||
plugins:
|
||||
- https://grafana.com/api/plugins/grafana-oncall-app/versions/v1.9.0/download;grafana-oncall-app
|
||||
- redis-datasource
|
||||
```
|
||||
|
||||
When the update is complete, a confirmation message will indicate the installation was successful.
|
||||
|
||||
### Update a plugin
|
||||
|
||||
To update a plugin:
|
||||
@@ -186,89 +97,24 @@ To uninstall a plugin:
|
||||
|
||||
When the update is complete, a confirmation message will indicate the installation was successful.
|
||||
|
||||
## Plugin signatures
|
||||
### Verify your plugins
|
||||
|
||||
Plugin signature verification, also known as _signing_, is a security measure to make sure plugins haven't been tampered with. Upon loading, Grafana checks to see if a plugin is signed or unsigned when inspecting and verifying its digital signature.
|
||||
Plugin signature verification, also known as _signing_, is a security measure to make sure plugins haven't been tampered with. Upon loading, Grafana checks to see if a plugin is signed or unsigned. Read more in [Plugin signatures](plugin-sign).
|
||||
|
||||
At startup, Grafana verifies the signatures of every plugin in the plugin directory. If a plugin is unsigned, then Grafana neither loads nor starts it. To see the result of this verification for each plugin, navigate to **Configuration** -> **Plugins**.
|
||||
## Advanced options
|
||||
|
||||
Grafana also writes an error message to the server log:
|
||||
### Customize navigation placement of plugin pages
|
||||
|
||||
```bash
|
||||
WARN[05-26|12:00:00] Some plugin scanning errors were found errors="plugin '<plugin id>' is unsigned, plugin '<plugin id>' has an invalid signature"
|
||||
```
|
||||
You can relocate app plugin pages to customize the navigation menu structure, as explained in [Customize navigation placement of plugin pages](customize-nav-bar).
|
||||
|
||||
If you are a plugin developer and want to know how to sign your plugin, refer to [Sign a plugin](/developers/plugin-tools/publish-a-plugin/sign-a-plugin).
|
||||
### Allow plugin backend communication
|
||||
|
||||
| Signature status | Description |
|
||||
| ------------------ | ------------------------------------------------------------------------------- |
|
||||
| Core | Core plugin built into Grafana. |
|
||||
| Invalid signature | The plugin has an invalid signature. |
|
||||
| Modified signature | The plugin has changed since it was signed. This may indicate malicious intent. |
|
||||
| Unsigned | The plugin is not signed. |
|
||||
| Signed | The plugin signature was successfully verified. |
|
||||
You can configure your Grafana instance to let the frontends of installed plugins directly communicate locally with the backends of other installed plugins. See how in [Configure backend communication between installed plugins](plugin-integrate).
|
||||
|
||||
### Plugin signature levels
|
||||
### Isolate plugin code with the Frontend Sandbox
|
||||
|
||||
All plugins are signed under a _signature level_. The signature level determines how the plugin can be distributed.
|
||||
You can use the [Plugin Frontend Sandbox](plugin-frontend-sandbox) to securely isolate plugin frontend code from the main Grafana application.
|
||||
|
||||
| **Plugin Level** | **Description** |
|
||||
| ---------------- | ------------------------------------------------------------------------------------------------------------------------------------------------------------------------------------------------------------------------ |
|
||||
| Private | <p>Private plugins are for use on your own Grafana. They may not be distributed to the Grafana community, and are not published in the Grafana catalog.</p> |
|
||||
| Community | <p>Community plugins have dependent technologies that are open source and not for profit.</p><p>Community plugins are published in the official Grafana catalog, and are available to the Grafana community.</p> |
|
||||
| Commercial | <p>Commercial plugins have dependent technologies that are closed source or commercially backed.</p><p>Commercial plugins are published on the official Grafana catalog, and are available to the Grafana community.</p> |
|
||||
|
||||
### Allow unsigned plugins
|
||||
|
||||
{{< admonition type="note" >}}
|
||||
Unsigned plugins are not supported in Grafana Cloud.
|
||||
{{< /admonition >}}
|
||||
|
||||
We strongly recommend that you don't run unsigned plugins in your Grafana instance. However, if you're aware of the risks and you still want to load an unsigned plugin, refer to [Configuration](../../setup-grafana/configure-grafana/#allow_loading_unsigned_plugins).
|
||||
|
||||
If you've allowed loading of an unsigned plugin, then Grafana writes a warning message to the server log:
|
||||
|
||||
```bash
|
||||
WARN[06-01|16:45:59] Running an unsigned plugin pluginID=<plugin id>
|
||||
```
|
||||
|
||||
{{< admonition type="note" >}}
|
||||
If you're developing a plugin, then you can enable development mode to allow all unsigned plugins.
|
||||
{{< /admonition >}}
|
||||
|
||||
## Integrate plugins
|
||||
|
||||
You can configure your Grafana instance to let the frontends of installed plugins directly communicate locally with the backends of other installed plugins. By default, you can only communicate with plugin backends remotely. You can use this configuration to, for example, enable a [canvas panel](https://grafana.com/docs/grafana/latest/panels-visualizations/visualizations/canvas/) to call an application resource API that is permitted by the `actions_allow_post_url` option.
|
||||
|
||||
To enable backend communication between plugins:
|
||||
|
||||
1. Set the plugins you want to communicate with. In your configuration file (`grafana.ini` or `custom.ini` depending on your operating system) remove the semicolon to enable and then set the following configuration option:
|
||||
|
||||
```
|
||||
actions_allow_post_url=
|
||||
```
|
||||
|
||||
This is a comma-separated list that uses glob matching.
|
||||
|
||||
- To allow access to all plugins that have a backend:
|
||||
|
||||
```
|
||||
actions_allow_post_url=/api/plugins/*
|
||||
```
|
||||
|
||||
- To access to the backend of only one plugin:
|
||||
|
||||
```
|
||||
actions_allow_post_url=/api/plugins/<GRAFANA_SPECIAL_APP>
|
||||
```
|
||||
|
||||
## Plugin Frontend Sandbox
|
||||
|
||||
{{< admonition type="caution" >}}
|
||||
Plugin Frontend Sandbox is currently in [public preview](/docs/release-life-cycle/). Grafana Labs offers limited support, and breaking changes might occur prior to the feature being made generally available.
|
||||
{{< /admonition >}}
|
||||
|
||||
The Plugin Frontend Sandbox is a security feature that isolates plugin frontend code from the main Grafana application.
|
||||
When enabled, plugins run in a separate JavaScript context, which provides several security benefits:
|
||||
|
||||
- Prevents plugins from modifying parts of the Grafana interface outside their designated areas
|
||||
@@ -276,46 +122,8 @@ When enabled, plugins run in a separate JavaScript context, which provides sever
|
||||
- Protects core Grafana features from being altered by plugins
|
||||
- Prevents plugins from modifying global browser objects and behaviors
|
||||
|
||||
Plugins running inside the Frontend Sandbox should continue to work normally without any noticeable changes in their intended functionality.
|
||||
### Learn more
|
||||
|
||||
### Enable Frontend Sandbox
|
||||
|
||||
The Frontend Sandbox feature is currently behind the `pluginsFrontendSandbox` feature flag. To enable it, you'll need to:
|
||||
|
||||
1. Enable the feature flag in your Grafana configuration. For more information about enabling feature flags, refer to [Configure feature toggles](/docs/grafana/<GRAFANA_VERSION>/setup-grafana/configure-grafana/feature-toggles/).
|
||||
|
||||
2. For self-hosted Grafana installations, add the plugin IDs you want to sandbox in the `security` section using the `enable_frontend_sandbox_for_plugins` configuration option.
|
||||
|
||||
For Grafana Cloud users, you can simply use the toggle switch in the plugin catalog page to enable or disable the sandbox for each plugin. By default, the sandbox is disabled for all plugins.
|
||||
|
||||
{{< admonition type="note" >}}
|
||||
Enabling the Frontend Sandbox might impact the performance of certain plugins. Only disable the sandbox if you fully trust the plugin and understand the security implications.
|
||||
{{< /admonition >}}
|
||||
|
||||
### Compatibility
|
||||
|
||||
The Frontend Sandbox is available in public preview in Grafana >=11.5. It is compatible with all types of plugins including app plugins, panel plugins, and data source plugins. Angular-based plugins are not supported. Plugins developed and signed by Grafana Labs are excluded and cannot be sandboxed.
|
||||
|
||||
### When to Use Frontend Sandbox
|
||||
|
||||
We strongly recommend enabling the Frontend Sandbox for plugins that allow users to write custom JavaScript code for data visualization or manipulation. These plugins, while powerful, can potentially execute arbitrary JavaScript code in your Grafana instance. The sandbox provides an additional layer of security by restricting what this code can access and modify.
|
||||
|
||||
Examples of plugins where the sandbox is particularly important include:
|
||||
|
||||
- Panel plugins that allow users to write custom JavaScript code
|
||||
- Plugins from untrusted sources
|
||||
|
||||
### Troubleshooting
|
||||
|
||||
If a plugin isn't functioning correctly with the Frontend Sandbox enabled:
|
||||
|
||||
1. Temporarily disable the sandbox for that specific plugin
|
||||
1. Test if the plugin works correctly without the sandbox
|
||||
1. If the plugin only works with the sandbox disabled, ensure you trust the plugin source before continuing to use it without sandbox protection
|
||||
1. Report any sandbox-related issues to the plugin developer
|
||||
|
||||
## Learn more
|
||||
|
||||
- [Browse plugins](/grafana/plugins)
|
||||
- [Develop plugins](/developers/plugin-tools)
|
||||
- [Plugin development Community](https://community.grafana.com/c/plugin-development/30)
|
||||
- [Browse available plugins](/grafana/plugins)
|
||||
- [Develop your own plugins](/developers/plugin-tools)
|
||||
- [Reach out to the plugin development Community](https://community.grafana.com/c/plugin-development/30)
|
||||
|
||||
@@ -5,7 +5,6 @@ labels:
|
||||
products:
|
||||
- enterprise
|
||||
- oss
|
||||
- cloud
|
||||
keywords:
|
||||
- grafana
|
||||
- plugins
|
||||
@@ -14,7 +13,7 @@ keywords:
|
||||
- customize
|
||||
- configuration
|
||||
- grafana.ini
|
||||
weight: 100
|
||||
weight: 300
|
||||
---
|
||||
|
||||
# Customize navigation placement of app plugin pages
|
||||
@@ -73,12 +72,12 @@ org-example-app = explore 50
|
||||
/a/org-example-app/logs = alerting 75
|
||||
```
|
||||
|
||||
## Understanding page paths
|
||||
## Find page paths
|
||||
|
||||
To move individual pages, you need to know their paths. Page paths in app plugins follow this format:
|
||||
`/a/PLUGIN_ID/PAGE_PATH`
|
||||
To move individual pages you need to know their paths. To identify a plugin page path:
|
||||
|
||||
You can identify a plugin page path by visiting the page in the browser and observing the URL in the address bar.
|
||||
- Visit the page in the browser and check the URL in the address bar.
|
||||
- Page paths in app plugins follow the format `/a/PLUGIN_ID/PAGE_PATH`
|
||||
|
||||
## Troubleshooting
|
||||
|
||||
|
||||
@@ -0,0 +1,75 @@
|
||||
---
|
||||
title: Isolate plugin code with the Plugin Frontend Sandbox
|
||||
description: Use the Plugin Frontend Sandbox to securely isolate plugin frontend code from the main Grafana application.
|
||||
labels:
|
||||
products:
|
||||
- enterprise
|
||||
- oss
|
||||
- cloud
|
||||
keywords:
|
||||
- grafana
|
||||
- plugins
|
||||
- plugin
|
||||
- navigation
|
||||
- customize
|
||||
- configuration
|
||||
- grafana.ini
|
||||
- sandbox
|
||||
- frontend
|
||||
weight: 400
|
||||
---
|
||||
|
||||
# Isolate plugin code with the Plugin Frontend Sandbox
|
||||
|
||||
{{< admonition type="caution" >}}
|
||||
Plugin Frontend Sandbox is currently in [public preview](https://grafana.com/docs/release-life-cycle/). Grafana Labs offers limited support, and breaking changes might occur prior to the feature being made generally available.
|
||||
{{< /admonition >}}
|
||||
|
||||
The Plugin Frontend Sandbox is a security feature that isolates plugin frontend code from the main Grafana application. When enabled, plugins run in a separate JavaScript context, which provides several security benefits:
|
||||
|
||||
- Prevents plugins from modifying parts of the Grafana interface outside their designated areas
|
||||
- Stops plugins from interfering with other plugins functionality
|
||||
- Protects core Grafana features from being altered by plugins
|
||||
- Prevents plugins from modifying global browser objects and behaviors
|
||||
|
||||
Plugins running inside the Frontend Sandbox should continue to work normally without any noticeable changes in their intended functionality.
|
||||
|
||||
## When to use the Plugin Frontend Sandbox
|
||||
|
||||
We strongly recommend enabling the Frontend Sandbox for plugins that allow users to write custom JavaScript code for data visualization or manipulation, since they can potentially execute arbitrary JavaScript code in your Grafana instance. The sandbox provides an additional layer of security by restricting what this code can access and modify.
|
||||
|
||||
These are examples of plugins where the sandbox is particularly useful:
|
||||
|
||||
- Panel plugins that allow users to write custom JavaScript code
|
||||
- Plugins from untrusted sources
|
||||
|
||||
## Compatibility and requirements
|
||||
|
||||
The following applies:
|
||||
|
||||
- The Frontend Sandbox is available in public preview in Grafana >=11.5. It's compatible with all types of plugins including app plugins, panel plugins, and data source plugins.
|
||||
- Angular-based plugins are not supported.
|
||||
- Plugins developed and signed by Grafana Labs are excluded and cannot be sandboxed.
|
||||
|
||||
## Enable the Frontend Sandbox
|
||||
|
||||
The Frontend Sandbox feature is currently behind the `pluginsFrontendSandbox` feature flag. To enable it, you need to:
|
||||
|
||||
1. Enable the feature flag in your Grafana configuration. For more information about enabling feature flags, refer to [Configure feature toggles](/docs/grafana/<GRAFANA_VERSION>/setup-grafana/configure-grafana/feature-toggles/).
|
||||
|
||||
2. For self-hosted Grafana installations, add the plugin IDs you want to sandbox in the `security` section using the `enable_frontend_sandbox_for_plugins` configuration option.
|
||||
|
||||
For Grafana Cloud users, you can simply use the toggle switch in the plugin catalog page to enable or disable the sandbox for each plugin. By default, the sandbox is disabled for all plugins.
|
||||
|
||||
{{< admonition type="note" >}}
|
||||
Enabling the Frontend Sandbox might impact the performance of certain plugins. Only disable the sandbox if you fully trust the plugin and understand the security implications.
|
||||
{{< /admonition >}}
|
||||
|
||||
## Troubleshooting
|
||||
|
||||
If a plugin isn't functioning correctly with the Frontend Sandbox enabled:
|
||||
|
||||
1. Temporarily disable the sandbox for that specific plugin
|
||||
1. Test if the plugin works correctly without the sandbox
|
||||
1. If the plugin only works with the sandbox disabled, ensure you trust the plugin source before continuing to use it without sandbox protection
|
||||
1. Report any sandbox-related issues to the plugin developer
|
||||
101
docs/sources/administration/plugin-management/plugin-install.md
Normal file
101
docs/sources/administration/plugin-management/plugin-install.md
Normal file
@@ -0,0 +1,101 @@
|
||||
---
|
||||
title: Install a plugin
|
||||
description: Learn about alternative ways to install a plugin.
|
||||
labels:
|
||||
products:
|
||||
- enterprise
|
||||
- oss
|
||||
- cloud
|
||||
keywords:
|
||||
- grafana
|
||||
- plugins
|
||||
- plugin
|
||||
- navigation
|
||||
- customize
|
||||
- configuration
|
||||
- grafana.ini
|
||||
- sandbox
|
||||
- frontend
|
||||
weight: 120
|
||||
---
|
||||
|
||||
# Install a plugin
|
||||
|
||||
Besides the UI, you can use alternative methods to install a plugin depending on your environment or set-up.
|
||||
|
||||
## Install a plugin using Grafana CLI
|
||||
|
||||
The Grafana CLI allows you to install, upgrade, and manage your Grafana plugins using a command line tool. For more information about Grafana CLI plugin commands, refer to [Plugin commands](/docs/grafana/<GRAFANA_VERSION>/cli/#plugins-commands).
|
||||
|
||||
## Install a plugin from a ZIP file
|
||||
|
||||
This method is typically used for plugins not available in the Plugin Catalog or in environments without internet access.
|
||||
|
||||
Download the archive containing the plugin assets, and install it by extracting the archive into the plugin directory. For example:
|
||||
|
||||
```bash
|
||||
unzip my-plugin-0.2.0.zip -d YOUR_PLUGIN_DIR/my-plugin
|
||||
```
|
||||
|
||||
The path to the plugin directory is defined in the configuration file. For more information, refer to [Configuration](/docs/grafana/<GRAFANA_VERSION>/setup-grafana/configure-grafana/#plugins).
|
||||
|
||||
## Install a plugin using Grafana configuration
|
||||
|
||||
{{< admonition type="note" >}}
|
||||
This feature requires Grafana 11.5.0 or later.
|
||||
{{< /admonition >}}
|
||||
|
||||
You can install plugins by adding the plugin ID to the `plugins.preinstall` section in the Grafana configuration file. This prevents the plugin from being accidentally uninstalled and can be auto-updated. For more information, refer to [Configuration](https://grafana.com/docs/grafana/<GRAFANA_VERSION>/setup-grafana/configure-grafana/#preinstall).
|
||||
|
||||
## Install a plugin in air-gapped environment
|
||||
|
||||
Plugin installation usually requires an Internet connection. You can check which endpoints are used during the installation on your instance and add them to your instance’s allow list.
|
||||
|
||||
If this is not possible try installing a plugin using the [Grafana CLI](#install-a-plugin-using-grafana-cli) or as a [ZIP file](#install-a-plugin-from-a-zip-file).
|
||||
|
||||
You can fetch any plugin from Grafana.com API following the download link referenced in the API.
|
||||
Here's an example based on `grafana-lokiexplore-app` plugins.
|
||||
|
||||
1. Open `https://grafana.com/api/plugins/grafana-lokiexplore-app` and look for `links` section
|
||||
1. Find a `download` url which looks something like `https://grafana.com/api/plugins/grafana-lokiexplore-app/versions/1.0.2/download`
|
||||
1. Use this URL to download the plugin ZIP file, which you can then install as described above.
|
||||
|
||||
## Install plugins using the Grafana Helm chart
|
||||
|
||||
With the Grafana Helm chart, you can install plugins using one of the methods described in this section. All the YAML snippets install v1.9.0 of the Grafana OnCall App plugin and the Redis data source plugin. When installation is complete you'll get a confirmation message indicating that the plugins were successfully installed.
|
||||
|
||||
### Method 1: Use the `plugins` field
|
||||
|
||||
Add the plugins you want to install as a list in your values file. For more information about the configuration, refer to [the Helm chart configuration reference](https://github.com/grafana/helm-charts/tree/main/charts/grafana#configuration).
|
||||
|
||||
```yaml
|
||||
plugins:
|
||||
- https://grafana.com/api/plugins/grafana-oncall-app/versions/v1.9.0/download;grafana-oncall-app
|
||||
- redis-datasource
|
||||
```
|
||||
|
||||
### Method 2: Use `GF_PLUGINS_PREINSTALL_SYNC`
|
||||
|
||||
Add the following to your `values.yaml` file:
|
||||
|
||||
```yaml
|
||||
env:
|
||||
# Format: <plugin ID>@[<plugin version>]@<url to plugin zip>
|
||||
GF_PLUGINS_PREINSTALL_SYNC: grafana-oncall-app@1.9.0@https://grafana.com/api/plugins/grafana-oncall-app/versions/v1.9.0/download
|
||||
|
||||
# Or without version and URL (latest version will be used)
|
||||
# GF_PLUGINS_PREINSTALL_SYNC: grafana-oncall-app
|
||||
|
||||
# Multiple plugins (comma-separated)
|
||||
# GF_PLUGINS_PREINSTALL_SYNC: grafana-oncall-app,redis-datasource
|
||||
```
|
||||
|
||||
### Method 3: Use `GF_PLUGINS_INSTALL` (Deprecated since v12.1.0)
|
||||
|
||||
Add the following to your `values.yaml` file:
|
||||
|
||||
```yaml
|
||||
env:
|
||||
# Comma-separated list of plugin IDs
|
||||
GF_PLUGINS_INSTALL: grafana-oncall-app,redis-datasource
|
||||
```
|
||||
@@ -0,0 +1,47 @@
|
||||
---
|
||||
title: Plugin backend communication
|
||||
description: Allow plugin frontends to communicate locally with the backends of other installed plugins.
|
||||
labels:
|
||||
products:
|
||||
- enterprise
|
||||
- oss
|
||||
keywords:
|
||||
- grafana
|
||||
- plugins
|
||||
- plugin
|
||||
- navigation
|
||||
- customize
|
||||
- configuration
|
||||
- grafana.ini
|
||||
- sandbox
|
||||
- frontend
|
||||
weight: 350
|
||||
---
|
||||
|
||||
# Allow plugin backend communication
|
||||
|
||||
By default, you can only communicate with plugin backends remotely.
|
||||
|
||||
However, you can configure your Grafana instance to let the frontends of installed plugins to directly communicate with the backends of other plugins installed locally. You can use this configuration to, for example, enable a [canvas panel](https://grafana.com/docs/grafana/<GRAFANA_VERSION>/panels-visualizations/visualizations/canvas/) to call an application resource API that is permitted by the `actions_allow_post_url` option.
|
||||
|
||||
## Integrate your plugins
|
||||
|
||||
To enable backend communication between plugins, set the plugins you want to communicate with. In your configuration file (`grafana.ini` or `custom.ini` depending on your operating system), remove the semicolon to enable and then set the following configuration option:
|
||||
|
||||
```
|
||||
actions_allow_post_url=
|
||||
```
|
||||
|
||||
This is a comma-separated list that uses glob matching.
|
||||
|
||||
- To allow access to all plugins that have a backend, use:
|
||||
|
||||
```
|
||||
actions_allow_post_url=/api/plugins/*
|
||||
```
|
||||
|
||||
- To access the backend of only one plugin, use:
|
||||
|
||||
```
|
||||
actions_allow_post_url=/api/plugins/<GRAFANA_SPECIAL_APP>
|
||||
```
|
||||
80
docs/sources/administration/plugin-management/plugin-sign.md
Normal file
80
docs/sources/administration/plugin-management/plugin-sign.md
Normal file
@@ -0,0 +1,80 @@
|
||||
---
|
||||
title: Plugin signatures
|
||||
description: Sign your plugins to make sure they haven't been tampered with.
|
||||
labels:
|
||||
products:
|
||||
- enterprise
|
||||
- oss
|
||||
- cloud
|
||||
keywords:
|
||||
- grafana
|
||||
- plugins
|
||||
- plugin
|
||||
- navigation
|
||||
- customize
|
||||
- configuration
|
||||
- grafana.ini
|
||||
- sandbox
|
||||
- frontend
|
||||
weight: 200
|
||||
---
|
||||
|
||||
# Plugin signatures
|
||||
|
||||
Plugin signature verification, also known as _signing_, is a security measure to make sure plugins haven't been tampered with. Upon loading, Grafana checks to see if a plugin is signed or unsigned when inspecting and verifying its digital signature.
|
||||
|
||||
Learn more at [plugin policies](https://grafana.com/legal/plugins/).
|
||||
|
||||
## How does verifiction work?
|
||||
|
||||
At startup, Grafana verifies the signatures of every plugin in the plugin directory.
|
||||
|
||||
To see the result of this verification for each plugin, navigate to **Configuration** -> **Plugins**. A signature can have any of the following signature status:
|
||||
|
||||
| Signature status | Description |
|
||||
| ------------------ | ------------------------------------------------------------------------------- |
|
||||
| Core | Core plugin built into Grafana. |
|
||||
| Invalid signature | The plugin has an invalid signature. |
|
||||
| Modified signature | The plugin has changed since it was signed. This may indicate malicious intent. |
|
||||
| Unsigned | The plugin is not signed. |
|
||||
| Signed | The plugin signature was successfully verified. |
|
||||
|
||||
### What happens if a plugin is not signed?
|
||||
|
||||
If a plugin is unsigned, then Grafana neither loads nor starts it. Grafana also writes an error message to the server log:
|
||||
|
||||
```bash
|
||||
WARN[05-26|12:00:00] Some plugin scanning errors were found errors="plugin '<plugin id>' is unsigned, plugin '<plugin id>' has an invalid signature"
|
||||
```
|
||||
|
||||
## Plugin signature levels
|
||||
|
||||
All plugins are signed under a _signature level_. The signature level determines how the plugin can be distributed.
|
||||
|
||||
| **Plugin Level** | **Description** |
|
||||
| ---------------- | ------------------------------------------------------------------------------------------------------------------------------------------------------------------------------------------------------------------------ |
|
||||
| Private | <p>Private plugins are for use on your own Grafana. They may not be distributed to the Grafana community, and are not published in the Grafana catalog.</p> |
|
||||
| Community | <p>Community plugins have dependent technologies that are open source and not for profit.</p><p>Community plugins are published in the official Grafana catalog, and are available to the Grafana community.</p> |
|
||||
| Commercial | <p>Commercial plugins have dependent technologies that are closed source or commercially backed.</p><p>Commercial plugins are published on the official Grafana catalog, and are available to the Grafana community.</p> |
|
||||
|
||||
## Allow unsigned plugins
|
||||
|
||||
{{< admonition type="note" >}}
|
||||
Unsigned plugins are not supported in Grafana Cloud.
|
||||
{{< /admonition >}}
|
||||
|
||||
We strongly recommend that you don't run unsigned plugins in your Grafana instance. However, if you're aware of the risks and you still want to load an unsigned plugin, refer to [Configuration](/docs/grafana/<GRAFANA_VERSION>/setup-grafana/configure-grafana/#allow_loading_unsigned_plugins).
|
||||
|
||||
If you've allowed loading of an unsigned plugin, then Grafana writes a warning message to the server log:
|
||||
|
||||
```bash
|
||||
WARN[06-01|16:45:59] Running an unsigned plugin pluginID=<plugin id>
|
||||
```
|
||||
|
||||
{{< admonition type="note" >}}
|
||||
If you're developing a plugin, then you can enable development mode to allow all unsigned plugins.
|
||||
{{< /admonition >}}
|
||||
|
||||
## Sign a plugin you've developed
|
||||
|
||||
If you are a plugin developer and want to know how to sign your plugin, refer to [Sign a plugin](https://grafana.com/developers/plugin-tools/publish-a-plugin/sign-a-plugin).
|
||||
@@ -0,0 +1,72 @@
|
||||
---
|
||||
title: Types of plugins
|
||||
description: Learn about the types of plugins available in Grafana.
|
||||
labels:
|
||||
products:
|
||||
- enterprise
|
||||
- oss
|
||||
- cloud
|
||||
keywords:
|
||||
- grafana
|
||||
- plugins
|
||||
- plugin
|
||||
- navigation
|
||||
- customize
|
||||
- configuration
|
||||
- grafana.ini
|
||||
- sandbox
|
||||
- frontend
|
||||
weight: 100
|
||||
---
|
||||
|
||||
# Types of plugins
|
||||
|
||||
Grafana supports three types of plugins:
|
||||
|
||||
- [Panels](/grafana/plugins/panel-plugins) - These plugins make it easy to create and add any kind of panel, to show your data, or improve your favorite dashboards.
|
||||
- [Data sources](/grafana/plugins/data-source-plugins) - These plugins allow you to pull data from various data sources such as databases, APIs, log files, and so on, and display it in the form of graphs, charts, and dashboards in Grafana.
|
||||
- [Apps](/grafana/plugins/app-plugins) - These plugins enable the bundling of data sources, panels, dashboards, and Grafana pages into a cohesive experience.
|
||||
|
||||
## Panel plugins
|
||||
|
||||
Add new visualizations to your dashboard with panel plugins, such as the [Clock](/grafana/plugins/grafana-clock-panel), [Mosaic](/grafana/plugins/boazreicher-mosaicplot-panel) and [Variable](/grafana/plugins/volkovlabs-variable-panel) panels.
|
||||
|
||||
Use panel plugins when you want to:
|
||||
|
||||
- Visualize data returned by data source queries.
|
||||
- Navigate between dashboards.
|
||||
- Control external systems, such as smart home devices.
|
||||
|
||||
## Data source plugins
|
||||
|
||||
Data source plugins add support for new databases, such as [Google BigQuery](/grafana/plugins/grafana-bigquery-datasource).
|
||||
|
||||
Data source plugins communicate with external sources of data and return the data in a format that Grafana understands. By adding a data source plugin, you can immediately use the data in any of your existing dashboards.
|
||||
|
||||
Use data source plugins when you want to query data from external or third-party systems.
|
||||
|
||||
### Managing access for data source plugins
|
||||
|
||||
Administrators can grant access to data source plugins with [LBAC](/docs/grafana/<GRAFANA_VERSION>/administration/data-source-management/teamlbac/).
|
||||
|
||||
Label Based Access Control (LBAC) customizes access rights based on team memberships, ensuring that users only query data relevant to their assigned permissions.
|
||||
|
||||
## App plugins
|
||||
|
||||
Applications, or app plugins, bundle data sources and panels to provide a cohesive experience, such as the [Zabbix](/grafana/plugins/alexanderzobnin-zabbix-app) app.
|
||||
|
||||
Apps can also add custom pages for things like control panels.
|
||||
|
||||
Use app plugins when you want an out-of-the-box monitoring experience.
|
||||
|
||||
### Managing access for app plugins
|
||||
|
||||
Customize access to app plugins with [RBAC](/docs/grafana/<GRAFANA_VERSION>/administration/roles-and-permissions/access-control/rbac-for-app-plugins/).
|
||||
|
||||
By default, the Viewer, Editor and Admin roles have access to all app plugins that their Organization role allows them to access.
|
||||
|
||||
Access is granted by the `fixed:plugins.app:reader` role.
|
||||
|
||||
{{< admonition type="note" >}}
|
||||
To prevent users from seeing an app plugin, refer to [these permissions scenarios](/docs/grafana/<GRAFANA_VERSION>/administration/roles-and-permissions/access-control/plan-rbac-rollout-strategy/#prevent-viewers-from-accessing-an-app-plugin).
|
||||
{{< /admonition >}}
|
||||
@@ -5,6 +5,7 @@ description: Describes provisioning settings for Grafana using configuration fil
|
||||
keywords:
|
||||
- grafana
|
||||
- provisioning
|
||||
- provision
|
||||
labels:
|
||||
products:
|
||||
- enterprise
|
||||
@@ -15,8 +16,7 @@ weight: 600
|
||||
|
||||
# Provision Grafana
|
||||
|
||||
Grafana has an active provisioning system that uses configuration files.
|
||||
This makes GitOps more natural since data sources and dashboards can be defined using files that can be version controlled.
|
||||
Grafana has an active provisioning system that uses configuration files. You can define data sources and dashboards using files that can be version controlled, making GitOps more natural.
|
||||
|
||||
## Configuration file
|
||||
|
||||
@@ -25,22 +25,22 @@ Refer to [Configuration](../../setup-grafana/configure-grafana/) for more inform
|
||||
### Configuration file locations
|
||||
|
||||
Grafana reads its default configuration from `<WORKING DIRECTORY>/conf/defaults.ini`.
|
||||
By default, Grafana reads custom configuration from `<WORKING DIRECTORY>/conf/custom.ini`.
|
||||
You can override the custom configuration path with the `--config` option.
|
||||
|
||||
Grafana reads custom configuration from `<WORKING DIRECTORY>/conf/custom.ini`. You can override the custom configuration path with the `--config` option.
|
||||
|
||||
{{< admonition type="note" >}}
|
||||
The Deb and RPM packages install the configuration file at `/etc/grafana/grafana.ini`.
|
||||
The Grafana init.d script sets the `--config` option to that path.
|
||||
{{< /admonition >}}
|
||||
|
||||
### Use environment variables
|
||||
## Use environment variables
|
||||
|
||||
You can use environment variable lookups in all provisioning configuration.
|
||||
The syntax for an environment variable is `$ENV_VAR_NAME` or `${ENV_VAR_NAME}`.
|
||||
If the environment variable value has a `$` in it (for example, `Pa$sw0rd`), use the `$ENV_VAR_NAME` syntax to avoid double expansion.
|
||||
You can only use environment variables for configuration values and not for keys or bigger parts of the configuration file structure.
|
||||
You can use environment variable lookups in all provisioning configuration. The syntax for an environment variable is `$ENV_VAR_NAME` or `${ENV_VAR_NAME}`.
|
||||
|
||||
You can use environment variables in dashboard provisioning configuration but not the dashboard definition files themselves.
|
||||
The following applies:
|
||||
|
||||
- Only use environment variables for configuration values. Do not use it for keys or bigger parts of the configuration file structure.
|
||||
- Use environment variables in dashboard provisioning configuration, but not in the dashboard definition files themselves.
|
||||
|
||||
The following example looks up the data source URL port, user, and password using environment variables:
|
||||
|
||||
@@ -53,7 +53,30 @@ datasources:
|
||||
password: $PASSWORD
|
||||
```
|
||||
|
||||
To escape a literal `$` in your provisioning file values, use `$$`.
|
||||
### Use of the special character `$`
|
||||
|
||||
Grafana's provisioning system considers any set of characters after an `$` a variable name.
|
||||
|
||||
During the replacement process, Grafana:
|
||||
|
||||
1. Replaces the variables that use the syntax `${ENV_VAR_NAME}`.
|
||||
1. Next, it replaces the variables that use the syntax `$ENV_VAR_NAME`.
|
||||
|
||||
If your data contains the character `$`, for example `Pa$sw0rd`, and you're using an environment variable, use the `$ENV_VAR_NAME` syntax to avoid double expansion. If you use the `${ENV_VAR_NAME}` syntax, the value is first replaced as `Pa$sw0rd` and then again as `Pa` since `$sw0rd` will be considered another variable.
|
||||
|
||||
If you want to use the literal value `Pa$sw0rd`, you need to escape the character `$` using a double `$$`: `Pa$$sw0rd`.
|
||||
|
||||
The following example shows how variables are replaced, assuming `PASSWORD=Pa$sw0rd`:
|
||||
|
||||
```yaml
|
||||
datasources:
|
||||
- name: Graphite
|
||||
secureJsonData:
|
||||
password1: $PASSWORD # Resolved as Pa$sw0rd
|
||||
password2: ${PASSWORD} # Resolved as Pa
|
||||
password3: 'Pa$$sw0rd' # Resolved as Pa$sw0rd
|
||||
password4: 'Pa$sw0rd' # Resolved as Pa
|
||||
```
|
||||
|
||||
## Configuration management tools
|
||||
|
||||
|
||||
@@ -271,20 +271,52 @@ When you set `X-Grafana-Alerting-Notification-Settings`, the header value must b
|
||||
|
||||
### Compatible endpoints
|
||||
|
||||
The API endpoints listed in this section are supported in Grafana and are used by mimirtool and cortextool, as shown earlier.
|
||||
The API endpoints listed in this section are supported in Grafana and are used by `mimirtool` and `cortextool`, as shown earlier. These endpoints are compatible with [Mimir HTTP API](/docs/mimir/latest/references/http-api/).
|
||||
|
||||
The `POST` endpoints can be used to import data source–managed alert rules.
|
||||
In these endpoints, a "namespace" corresponds to a folder title in Grafana.
|
||||
|
||||
| Endpoint | Method | Summary |
|
||||
| -------- | --------------------------------------------------- | ----------------------------------------------------------------------------------------------------------------------------------------------------- |
|
||||
| POST | /convert/prometheus/config/v1/rules | Create or update multiple rule groups across multiple namespaces. Requires [`X-Grafana-Alerting-Datasource-UID`](#x-grafana-alerting-datasource-uid). |
|
||||
| POST | /convert/prometheus/config/v1/rules/:namespaceTitle | Create or update a single rule group in a namespace. Requires [`X-Grafana-Alerting-Datasource-UID`](#x-grafana-alerting-datasource-uid). |
|
||||
The `POST` endpoints can be used to import data source–managed alert rules. They accept requests in both YAML and JSON. If no media type is specified, YAML is assumed.
|
||||
|
||||
| Endpoint | Method | Summary | Mimir equivalent |
|
||||
| -------- | ----------------------------------------------------- | ----------------------------------------------------------------------------------------------------------------------------------------------------------------------------------------------- | ------------------------------------------------------------------------ |
|
||||
| POST | `/convert/prometheus/config/v1/rules` | [Create or update multiple rule groups](#create-or-update-multiple-rule-groups) across multiple namespaces. Requires [`X-Grafana-Alerting-Datasource-UID`](#x-grafana-alerting-datasource-uid). | None |
|
||||
| POST | `/convert/prometheus/config/v1/rules/:namespaceTitle` | Create or update a single rule group in a namespace. Requires [`X-Grafana-Alerting-Datasource-UID`](#x-grafana-alerting-datasource-uid). | [Set rule group](/docs/mimir/latest/references/http-api/#set-rule-group) |
|
||||
|
||||
The `GET` and `DELETE` endpoints work only with provisioned and imported alert rules.
|
||||
|
||||
| Endpoint | Method | Summary |
|
||||
| -------- | ---------------------------------------------------------- | --------------------------------------------------- |
|
||||
| GET | /convert/prometheus/config/v1/rules | Get all imported rule groups across all namespaces. |
|
||||
| GET | /convert/prometheus/config/v1/rules/:namespaceTitle | Get imported rule groups in a specific namespace. |
|
||||
| DELETE | /convert/prometheus/config/v1/rules/:namespaceTitle | Delete all imported alert rules in a namespace. |
|
||||
| DELETE | /convert/prometheus/config/v1/rules/:namespaceTitle/:group | Delete a specific imported rule group. |
|
||||
| Endpoint | Method | Summary | Mimir equivalent |
|
||||
| -------- | ------------------------------------------------------------ | --------------------------------------------------- | ---------------------------------------------------------------------------------------------------- |
|
||||
| GET | `/convert/prometheus/config/v1/rules` | Get all imported rule groups across all namespaces. | [List rule groups](/docs/mimir/latest/references/http-api/#list-rule-groups) |
|
||||
| GET | `/convert/prometheus/config/v1/rules/:namespaceTitle` | Get imported rule groups in a specific namespace. | [Get rule groups by namespace](/docs/mimir/latest/references/http-api/#get-rule-groups-by-namespace) |
|
||||
| GET | `/convert/prometheus/config/v1/rules/:namespaceTitle/:group` | Get imported rule group in a specific namespace. | [Get rule group](/docs/mimir/latest/references/http-api/#get-rule-group) |
|
||||
| DELETE | `/convert/prometheus/config/v1/rules/:namespaceTitle` | Delete all imported alert rules in a namespace. | [Delete namespace](/docs/mimir/latest/references/http-api/#delete-namespace) |
|
||||
| DELETE | `/convert/prometheus/config/v1/rules/:namespaceTitle/:group` | Delete a specific imported rule group. | [Delete rule group](/docs/mimir/latest/references/http-api/#delete-rule-group) |
|
||||
|
||||
#### Create or update multiple rule groups
|
||||
|
||||
```
|
||||
POST /convert/prometheus/config/v1/rules
|
||||
```
|
||||
|
||||
Creates or updates multiple rule groups across multiple namespaces. This endpoint expects a request with a map of namespace titles to arrays of rule groups, and returns `202` on success.
|
||||
|
||||
This endpoint has no Mimir equivalent and is Grafana-specific for bulk operations.
|
||||
|
||||
##### Example request body
|
||||
|
||||
```yaml
|
||||
namespace1:
|
||||
- name: MyGroupName1
|
||||
rules:
|
||||
- alert: MyAlertName1
|
||||
expr: up == 0
|
||||
labels:
|
||||
severity: warning
|
||||
namespace2:
|
||||
- name: MyGroupName2
|
||||
rules:
|
||||
- alert: MyAlertName2
|
||||
expr: rate(http_requests_total[5m]) > 0.1
|
||||
labels:
|
||||
severity: critical
|
||||
```
|
||||
|
||||
@@ -161,7 +161,7 @@ You can find the public data sources that support alert rules in the [Grafana Pl
|
||||
In Grafana Cloud, the number of Grafana-managed alert rules you can create depends on your Grafana Cloud plan.
|
||||
|
||||
- Free Forever plan: You can create up to 100 free alert rules, with each alert rule having a maximum of 1000 alert instances.
|
||||
- All paid plans (Pro and Advanced): They have a soft limit of 2000 alert rules and support unlimited alert instances. To increase the limit, open a support ticket from the [Cloud portal](/docs/grafana-cloud/account-management/support/).
|
||||
- All paid plans: They have a soft limit of 2000 alert rules and support unlimited alert instances. To increase the limit, open a support ticket from the [Cloud portal](/docs/grafana-cloud/account-management/support/).
|
||||
|
||||
### Permissions
|
||||
|
||||
|
||||
@@ -48,7 +48,7 @@ Note that in data source-managed groups, the alert rules and recording rules wit
|
||||
To create a new data source-managed recording rule:
|
||||
|
||||
1. Click **Alerts & IRM** -> **Alerting** -> **Alert rules**.
|
||||
1. Scroll to the **Data source-managed section** and click **+New recording rule**.
|
||||
1. At the top of the Alert rules page, click **More** -> **New Grafana recording rule**.
|
||||
|
||||
## Enter recording rule name
|
||||
|
||||
|
||||
@@ -81,7 +81,7 @@ To create a new Grafana-managed recording rule:
|
||||
|
||||
1. Click **Alerts & IRM** -> **Alerting** ->
|
||||
**Alert rules**.
|
||||
1. Scroll to the **Grafana-managed section** and click **+New recording rule**.
|
||||
1. At the top of the Alert rules page, click **More** -> **New Grafana recording rule**.
|
||||
|
||||
1. Enter the names to identify your recording rule and metric.
|
||||
|
||||
|
||||
@@ -24,15 +24,15 @@ Users can transpose their [now-depreciated recorded queries](/docs/grafana/lates
|
||||
|
||||
## Migrate your recorded queries to Grafana-managed alert rules
|
||||
|
||||
1. Navigate to **Administration > Plugins and Data > Recorded queries.**
|
||||
1. Navigate to **Administration** -> **Plugins and Data** -> **Recorded queries.**
|
||||
|
||||
1. Note the data source, query PromQL, interval, and time range, and copy them somewhere accessible.
|
||||
|
||||
{{< figure alt="Example of relevant recorded query information" src="/media/docs/alerting/rec-query-example.png" max-width="800px" >}}
|
||||
|
||||
1. Now navigate to **Alerting > Alert rules.**
|
||||
1. Now navigate to **Alerting** -> **Alert rules.**
|
||||
|
||||
1. In the Grafana-managed section of the Alert rules page, click **+ New recording**.
|
||||
1. At the top of the Alert rules page, click **More** -> **New Grafana recording rule**.
|
||||
|
||||
Add a name for your Recording Rule and a name for the new metric that the recording rule generates.
|
||||
|
||||
|
||||
@@ -29,7 +29,7 @@ Declare an incident from a firing alert to streamline your alert to incident wor
|
||||
To declare an incident from a firing alert, complete the following steps.
|
||||
|
||||
1. Navigate to **Alerts & IRM** -> **Alerting** -> **Alert rules**.
|
||||
1. From the Alert rules page, find the firing alert that you want to declare an incident for.
|
||||
1. From the Alert rules page, click the **Firing** filter to display firing alerts. Find the firing alert that you want to declare an incident for.
|
||||
1. Click **More** -> **Declare Incident**.
|
||||
|
||||
Alternatively, you can declare an incident from the Alert details page.
|
||||
|
||||
@@ -33,13 +33,15 @@ The Alert rules list view page lists all existing recording and alert rules, inc
|
||||
|
||||
To access the Alert rules page, click **Alerts & IRM** -> **Alerting** -> **Alert rules**.
|
||||
|
||||
{{< figure src="/media/docs/alerting/alert-rules-page.png" max-width="750px" alt="Alert rule view page in Grafana Alerting" >}}
|
||||
{{< figure src="/media/docs/alerting/alert-rules-page-2.png" max-width="750px" alt="Alert rule view page in Grafana Alerting" >}}
|
||||
|
||||
By default, alert rules are grouped by alert rule type: Grafana-managed or data source-managed.
|
||||
By default, alert rules are grouped in separate sections—one for Grafana-managed alerts, and another for data source-managed alerts.
|
||||
Inside the Grafana-managed alert rules section, the rules are organized in a hierarchical structure, from folder -> rule group -> rules.
|
||||
Inside the data source-managed alert rules section, the rules are organized from namespace ->rule group -> rules.
|
||||
|
||||
In this view, you can find and edit rules created in Grafana. However, rules created in Prometheus-compatible data sources are displayed but cannot be edited.
|
||||
Select a group to expand it and view the list of alert rules within that group.
|
||||
|
||||
This view includes filters to simplify managing large volumes of alerts.
|
||||
The view includes filters to simplify managing large volumes of alerts.
|
||||
|
||||
You can filter by data sources, dashboards, and alert rule properties such as state, type, health, and contact points. The **Search** input allows you to filter by additional parameters like folders, evaluation groups, labels, and more.
|
||||
|
||||
@@ -47,15 +49,11 @@ You can filter by data sources, dashboards, and alert rule properties such as st
|
||||
|
||||
You can also change how the rule list is displayed using the **View as** option.
|
||||
|
||||
- **Grouped**: Displays Grafana rules grouped by folder and evaluation group, and data-source rules by namespace and evaluation group. This is the default view.
|
||||
- **Grouped**: Displays Grafana rules grouped in a hierarchical structure, from folder/namespace, to evaluation group, to the individual rules. This is the default view.
|
||||
|
||||
- **List**: Displays Grafana rules grouped only by folder.
|
||||
- **List**: Displays all rules from all data sources in a flat, unpaginated list.
|
||||
|
||||
- **State**: Displays rules grouped by state, providing an overview for each state.
|
||||
|
||||
Select a group to expand it and view the list of alert rules within that group.
|
||||
|
||||
{{< figure src="/media/docs/alerting/view-alert-rule-list-with-actions.png" max-width="750px" alt="View alert rule state and alert rule health in Grafana Alerting" >}}
|
||||
{{< figure src="/media/docs/alerting/view-alert-rule-list-with-actions-2.png" max-width="750px" alt="View alert rule state and alert rule health in Grafana Alerting" >}}
|
||||
|
||||
For details on how rule states and alert instance states are displayed, refer to [View alert state](ref:view-alert-state).
|
||||
|
||||
@@ -69,7 +67,7 @@ In Grafana OSS and Enterprise, the number of alert rule versions is limited. Fre
|
||||
|
||||
To view or restore previous versions for an alert rule, complete the following steps.
|
||||
|
||||
1. Navigate to **Alerts & IRM -> Alerting -> Alert rules**.
|
||||
1. Navigate to **Alerts & IRM** -> **Alerting** -> **Alert rules**.
|
||||
1. Select an alert rule and click **View**.
|
||||
1. Click the **Versions** tab.
|
||||
The page displays a list of the previous rule versions.
|
||||
@@ -89,7 +87,7 @@ Admin users can delete all of the alert rules within a folder. To delete all the
|
||||
|
||||
Only users with an Admin role can restore deleted Grafana-managed alert rules. After an alert rule is restored, it is restored with a new, different UID from the one it had before.
|
||||
|
||||
1. Go to **Alerts & IRM > Alerting > Recently deleted**.
|
||||
1. Go to **Alerts & IRM** -> **Alerting** -> **Recently deleted**.
|
||||
1. Click the **Restore** button to restore the alert rule or click **Delete permanently** to delete the alert rule.
|
||||
|
||||
{{< admonition type="note" >}}
|
||||
|
||||
@@ -66,26 +66,24 @@ There are three key components that helps us understand the behavior of our aler
|
||||
|
||||
## View alert rule and instance states
|
||||
|
||||
To view the state and health of your alert rules and the status of alert instances:
|
||||
To view the details of your alert rules and the status of alert instances:
|
||||
|
||||
1. Click **Alerts & IRM** -> **Alerting**.
|
||||
1. Click **Alert rules** to view the list of existing alert rules.
|
||||
|
||||
{{< figure src="/media/docs/alerting/view-alert-rule-list-with-actions.png" max-width="750px" alt="View alert rule state and alert rule health in Grafana Alerting" >}}
|
||||
{{< figure src="/media/docs/alerting/view-alert-rule-list-with-actions2.png" max-width="750px" alt="View alert rule state and alert rule health in Grafana Alerting" >}}
|
||||
|
||||
Each alert rule shows its state, health, summary, next evaluation time, and available actions such as **Pause evaluation**, **Silence notifications**, **Export**, **Delete**, and more.
|
||||
Each alert rule shows its state, summary, and available actions such as **Pause evaluation**, **Silence notifications**, **Export**, **Delete**, and more.
|
||||
|
||||
1. Click on an alert rule to view additional details and its resulting alert instances.
|
||||
|
||||
{{< figure src="/media/docs/alerting/view-alert-instance-state.png" max-width="750px" alt="View alert rule state and alert rule health in Grafana Alerting" >}}
|
||||
|
||||
### View from the alert rule details page
|
||||
|
||||
To view more alert rule details, complete the following steps.
|
||||
|
||||
1. Click **Alerts & IRM** -> **Alerting** -> **Alert rules**.
|
||||
1. Click to expand an alert rule.
|
||||
1. In **Actions**, click **View** (the eye icon).
|
||||
1. Click the alert name to go to the alert details view.
|
||||
|
||||
{{< figure src="/media/docs/alerting/alert-rule-view-page-with-breadcrumb.png" max-width="750px" alt="Alert rule view page in Grafana Alerting" >}}
|
||||
|
||||
|
||||
@@ -128,6 +128,12 @@ This metric is a gauge that shows you the number of seconds that the scheduler i
|
||||
|
||||
This metric is a histogram that shows you the number of seconds taken to send notifications for firing and resolved alerts. This metric lets you observe slow or over-utilized integrations, such as an SMTP server that is being given emails faster than it can send them.
|
||||
|
||||
#### grafana_alerting_state_history_writes_failed_total
|
||||
|
||||
This metric is a counter that shows you the number of failed writes to the configured alert state history backend. It includes a `backend` label to distinguish between different backends (such as `loki` or `prometheus`).
|
||||
|
||||
For example, you might want to create an alert that fires when `grafana_alerting_state_history_writes_failed_total{backend="prometheus"}` is greater than 0 to detect when Prometheus remote write is failing.
|
||||
|
||||
## Logs for Grafana-managed alerts
|
||||
|
||||
If you have configured [Loki for alert state history](/docs/grafana/<GRAFANA_VERSION>/alerting/set-up/configure-alert-state-history/), logs related to state changes in Grafana-managed alerts are stored in the Loki data source.
|
||||
|
||||
@@ -208,6 +208,6 @@ The above configuration produces the following result in the Time series panel:
|
||||
|
||||
{{< figure src="/media/docs/grafana/screenshot-grafana-10-0-timeseries-time-regions.png" max-width="600px" alt="Time series visualization with time regions business hours" >}}
|
||||
|
||||
Toggle the **Advanced** switch and use [Cron syntax](https://crontab.run/) to set more granular time region controls. The following example sets a time region of 9:00 AM, Monday to Friday:
|
||||
Toggle the **Advanced** switch and use [Cron syntax](https://en.wikipedia.org/wiki/Cron) to set more granular time region controls. The following example sets a time region of 9:00 AM, Monday to Friday:
|
||||
|
||||
{{< figure src="/media/docs/grafana/dashboards/screenshot-annotations-cron-option-v11.6.png" max-width="600px" alt="Time region query with cron syntax" >}}
|
||||
|
||||
@@ -2,7 +2,6 @@
|
||||
labels:
|
||||
products:
|
||||
- cloud
|
||||
- enterprise
|
||||
- oss
|
||||
stage:
|
||||
- experimental
|
||||
@@ -161,6 +160,14 @@ To create a dashboard, follow these steps:
|
||||
1. When you've saved all the changes you want to make to the dashboard, click **Back to dashboard**.
|
||||
1. Toggle off the edit mode switch.
|
||||
|
||||
{{< admonition type="caution" >}}
|
||||
|
||||
Dynamic dashboards is an [experimental](https://grafana.com/docs/release-life-cycle/) feature. Engineering and on-call support is not available. Documentation is either limited or not provided outside of code comments. No SLA is provided. To get early access to this feature, request it through [this form](https://docs.google.com/forms/d/e/1FAIpQLSd73nQzuhzcHJOrLFK4ef_uMxHAQiPQh1-rsQUT2MRqbeMLpg/viewform?usp=dialog).
|
||||
|
||||
**Do not enable this feature in production environments as it may result in the irreversible loss of data.**
|
||||
|
||||
{{< /admonition >}}
|
||||
|
||||
## Group panels
|
||||
|
||||
To help create meaningful sections in your dashboard, you can group panels into rows or tabs.
|
||||
@@ -294,6 +301,14 @@ To configure show/hide rules, follow these steps:
|
||||
1. Click **Save**.
|
||||
1. Toggle off the edit mode switch.
|
||||
|
||||
{{< admonition type="caution" >}}
|
||||
|
||||
Dynamic dashboards is an [experimental](https://grafana.com/docs/release-life-cycle/) feature. Engineering and on-call support is not available. Documentation is either limited or not provided outside of code comments. No SLA is provided. To get early access to this feature, request it through [this form](https://docs.google.com/forms/d/e/1FAIpQLSd73nQzuhzcHJOrLFK4ef_uMxHAQiPQh1-rsQUT2MRqbeMLpg/viewform?usp=dialog).
|
||||
|
||||
**Do not enable this feature in production environments as it may result in the irreversible loss of data.**
|
||||
|
||||
{{< /admonition >}}
|
||||
|
||||
## Edit dashboards
|
||||
|
||||
When the dashboard is in edit mode, the edit pane that opens displays options associated with the part of the dashboard that it's in focus.
|
||||
@@ -397,3 +412,11 @@ To make a copy of a dashboard, follow these steps:
|
||||
By default, the copied dashboard has the same name as the original dashboard with the word "Copy" appended and is in the same folder.
|
||||
|
||||
1. Click **Save**.
|
||||
|
||||
{{< admonition type="caution" >}}
|
||||
|
||||
Dynamic dashboards is an [experimental](https://grafana.com/docs/release-life-cycle/) feature. Engineering and on-call support is not available. Documentation is either limited or not provided outside of code comments. No SLA is provided. To get early access to this feature, request it through [this form](https://docs.google.com/forms/d/e/1FAIpQLSd73nQzuhzcHJOrLFK4ef_uMxHAQiPQh1-rsQUT2MRqbeMLpg/viewform?usp=dialog).
|
||||
|
||||
**Do not enable this feature in production environments as it may result in the irreversible loss of data.**
|
||||
|
||||
{{< /admonition >}}
|
||||
|
||||
@@ -80,16 +80,18 @@ Folders help you organize and group dashboards, which is useful when you have ma
|
||||
- On the **Dashboards** page, click **New** and select **New folder** in the drop-down.
|
||||
- Click an existing folder and on the folder’s page, click **New** and select **New folder** in the drop-down.
|
||||
|
||||
1. Enter a unique name and click **Create**.
|
||||
1. Enter a unique name.
|
||||
|
||||
Folder names can't include underscores (\_) or percentage signs (%), as it interferes with the search functionality.
|
||||
|
||||
Also, alerts can't be placed in folders with slashes (\ /) in the name. If you want to place alerts in the folder, don't use slashes in the folder name.
|
||||
|
||||
1. Click **Create**
|
||||
|
||||
When you nest folders, you can do so up to four levels deep.
|
||||
|
||||
When you save a dashboard, you can optionally select a folder to save the dashboard in.
|
||||
|
||||
{{< admonition type="note" >}}
|
||||
Alerts can't be placed in folders with slashes (\ /) in the name. If you wish to place alerts in the folder, don't use slashes in the folder name.
|
||||
{{< /admonition >}}
|
||||
|
||||
**To edit the name of a folder:**
|
||||
|
||||
1. Click **Dashboards** in the primary menu.
|
||||
|
||||
@@ -15,57 +15,81 @@ weight: 800
|
||||
|
||||
# Variables
|
||||
|
||||
A variable is a placeholder for a value.
|
||||
When you change the value, the element using the variable will change to reflect the new value.
|
||||
|
||||
Variables are displayed as drop-down lists (or in some cases text fields) at the top of the dashboard.
|
||||
These drop-down lists make it easy to update the variable value and thus change the data being displayed in your dashboard.
|
||||
|
||||
For example, if you needed to monitor several servers, you _could_ make a dashboard for each server.
|
||||
Or you could create one dashboard and use panels with variables like this one, where you can change the server using the variable selector:
|
||||
|
||||
{{< figure src="/media/docs/grafana/dashboards/screenshot-selected-variables-v12.png" max-width="750px" alt="Variable drop-down open and two values selected" >}}
|
||||
|
||||
Variables allow you to create more interactive dashboards.
|
||||
Instead of hard-coding things like server, application, and sensor names in your metric queries, you can use variables in their place.
|
||||
They're useful for administrators who want to allow Grafana viewers to adjust visualizations without giving them full editing permissions.
|
||||
|
||||
Using variables also allows you to single-source dashboards.
|
||||
If you have multiple identical data sources or servers, you can make one dashboard and use variables to change what you are viewing.
|
||||
This simplifies maintenance and upkeep enormously.
|
||||
|
||||
{{< youtube id="mMUJ3iwIYwc" >}}
|
||||
|
||||
You can use variables in:
|
||||
|
||||
- Data source queries
|
||||
- [Panel repeating options](https://grafana.com/docs/grafana/<GRAFANA_VERSION>/panels-visualizations/configure-panel-options/#configure-repeating-panels)
|
||||
- [Dashboard and panel links](https://grafana.com/docs/grafana/<GRAFANA_VERSION>/dashboards/build-dashboards/manage-dashboard-links/)
|
||||
- Titles
|
||||
- Descriptions
|
||||
- [Transformations](https://grafana.com/docs/grafana/<GRAFANA_VERSION>/panels-visualizations/query-transform-data/transform-data/)
|
||||
|
||||
To see variable settings, navigate to **Dashboard Settings > Variables**.
|
||||
Click a variable in the list to see its settings.
|
||||
|
||||
{{< docs/play title="Templating - Interactive dashboard" url="https://play.grafana.org/goto/B9Xog68Hg?orgId=1" >}}
|
||||
|
||||
## Template variables {#templates}
|
||||
|
||||
A _template_ is any query that contains a variable.
|
||||
Queries with text that starts with `$` are templates.
|
||||
|
||||
{{< admonition type="note">}}
|
||||
In our documentation and in the application, we typically simply refer to a _template query_ as a _query_, but we often use the terms _variable_ and _template variable_ interchangeably.
|
||||
{{< /admonition >}}
|
||||
|
||||
For example, if you were administering a dashboard to monitor several servers, it could have panels that use template queries like this one:
|
||||
|
||||
```text
|
||||
groupByNode(movingAverage(apps.$app.$server.counters.requests.count, 10), 2, 'sum')
|
||||
```
|
||||
|
||||
The following image shows a panel in edit mode using the query:
|
||||
|
||||
{{< figure src="/media/docs/grafana/dashboards/screenshot-template-query-v12.1.png" max-width="750px" alt="A panel using a template query" >}}
|
||||
|
||||
### Variables in URLs
|
||||
|
||||
Variable values are always synced to the URL using [query parameter syntax](https://grafana.com/docs/grafana/latest/dashboards/variables/variable-syntax/#query-parameters), `var-<varname>=value`.
|
||||
For example:
|
||||
|
||||
```text
|
||||
https://play.grafana.org/d/HYaGDGIMk/templating-global-variables-and-interpolation?orgId=1&from=now-6h&to=now&timezone=utc&var-Server=CCC&var-MyCustomDashboardVariable=Hello%20World%21
|
||||
```
|
||||
|
||||
In the preceding example, the variables and values are `var-Server=CCC` and `var-MyCustomDashboardVariable=Hello%20World%21`.
|
||||
|
||||
## Additional examples
|
||||
|
||||
The following dashboards in Grafana Play provide examples of template variables:
|
||||
|
||||
- [Templating - Repeated panels](https://play.grafana.org/goto/yfZOReUNR?orgId=1) - Using query variables to control how many panels appear in a dashboard.
|
||||
- [Templating - Nested Variables Drilldown](https://play.grafana.org/d/testdata-nested-variables-drilldown/) - Demonstrates how changing one variable value can change the values available in a nested variable.
|
||||
- [Templating - Global variables and interpolation](https://play.grafana.org/d/HYaGDGIMk/) - Shows you how the syntax for Grafana variables works.
|
||||
|
||||
## Next steps
|
||||
|
||||
The following topics describe how to add and manage variables in your dashboards:
|
||||
|
||||
{{< section >}}
|
||||
|
||||
A variable is a placeholder for a value. You can use variables in metric queries and in panel titles. So when you change
|
||||
the value, using the dropdown at the top of the dashboard, your panel's metric queries will change to reflect the new value.
|
||||
|
||||
Variables allow you to create more interactive and dynamic dashboards. Instead of hard-coding things like server, application,
|
||||
and sensor names in your metric queries, you can use variables in their place. Variables are displayed as dropdown lists at the top of
|
||||
the dashboard. These dropdowns make it easy to change the data being displayed in your dashboard.
|
||||
|
||||
{{< figure src="/static/img/docs/v50/variables_dashboard.png" alt="Variable drop-down open and two values selected" >}}
|
||||
|
||||
{{< docs/play title="Templating - Global variables and interpolation" url="https://play.grafana.org/d/HYaGDGIMk/" >}}
|
||||
|
||||
Variables are useful for administrators who want to allow Grafana viewers to adjust visualizations without giving them full editing permissions. Grafana viewers can use variables.
|
||||
|
||||
Variables and templates also allow you to single-source dashboards. If you have multiple identical data sources or servers, you can make one dashboard and use variables to change what you are viewing. This simplifies maintenance and upkeep enormously.
|
||||
|
||||
## Templates
|
||||
|
||||
A _template_ is any query that contains a variable.
|
||||
|
||||
For example, if you were administering a dashboard to monitor several servers, you _could_ make a dashboard for each server. Or you could create one dashboard and use panels with template queries like this one:
|
||||
|
||||
```
|
||||
wmi_system_threads{instance=~"$server"}
|
||||
```
|
||||
|
||||
Variable values are always synced to the URL using the syntax `var-<varname>=value`.
|
||||
|
||||
## Additional Examples
|
||||
|
||||
Variables are listed in drop-down lists across the top of the screen. Select different variables to see how the visualizations change.
|
||||
|
||||
To see variable settings, navigate to **Dashboard Settings > Variables**. Click a variable in the list to see its settings.
|
||||
|
||||
Variables can be used in titles, descriptions, text panels, and queries. Queries with text that starts with `$` are templates. Not all panels will have template queries.
|
||||
|
||||
The following dashboards in Grafana Play provide examples of template variables:
|
||||
|
||||
- [Templating, repeated panels](https://play.grafana.org/d/000000025/) - Using query variables to control how many panels appear.
|
||||
- [Templated Dynamic Dashboard](https://play.grafana.org/d/000000056/) - Uses query variables, chained query variables, an interval variable, and a repeated panel.
|
||||
- [Templating - Nested Variables Drilldown](https://play.grafana.org/d/testdata-nested-variables-drilldown/)
|
||||
|
||||
## Variable best practices
|
||||
|
||||
- Variable drop-down lists are displayed in the order they are listed in the variable list in Dashboard settings.
|
||||
- Put the variables that you will change often at the top, so they will be shown first (far left on the dashboard).
|
||||
- By default, variables don't have a default value. This means that the topmost value in the drop-down is always preselected. If you want to pre-populate a variable with an empty value, you can use the following workaround in the variable settings:
|
||||
1. Select the **Include All Option** checkbox.
|
||||
2. In the **Custom all value** field, enter a value like `+`.
|
||||
|
||||
@@ -35,6 +35,7 @@ keywords:
|
||||
- nested
|
||||
- chained
|
||||
- linked
|
||||
- best practices
|
||||
labels:
|
||||
products:
|
||||
- cloud
|
||||
@@ -138,6 +139,13 @@ To create a variable, follow these steps:
|
||||
|
||||
<!-- vale Grafana.Spelling = YES -->
|
||||
|
||||
### Variable best practices
|
||||
|
||||
- Variable drop-down lists are displayed in the order in which they're listed in the **Variables** in dashboard settings, so put the variables that you will change often at the top, so they will be shown first (far left on the dashboard).
|
||||
- By default, variables don't have a default value. This means that the topmost value in the drop-down list is always preselected. If you want to pre-populate a variable with an empty value, you can use the following workaround in the variable settings:
|
||||
1. Select the **Include All Option** checkbox.
|
||||
2. In the **Custom all value** field, enter a value like `+`.
|
||||
|
||||
## Add a query variable
|
||||
|
||||
Query variables enable you to write a data source query that can return a list of metric names, tag values, or keys. For example, a query variable might return a list of server names, sensor IDs, or data centers. The variable values change as they dynamically fetch options with a data source query.
|
||||
@@ -299,16 +307,20 @@ groupByNode(summarize(movingAverage(apps.$app.$server.counters.requests.count, 5
|
||||
## Add ad hoc filters
|
||||
|
||||
_Ad hoc filters_ are one of the most complex and flexible variable options available.
|
||||
Instead of a regular list of variable options, this variable allows you to build a dashboard-wide ad hoc query.
|
||||
Instead of creating a variable for each dimension by which you want to filter, ad hoc filters automatically create variables (key/value pairs) for all the dimensions returned by your data source query.
|
||||
This allows you to apply filters dashboard-wide.
|
||||
|
||||
Ad hoc filters let you add label/value filters that are automatically added to all metric queries that use the specified data source.
|
||||
Unlike other variables, you don't use ad hoc filters in queries.
|
||||
Instead, you use ad hoc filters to write filters for existing queries.
|
||||
|
||||
{{< admonition type="note" >}}
|
||||
Not all data sources support ad hoc filters.
|
||||
Examples of those that do include Prometheus, Loki, InfluxDB, and Elasticsearch.
|
||||
{{< /admonition >}}
|
||||
The following data sources support ad hoc filters:
|
||||
|
||||
- Prometheus
|
||||
- Loki
|
||||
- InfluxDB
|
||||
- Elasticsearch
|
||||
- OpenSearch
|
||||
|
||||
To create an ad hoc filter, follow these steps:
|
||||
|
||||
@@ -325,6 +337,25 @@ To create an ad hoc filter, follow these steps:
|
||||
|
||||
Now you can [filter data on the dashboard](ref:filter-dashboard).
|
||||
|
||||
### Dashboard drilldown with ad hoc filters
|
||||
|
||||
In table visualizations, you can apply ad hoc filters from the visualization with one click.
|
||||
To quickly filter the dashboard data, follow these steps:
|
||||
|
||||
1. Hover your cursor over the cell with the value you want to filter for to display the filter icons. In this example, the cell value is `ConfigMap Updated`, which is in the `alertname` column:
|
||||
|
||||
{{< figure src="/media/docs/grafana/panels-visualizations/screenshot-ad-hoc-filter-icon-v12.png" max-width="750px" alt="Table with ad hoc filter icon displayed on a cell" >}}
|
||||
|
||||
1. Click the add filter icon.
|
||||
|
||||
The variable pair `alertname = ConfigMap Updated` is added to the ad hoc filter and all panels using the same data source are filtered by that value:
|
||||
|
||||
{{< figure src="/media/docs/grafana/panels-visualizations/screenshot-ad-hoc-filter-applied-v12.2.png" max-width="750px" alt="Two tables, filtered" >}}
|
||||
|
||||
Panels in the dashboard that use the same data source but don't include the column value won't have any data remaining to display once the filter has been applied. In this example, the variable pair `_name_ = ALERTS` has been added to the ad hoc filter, so one of the tables doesn't return any results:
|
||||
|
||||
{{< figure src="/media/docs/grafana/panels-visualizations/screenshot-ad-hoc-filter-no-data-v12.2.png" max-width="750px" alt="Two tables, one filtered and one returning no results" >}}
|
||||
|
||||
<!-- vale Grafana.Spelling = YES -->
|
||||
<!-- vale Grafana.WordList = YES -->
|
||||
|
||||
|
||||
@@ -24,6 +24,8 @@ refs:
|
||||
grafana-enterprise:
|
||||
- pattern: /docs/grafana/
|
||||
destination: /docs/grafana/<GRAFANA_VERSION>/introduction/grafana-enterprise/
|
||||
- pattern: /docs/grafana-cloud/
|
||||
destination: /docs/grafana/<GRAFANA_VERSION>/introduction/grafana-enterprise/
|
||||
organization-roles:
|
||||
- pattern: /docs/grafana/
|
||||
destination: /docs/grafana/<GRAFANA_VERSION>/administration/roles-and-permissions/#organization-roles
|
||||
|
||||
@@ -160,26 +160,22 @@ securityContext:
|
||||
## Use Grafana Assume Role
|
||||
|
||||
{{< admonition type="note" >}}
|
||||
Grafana Assume Role is currently in [private preview](https://grafana.com/docs/release-life-cycle/) for Grafana Cloud.
|
||||
Grafana Assume Role is only available in Grafana Cloud.
|
||||
|
||||
It's currently only available for Amazon CloudWatch.
|
||||
|
||||
To gain early access to this feature, contact Customer Support and ask for the `awsDatasourcesTempCredentials` feature toggle to be enabled on your account.
|
||||
It's currently only available for Amazon CloudWatch and Athena.
|
||||
{{< /admonition >}}
|
||||
|
||||
The Grafana Assume Role authentication provider lets you authenticate with AWS without having to create and maintain long term AWS users or rotate their access and secret keys. Instead, you can create an IAM role that has permissions to access CloudWatch and a trust relationship with Grafana's AWS account. Grafana's AWS account then makes an STS request to AWS to create temporary credentials to access your AWS data. It makes this STS request by passing along an `externalID` that's unique per Cloud account, to ensure that Grafana Cloud users can only access their own AWS data. For more information, refer to the [AWS documentation on external ID](https://docs.aws.amazon.com/IAM/latest/UserGuide/id_roles_create_for-user_externalid.html).
|
||||
|
||||
To use the Grafana Assume Role:
|
||||
|
||||
1. Grafana Cloud customers need to open a support ticket to enable the feature `awsDatasourcesTempCredentials`.
|
||||
This feature is enabled by default in open source Grafana and Grafana Enterprise.
|
||||
2. Once the feature is enabled, create a new CloudWatch data source (or update an existing one) and select **Grafana Assume Role** as an authentication provider.
|
||||
3. In the AWS Console, create a new IAM role, and under **Trusted entity type**, select **Another AWS account** as the trusted Entity.
|
||||
4. Enter Grafana's account id (displayed in the instructions box on the **Settings** tab of the CloudWatch data source configuration) and check the **Require external ID** box.
|
||||
5. Enter the external ID specified in the instructions box on the **Settings** tab of the CloudWatch data source configuration in Grafana. This external ID will be unique to your Grafana instance.
|
||||
6. Attach any required permissions you would like Grafana to be able to access on your behalf (for example, CloudWatch Logs and CloudWatch Metrics policies).
|
||||
7. Give the role a name and description, and click **Create role**.
|
||||
8. Copy the ARN of the role you just created and paste it into the **Assume Role ARN** field on the **Settings** tab of CloudWatch data source configuration in Grafana.
|
||||
1. Create a new CloudWatch data source (or update an existing one) and select **Grafana Assume Role** as an authentication provider.
|
||||
2. In the AWS Console, create a new IAM role, and under **Trusted entity type**, select **Another AWS account** as the trusted Entity.
|
||||
3. Enter the Grafana account id (displayed in the instructions box on the **Settings** tab of the CloudWatch data source configuration) and check the **Require external ID** box.
|
||||
4. Enter the external ID specified in the instructions box on the **Settings** tab of the CloudWatch data source configuration in Grafana. This external ID will be unique to your Grafana instance.
|
||||
5. Attach any required permissions you would like Grafana to be able to access on your behalf (for example, CloudWatch Logs and CloudWatch Metrics policies).
|
||||
6. Give the role a name and description, and click **Create role**.
|
||||
7. Copy the ARN of the role you just created and paste it into the **Assume Role ARN** field on the **Settings** tab of CloudWatch data source configuration in Grafana.
|
||||
|
||||
Sample Trust Relationship for an IAM role:
|
||||
|
||||
|
||||
@@ -32,6 +32,11 @@ refs:
|
||||
destination: /docs/grafana/<GRAFANA_VERSION>/panels-visualizations/query-transform-data/
|
||||
- pattern: /docs/grafana-cloud/
|
||||
destination: /docs/grafana-cloud/visualizations/panels-visualizations/query-transform-data/
|
||||
provisioning-data-source:
|
||||
- pattern: /docs/grafana/
|
||||
destination: /docs/grafana/<GRAFANA_VERSION>/datasources/elasticsearch/#provision-the-data-source
|
||||
- pattern: /docs/grafana-cloud/
|
||||
destination: /docs/grafana-cloud/connect-externally-hosted/data-sources/elasticsearch/#provision-the-data-source
|
||||
---
|
||||
|
||||
# Configure the Elasticsearch data source
|
||||
@@ -42,7 +47,7 @@ You can create a variety of queries to visualize logs or metrics stored in Elast
|
||||
For instructions on how to add a data source to Grafana, refer to the [administration documentation](ref:administration-documentation).
|
||||
|
||||
Only users with the organization `administrator` role can add data sources.
|
||||
Administrators can also [configure the data source via YAML](ref:provisioning-data-sources) with Grafana's provisioning system.
|
||||
Administrators can also [configure the data source via YAML](ref:provisioning-data-source) with Grafana's provisioning system.
|
||||
|
||||
## Configuring permissions
|
||||
|
||||
|
||||
@@ -34,15 +34,11 @@ This document provides instructions for configuring the InfluxDB data source and
|
||||
|
||||
To configure the InfluxDB data source you must have the `Administrator` role.
|
||||
|
||||
{{< admonition type="note" >}}
|
||||
Select the query language you want to use with InfluxDB before adding the InfluxDB data source. Configuration options differ based on query language type.
|
||||
{{< /admonition >}}
|
||||
|
||||
InfluxData provides three query languages. Some key points to consider:
|
||||
|
||||
- SQL is only available for InfluxDB v3.x.
|
||||
- Flux is a functional data scripting language for InfluxDB 2.x. Refer to [Query InfluxDB with Flux](https://docs.influxdata.com/influxdb/cloud/query-data/get-started/query-influxdb/) for a basic guide on working with Flux.
|
||||
- InfluxQL is SQL-like query language developed by InfluxData. It doesn't support more advanced functions such as JOINs.
|
||||
- SQL is only available for InfluxDB v3.x.
|
||||
|
||||
To help choose the best language for your needs, refer to
|
||||
a [comparison of Flux vs InfluxQL](https://docs.influxdata.com/influxdb/v1.8/flux/flux-vs-influxql/)
|
||||
@@ -60,97 +56,123 @@ Complete the following steps to set up a new InfluxDB data source:
|
||||
|
||||
You are taken to the **Settings** tab where you will configure the data source.
|
||||
|
||||
## InfluxDB common configuration options
|
||||
## Configuration Options
|
||||
|
||||
The following configuration options apply to **all three query language options**.
|
||||
The following is a list of configuration options for InfluxDB.
|
||||
|
||||

|
||||
|
||||
The first option is to configure the name of your connection.
|
||||
|
||||
- **Name** - Sets the name you use to refer to the data source in panels and queries. Examples: `InfluxDB-InfluxQL`, `InfluxDB_SQL`.
|
||||
- **Default** - Toggle to set as the default data source.
|
||||
- **Query language** - Select the query language for your InfluxDB instance. The three options are:
|
||||
- **InfluxQL** - SQL-like language for querying InfluxDB, with statements such as SELECT, FROM, WHERE, and GROUP BY that are familiar to SQL users.
|
||||
- **SQL** - Native SQL language starting with InfluxDB v.3.0. Refer to InfluxData's [SQL reference documentation](https://docs.influxdata.com/influxdb/cloud-serverless/reference/sql/) for a list of supported statements, operators, and functions.
|
||||
- **Flux** - Flux is a data scripting language developed by InfluxData that allows you to query, analyze, and act on data. Refer to [Get started with Flux](https://docs.influxdata.com/influxdb/cloud/query-data/get-started/) for guidance on using Flux.
|
||||
|
||||
**HTTP section:**
|
||||
### URL and Authentication
|
||||
|
||||
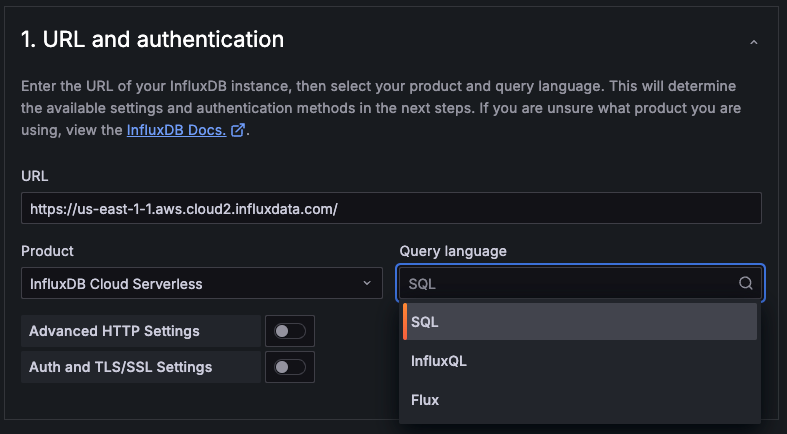
|
||||
|
||||
These settings identify the Influx instance and schema the data source is connecting to.
|
||||
|
||||
- **URL** - The HTTP protocol, IP address, and port of your InfluxDB API. InfluxDB’s default API port is `8086`.
|
||||
- **Product** - Select the product version of your Influx instance.
|
||||
- **Query language** - Select the query language for your InfluxDB instance. This will determine the connection details needed in **Database Settings**. The three options are:
|
||||
- **Flux** - Flux is a data scripting language developed by InfluxData that allows you to query, analyze, and act on data. Refer to [Get started with Flux](https://docs.influxdata.com/influxdb/cloud/query-data/get-started/) for guidance on using Flux.
|
||||
- **InfluxQL** - SQL-like language for querying InfluxDB, with statements such as SELECT, FROM, WHERE, and GROUP BY that are familiar to SQL users.
|
||||
- **SQL** - Native SQL language starting with **InfluxDB v.3.0**. Refer to InfluxData's [SQL reference documentation](https://docs.influxdata.com/influxdb/cloud-serverless/reference/sql/) for a list of supported statements, operators, and functions.
|
||||
|
||||
{{< admonition type="note" >}}
|
||||
_For InfluxQL only._ **Database + Retention Policy (DBRP) Mapping** must be configured before data can be queried for the following product versions: _Influx OSS 1.x_, _Influx OSS 2.x_, _Influx Enterprise 1.x_, _Influx Cloud (TSM)_, _Influx Cloud Serverless_
|
||||
|
||||
Refer to [Manage DBRP Mappings](https://docs.influxdata.com/influxdb/cloud/query-data/influxql/dbrp/) for guidance on setting this up via the CLI or API
|
||||
{{< /admonition >}}
|
||||
|
||||
#### Advanced HTTP Settings (Optional)
|
||||
|
||||
Advanced HTTP Settings are optional settings that can be configured for more control over your data source.
|
||||
|
||||
- **Allowed cookies** - Defines which cookies are forwarded to the data source. All other cookies are deleted by default.
|
||||
- **Timeout** - Set an HTTP request timeout in seconds.
|
||||
|
||||
**Auth section:**
|
||||
**Custom HTTP Headers**
|
||||
|
||||
- **Basic auth** - The most common authentication method. Use your InfluxData user name and password to authenticate. Toggling requires you to add the user and password under **Basic auth details**.
|
||||
- **With credentials** - Toggle to enable credentials such as cookies or auth headers to be sent with cross-site requests.
|
||||
- **TLS client auth** - Toggle to use client authentication. When enabled, add the `Server name`, `Client cert` and `Client key` under the **TLS/SSL auth details** section. The client provides a certificate that the server validates to establish the client’s trusted identity. The client key encrypts the data between client and server.
|
||||
- **With CA cert** - Authenticate with a CA certificate. Follow the instructions of your CA (Certificate Authority) to download the certificate file.
|
||||
- **Skip TLS verify** - Toggle to bypass TLS certificate validation.
|
||||
- **Forward OAuth identity** - Forward the OAuth access token (and also the OIDC ID token if available) of the user querying the data source.
|
||||
|
||||
**Basic auth details:**
|
||||
|
||||
If you enable **Basic auth** under the Auth section you need to configure the following:
|
||||
|
||||
- **User** - Add the username used to sign in to InfluxDB.
|
||||
- **Password** - Defines the token you use to query the bucket defined in **Database**. Retrieve this from the [Tokens page](https://docs.influxdata.com/influxdb/v2.0/security/tokens/view-tokens/) in the InfluxDB UI.
|
||||
|
||||
**TLS/SSL auth details:**
|
||||
|
||||
TLS/SSL certificates are encrypted and stored in the Grafana database.
|
||||
|
||||
- **CA cert** - If you toggle **With CA cert** add your self-signed cert here.
|
||||
- **Server name** - Name of the server. Example: server1.domain.com
|
||||
- **Client cert** - Add the client certificate.
|
||||
- **Client key** - Add the client key.
|
||||
|
||||
**Custom HTTP headers:**
|
||||
Click **+ Add header** to add one or more HTTP headers. HTTP headers pass additional context and metadata about the request/response.
|
||||
|
||||
- **Header** - Add a custom HTTP header. Select an option from the drop-down. Allows custom headers to be passed based on the needs of your InfluxDB instance.
|
||||
- **Value** - The value for the header.
|
||||
|
||||
**Private data source connect:**
|
||||
#### Auth and TSL/SSL Settings (Optional)
|
||||
|
||||
- **Private data source connect** - _Only for Grafana Cloud users._ Private data source connect, or PDC, allows you to establish a private, secured connection between a Grafana Cloud instance, or stack, and data sources secured within a private network. Click the drop-down to locate the URL for PDC. For more information regarding Grafana PDC refer to [Private data source connect (PDC)](https://grafana.com/docs/grafana-cloud/connect-externally-hosted/private-data-source-connect/).
|
||||
There are several authentication methods you can choose in the Authentication section.
|
||||
|
||||
- **No Authentication** - Make the data source available without authentication. Grafana recommends using some type of authentication method.
|
||||
- **Basic auth** - The most common authentication method. Use your Influx instance username and password to authenticate.
|
||||
- **Forward OAuth identity** - Forward the OAuth access token (and also the OIDC ID token if available) of the user querying the data source.
|
||||
- **With credentials** - Toggle to enable credentials such as cookies or auth headers to be sent with cross-site requests.
|
||||
|
||||
TLS/SSL Certificates are encrypted and stored in the Grafana database.
|
||||
|
||||
- **TLS client auth** - When enabled, add the `Server name`, `Client cert` and `Client key`. The client provides a certificate that the server validates to establish the client’s trusted identity. The client key encrypts the data between client and server.
|
||||
- **Server name** - Name of the server. Example: `server1.domain.com`
|
||||
- **Client cert** - Add the client certificate.
|
||||
- **Client key** - Add the client key.
|
||||
- **CA cert** - Authenticate with a CA certificate. When enabled, follow the instructions of your CA (Certificate Authority) to download the certificate file.
|
||||
- **Skip TLS verify** - Toggle to bypass TLS certificate validation.
|
||||
|
||||
### Database Settings
|
||||
|
||||
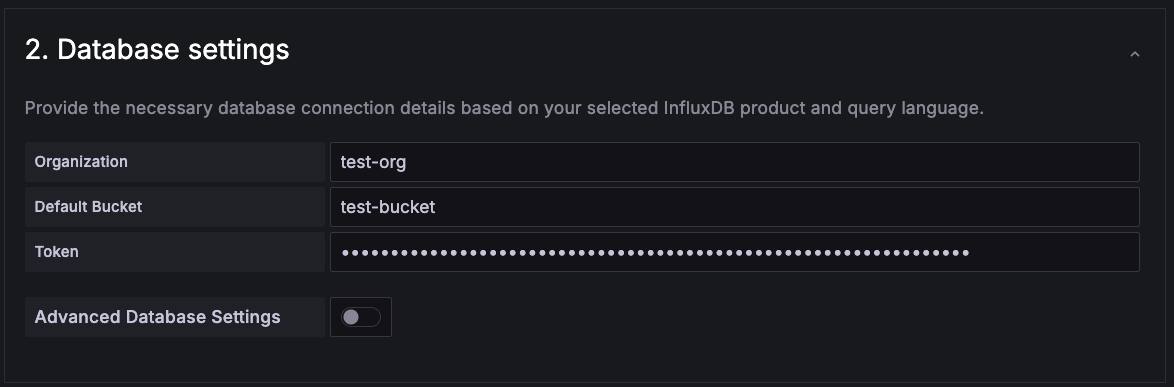
|
||||
|
||||
{{< admonition type="note" >}}
|
||||
Setting the database for this data source **does not deny access to other databases**. The InfluxDB query syntax allows switching the database in the query. For example: `SHOW MEASUREMENTS ON _internal` or `SELECT * FROM "_internal".."database" LIMIT 10`
|
||||
|
||||
To support data isolation and security, make sure appropriate permissions are configured in InfluxDB.
|
||||
{{< /admonition >}}
|
||||
|
||||
These settings identify the Influx database your data source will connect to. The required information will vary by the query language selected in **URL and Authentication**. Each query language uses a different set of connection details.
|
||||
|
||||
The table below illustrates the details needed for each query language:
|
||||
|
||||
| **Setting** | **Flux** | **InfluxQL** | **SQL** |
|
||||
| -------------------------- | -------- | ------------ | -------- |
|
||||
| **Bucket** or **Database** | ✓ | ✓ | ✓ |
|
||||
| **Organization** | ✓ | | |
|
||||
| **Password** or **Token** | ✓ | ✓ | ✓ |
|
||||
| **User** | | ✓ | |
|
||||
|
||||
- **Bucket** or **Database** - Sets the ID of the bucket to query. Refer to [View buckets](https://docs.influxdata.com/influxdb/v2.0/organizations/buckets/view-buckets/) in InfluxData's documentation on how to locate the list of available buckets and their corresponding IDs.
|
||||
- **Organization** - Sets the [Influx organization](https://v2.docs.influxdata.com/v2.0/organizations/) used for Flux queries. Also used for the `v.organization` query macro.
|
||||
- **Password** or **Token** - Specify the token used to query the bucket defined in **Database**. Retrieve this from the [Tokens page](https://docs.influxdata.com/influxdb/v2.0/security/tokens/view-tokens/) in the InfluxDB UI.
|
||||
- **User** - Add the username used to sign in to InfluxDB.
|
||||
|
||||
**For Flux**
|
||||
|
||||
- **Default bucket** is optional. The [Influx bucket](https://v2.docs.influxdata.com/v2.0/organizations/buckets/) used for the `v.defaultBucket` macro in Flux queries.
|
||||
- With Influx 2.0 products, use the [influx authentication token to function](https://v2.docs.influxdata.com/v2.0/security/tokens/create-token/). Token must be set as `Authorization` header with the value `Token <generated-token>`.
|
||||
- For Influx 1.8, the token is `username:password`.
|
||||
|
||||
#### Advanced Database Settings (Optional)
|
||||
|
||||
Advanced Database Settings are optional settings that give you more control over the query experience.
|
||||
|
||||
- **Min time interval** - Sets the minimum time interval for auto group-by. Grafana recommends setting this to match the data write frequency. For example, if your data is written every minute, it’s recommended to set this interval to 1 minute, so that each group contains data from each new write. The default is `10s`. Refer to [Min time interval](#min-time-interval) for format examples.
|
||||
- **Max series** - Sets a limit on the maximum number of series or tables that Grafana processes. Set a lower limit to prevent system overload, or increase it if you have many small time series and need to display more of them. The default is `1000`.
|
||||
|
||||
**For InfluxQL**
|
||||
|
||||
- **HTTP method** - Sets the HTTP method used to query your data source. The POST method allows for larger queries that would return an error using the GET method. The default method is `POST`.
|
||||
- **Autocomplete range** - Sets a time range limit for the query editor's autocomplete to reduce the execution time of tag filter queries. As a result, any tags not present within the defined time range will be filtered out. For example, setting the value to 12h will include only tag keys/values from the past 12 hours. This feature is recommended for use with very large databases, where significant performance improvements can be observed.
|
||||
|
||||
**For SQL**
|
||||
|
||||
- **Insecure Connection** - Toggle to disable gRPC TLS security.
|
||||
|
||||
### Private Data Source Connect
|
||||
|
||||
_For Grafana Cloud only._ Private data source connect (PDC) allows you to establish a private, secured connection between a Grafana Cloud instance, or stack, and data sources secured within a private network. Click the drop-down to locate the URL for PDC. For more information regarding Grafana PDC refer to [Private data source connect (PDC)](https://grafana.com/docs/grafana-cloud/connect-externally-hosted/private-data-source-connect/).
|
||||
|
||||
Click **Manage private data source connect** to be taken to your PDC connection page, where you'll find your PDC configuration details.
|
||||
|
||||
Once you have added your connection settings, click **Save & test** to test the data source connection.
|
||||
|
||||
### InfluxQL-specific configuration section
|
||||
|
||||
The following settings are specific to the InfluxQL query language option.
|
||||
|
||||
**InfluxQL InfluxDB details section:**
|
||||
|
||||
- **Database** - Sets the ID of the bucket to query. Refer to [View buckets](https://docs.influxdata.com/influxdb/v2.0/organizations/buckets/view-buckets/) in InfluxData's documentation on how to locate the list of available buckets and their corresponding IDs.
|
||||
- **User** - The user name used to sign in to InfluxDB.
|
||||
- **Password** - Defines the token used to query the bucket defined in **Database**. Retrieve the password from the [Tokens page](https://docs.influxdata.com/influxdb/v2.0/security/tokens/view-tokens/) of the InfluxDB UI.
|
||||
- **HTTP method** - Sets the HTTP method used to query your data source. The POST method allows for larger queries that would return an error using the GET method. The default method is `POST`.
|
||||
- **Min time interval** - _(Optional)_ Sets the minimum time interval for auto group-by. Grafana recommends setting this to match the data write frequency. For example, if your data is written every minute, it’s recommended to set this interval to 1 minute, so that each group contains data from each new write. The default is `10s`. Refer to [Min time interval](#min-time-interval) for format examples.
|
||||
- **Autocomplete range** - _(Optional)_ Sets a time range limit for the query editor's autocomplete to reduce the execution time of tag filter queries. As a result, any tags not present within the defined time range will be filtered out. For example, setting the value to 12h will include only tag keys/values from the past 12 hours. This feature is recommended for use with very large databases, where significant performance improvements can be observed.
|
||||
- **Max series** - _(Optional)_ Sets a limit on the maximum number of series or tables that Grafana processes. Set a lower limit to prevent system overload, or increase it if you have many small time series and need to display more of them. The default is `1000`.
|
||||
|
||||
### SQL-specific configuration section
|
||||
|
||||
The following settings are specific to the SQL query language option.
|
||||
|
||||
**SQL InfluxDB details section:**
|
||||
|
||||
- **Database** - Specify the **bucket ID**. Refer to the **Buckets page** in the InfluxDB UI to locate the ID.
|
||||
- **Token** The API token used for SQL queries. Generated on InfluxDB Cloud dashboard under [Load Data > API Tokens](https://docs.influxdata.com/influxdb/cloud-serverless/get-started/setup/#create-an-all-access-api-token) menu.
|
||||
- **Insecure Connection** - Toggle to disable gRPC TLS security.
|
||||
- **Max series** - _(Optional)_ Sets a limit on the maximum number of series or tables that Grafana processes. Set a lower limit to prevent system overload, or increase it if you have many small time series and need to display more of them. The default is `1000`.
|
||||
|
||||
### Flux-specific configuration section
|
||||
|
||||
The following settings are specific to the Flux query language option.
|
||||
|
||||
**Flux InfluxDB details section:**
|
||||
|
||||
- **Organization** - The [Influx organization](https://v2.docs.influxdata.com/v2.0/organizations/) used for Flux queries. Also used for the `v.organization` query macro.
|
||||
- **Token** - The authentication token used for Flux queries. With Influx 2.0, use the [influx authentication token to function](https://v2.docs.influxdata.com/v2.0/security/tokens/create-token/). Token must be set as `Authorization` header with the value `Token <generated-token>`. For Influx 1.8, the token is `username:password`.
|
||||
- **Default bucket** - _(Optional)_ The [Influx bucket](https://v2.docs.influxdata.com/v2.0/organizations/buckets/) used for the `v.defaultBucket` macro in Flux queries.
|
||||
- **Min time interval** - Sets the minimum time interval for auto group-by. Grafana recommends aligning this setting with the data write frequency. For example, if data is written every minute, set the interval to 1 minute to ensure each group includes data from every new write. The default is `10s`.
|
||||
- **Max series** - Sets a limit on the maximum number of series or tables that Grafana processes. Set a lower limit to prevent system overload, or increase it if you have many small time series and need to display more of them. The default is `1000`.
|
||||
After you have added your connection settings, click **Save & test** to test the data source connection.
|
||||
|
||||
### Min time interval
|
||||
|
||||
|
||||
@@ -46,9 +46,9 @@ refs:
|
||||
destination: /docs/grafana/<GRAFANA_VERSION>/dashboards/variables/add-template-variables/#add-a-query-variable
|
||||
variable-best-practices:
|
||||
- pattern: /docs/grafana/
|
||||
destination: /docs/grafana/<GRAFANA_VERSION>/dashboards/variables/#variable-best-practices
|
||||
destination: /docs/grafana/<GRAFANA_VERSION>/dashboards/variables/add-template-variables/#variable-best-practices
|
||||
- pattern: /docs/grafana-cloud/
|
||||
destination: /docs/grafana-cloud/visualizations/dashboards/variables/#variable-best-practices
|
||||
destination: /docs/grafana-cloud/visualizations/dashboards/variables/add-template-variables/#variable-best-practices
|
||||
---
|
||||
|
||||
# InfluxDB template variables
|
||||
|
||||
@@ -49,148 +49,78 @@ refs:
|
||||
destination: /docs/grafana/<GRAFANA_VERSION>/administration/provisioning/#data-sources
|
||||
- pattern: /docs/grafana-cloud/
|
||||
destination: /docs/grafana/<GRAFANA_VERSION>/administration/provisioning/#data-sources
|
||||
transformations:
|
||||
- pattern: /docs/grafana/
|
||||
destination: /docs/grafana/<GRAFANA_VERSION>/panels-visualizations/query-transform-data/transform-data/
|
||||
- pattern: /docs/grafana-cloud/
|
||||
destination: /docs/grafana-cloud/visualizations/panels-visualizations/query-transform-data/transform-data/
|
||||
alerting:
|
||||
- pattern: /docs/grafana/
|
||||
destination: /docs/grafana/<GRAFANA_VERSION>/alerting/
|
||||
- pattern: /docs/grafana-cloud/
|
||||
destination: /docs/grafana-cloud/alerting-and-irm/alerting/
|
||||
visualizations:
|
||||
- pattern: /docs/grafana/
|
||||
destination: /docs/grafana/<GRAFANA_VERSION>/panels-visualizations/visualizations/
|
||||
- pattern: /docs/grafana-cloud/
|
||||
destination: /docs/grafana-cloud/visualizations/panels-visualizations/visualizations/
|
||||
variables:
|
||||
- pattern: /docs/grafana/
|
||||
destination: /docs/grafana/<GRAFANA_VERSION>/dashboards/variables/
|
||||
- pattern: /docs/grafana-cloud/
|
||||
destination: /docs/grafana-cloud/visualizations/dashboards/variables/
|
||||
annotate-visualizations:
|
||||
- pattern: /docs/grafana/
|
||||
destination: /docs/grafana/<GRAFANA_VERSION>/dashboards/build-dashboards/annotate-visualizations/
|
||||
- pattern: /docs/grafana-cloud/
|
||||
destination: /docs/grafana-cloud/visualizations/dashboards/build-dashboards/annotate-visualizations/
|
||||
set-up-grafana-monitoring:
|
||||
- pattern: /docs/grafana/
|
||||
destination: /docs/grafana/<GRAFANA_VERSION>/setup-grafana/set-up-grafana-monitoring/
|
||||
- pattern: /docs/grafana-cloud/
|
||||
destination: /docs/grafana/<GRAFANA_VERSION>/setup-grafana/set-up-grafana-monitoring/
|
||||
configure-mssql-data-source:
|
||||
- pattern: /docs/grafana/
|
||||
destination: /docs/grafana/<GRAFANA_VERSION>/datasources/mssql/configure
|
||||
- pattern: /docs/grafana-cloud/
|
||||
destination: /docs/grafana/<GRAFANA_VERSION>/datasources/mssql/configure
|
||||
mssql-query-editor:
|
||||
- pattern: /docs/grafana/
|
||||
destination: /docs/grafana/<GRAFANA_VERSION>/datasources/mssql/query-editor/
|
||||
- pattern: /docs/grafana-cloud/
|
||||
destination: /docs/grafana/<GRAFANA_VERSION>/datasources/mssql/query-editor/
|
||||
mssql-template-variables:
|
||||
- pattern: /docs/grafana/
|
||||
destination: /docs/grafana/<GRAFANA_VERSION>/datasources/mssql/template-variables/
|
||||
- pattern: /docs/grafana-cloud/
|
||||
destination: /docs/grafana/<GRAFANA_VERSION>/datasources/mssql/template-variables/
|
||||
query-caching:
|
||||
- pattern: /docs/grafana/
|
||||
destination: /docs/grafana/<GRAFANA_VERSION>/administration/data-source-management/#query-and-resource-caching
|
||||
- pattern: /docs/grafana-cloud/
|
||||
destination: /docs/grafana/<GRAFANA_VERSION>/administration/data-source-management/#query-and-resource-caching
|
||||
---
|
||||
|
||||
# Microsoft SQL Server data source
|
||||
# Microsoft SQL Server (MSSQL) data source
|
||||
|
||||
Grafana ships with built-in support for Microsoft SQL Server (MS SQL).
|
||||
You can query and visualize data from any Microsoft SQL Server 2005 or newer, including Microsoft Azure SQL Database.
|
||||
Grafana ships with built-in support for Microsoft SQL Server (MSSQL).
|
||||
You can query and visualize data from any Microsoft SQL Server 2005 or newer, including the Microsoft Azure SQL Database.
|
||||
|
||||
This topic explains configuration specific to the Microsoft SQL Server data source.
|
||||
Use this data source to create dashboards, explore SQL data, and monitor MSSQL-based workloads in real time.
|
||||
|
||||
For instructions on how to add a data source to Grafana, refer to the [administration documentation](ref:data-source-management).
|
||||
Only users with the organization administrator role can add data sources.
|
||||
Administrators can also [configure the data source via YAML](#provision-the-data-source) with Grafana's provisioning system.
|
||||
The following documentation helps you get started working with the Microsoft SQL Server (MSSQL) data source:
|
||||
|
||||
Once you've added the Microsoft SQL Server data source, you can [configure it](#configure-the-data-source) so that your Grafana instance's users can create queries in its [query editor](query-editor/) when they [build dashboards](ref:build-dashboards) and use [Explore](ref:explore).
|
||||
- [Configure the Microsoft SQL Server data source](ref:configure-mssql-data-source)
|
||||
- [Microsoft SQL Server query editor](ref:mssql-query-editor)
|
||||
- [Microsoft SQL Server template variables](ref:mssql-template-variables)
|
||||
|
||||
## Configure the data source
|
||||
## Get the most out of the data source
|
||||
|
||||
To configure basic settings for the data source, complete the following steps:
|
||||
After installing and configuring the Microsoft SQL Server data source, you can:
|
||||
|
||||
1. Click **Connections** in the left-side menu.
|
||||
1. Under Your connections, click **Data sources**.
|
||||
1. Enter `Microsoft SQL Server` in the search bar.
|
||||
1. Select **Microsoft SQL Server**.
|
||||
|
||||
The **Settings** tab of the data source is displayed.
|
||||
|
||||
1. Set the data source's basic configuration options:
|
||||
|
||||
| Name | Description |
|
||||
| ------------------- | ------------------------------------------------------------------------------------------------------------------------------------------------------------------------------------------------------------------------------------------------------------------------------------------------------------------------------------------------------------------ |
|
||||
| **Name** | Sets the name you use to refer to the data source in panels and queries. |
|
||||
| **Default** | Sets the data source that's pre-selected for new panels. |
|
||||
| **Host** | Sets the IP address/hostname and optional port of your MS SQL instance. Default port is 0, the driver default. You can specify multiple connection properties, such as `ApplicationIntent`, by separating each property with a semicolon (`;`). |
|
||||
| **Database** | Sets the name of your MS SQL database. |
|
||||
| **Authentication** | Sets the authentication mode, either using SQL Server authentication, Windows authentication (single sign-on for Windows users), Azure Active Directory authentication, or various forms of Windows Active Directory authentication. |
|
||||
| **User** | Defines the database user's username. |
|
||||
| **Password** | Defines the database user's password. |
|
||||
| **Encrypt** | Determines whether or to which extent a secure SSL TCP/IP connection will be negotiated with the server. Options include: `disable` - data sent between client and server is not encrypted; `false` - data sent between client and server is not encrypted beyond the login packet; `true` - data sent between client and server is encrypted. Default is `false`. |
|
||||
| **Max open** | Sets the maximum number of open connections to the database. Default is `100`. |
|
||||
| **Max idle** | Sets the maximum number of connections in the idle connection pool. Default is `100`. |
|
||||
| **Auto (max idle)** | If set will set the maximum number of idle connections to the number of maximum open connections. Default is `true`. |
|
||||
| **Max lifetime** | Sets the maximum number of seconds that the data source can reuse a connection. Default is `14400` (4 hours). |
|
||||
|
||||
You can also configure settings specific to the Microsoft SQL Server data source. These options are described in the sections below.
|
||||
|
||||
### Min time interval
|
||||
|
||||
The **Min time interval** setting defines a lower limit for the [`$__interval`](ref:add-template-variables-interval) and [`$__interval_ms`][add-template-variables-interval_ms] variables.
|
||||
|
||||
This value _must_ be formatted as a number followed by a valid time identifier:
|
||||
|
||||
| Identifier | Description |
|
||||
| ---------- | ----------- |
|
||||
| `y` | year |
|
||||
| `M` | month |
|
||||
| `w` | week |
|
||||
| `d` | day |
|
||||
| `h` | hour |
|
||||
| `m` | minute |
|
||||
| `s` | second |
|
||||
| `ms` | millisecond |
|
||||
|
||||
We recommend setting this value to match your Microsoft SQL Server write frequency.
|
||||
For example, use `1m` if Microsoft SQL Server writes data every minute.
|
||||
|
||||
You can also override this setting in a dashboard panel under its data source options.
|
||||
|
||||
### Connection timeout
|
||||
|
||||
The **Connection timeout** setting defines the maximum number of seconds to wait for a connection to the database before timing out. Default is 0 for no timeout.
|
||||
|
||||
### UDP Preference Limit
|
||||
|
||||
The **UDP Preference Limit** setting defines the maximum size packet that the Kerberos libraries will attempt to send over a UDP connection before retrying with TCP. Default is 1 which means always use TCP.
|
||||
|
||||
### DNS Lookup KDC
|
||||
|
||||
The **DNS Lookup KDC** setting controls whether to [lookup KDC in DNS](https://web.mit.edu/kerberos/krb5-latest/doc/admin/realm_config.html#mapping-hostnames-onto-kerberos-realms). Default is true.
|
||||
|
||||
### KRB5 config file path
|
||||
|
||||
The **KRB5 config file path** stores the location of the `krb5` config file. Default is `/etc/krb5.conf`
|
||||
|
||||
### Database user permissions
|
||||
|
||||
Grafana doesn't validate that a query is safe, and could include any SQL statement.
|
||||
For example, Microsoft SQL Server would execute destructive queries like `DELETE FROM user;` and `DROP TABLE user;` if the querying user has permission to do so.
|
||||
|
||||
To protect against this, we strongly recommend that you create a specific MS SQL user with restricted permissions.
|
||||
|
||||
Grant only `SELECT` permissions on the specified database and tables that you want to query to the database user you specified when you added the data source:
|
||||
|
||||
```sql
|
||||
CREATE USER grafanareader WITH PASSWORD 'password'
|
||||
GRANT SELECT ON dbo.YourTable3 TO grafanareader
|
||||
```
|
||||
|
||||
Also, ensure that the user doesn't have any unwanted privileges from the public role.
|
||||
|
||||
### Diagnose connection issues
|
||||
|
||||
If you use older versions of Microsoft SQL Server, such as 2008 and 2008R2, you might need to disable encryption before you can connect the data source.
|
||||
|
||||
We recommend that you use the latest available service pack for optimal compatibility.
|
||||
|
||||
### Provision the data source
|
||||
|
||||
You can define and configure the data source in YAML files as part of Grafana's provisioning system.
|
||||
For more information about provisioning, and for available configuration options, refer to [Provisioning Grafana](ref:provisioning-data-sources).
|
||||
|
||||
#### Provisioning example
|
||||
|
||||
```yaml
|
||||
apiVersion: 1
|
||||
|
||||
datasources:
|
||||
- name: MSSQL
|
||||
type: mssql
|
||||
url: localhost:1433
|
||||
user: grafana
|
||||
jsonData:
|
||||
database: grafana
|
||||
maxOpenConns: 100
|
||||
maxIdleConns: 100
|
||||
maxIdleConnsAuto: true
|
||||
connMaxLifetime: 14400
|
||||
connectionTimeout: 0
|
||||
encrypt: 'false'
|
||||
secureJsonData:
|
||||
password: 'Password!'
|
||||
```
|
||||
|
||||
## Query the data source
|
||||
|
||||
You can create queries with the Microsoft SQL Server data source's query editor when editing a panel that uses a MS SQL data source.
|
||||
|
||||
For details, refer to the [query editor documentation](query-editor/).
|
||||
|
||||
## Use template variables
|
||||
|
||||
Instead of hard-coding details such as server, application, and sensor names in metric queries, you can use variables.
|
||||
Grafana lists these variables in dropdown select boxes at the top of the dashboard to help you change the data displayed in your dashboard.
|
||||
Grafana refers to such variables as template variables.
|
||||
|
||||
For details, see the [template variables documentation](template-variables/).
|
||||
- Create a wide variety of [visualizations](ref:visualizations)
|
||||
- Configure and use [templates and variables](ref:variables)
|
||||
- Add [transformations](ref:transformations)
|
||||
- Add [annotations](ref:annotate-visualizations)
|
||||
- Set up [alerting](ref:alerting)
|
||||
- Optimize performance with [query caching](ref:query-caching)
|
||||
|
||||
251
docs/sources/datasources/mssql/configure/index.md
Normal file
251
docs/sources/datasources/mssql/configure/index.md
Normal file
@@ -0,0 +1,251 @@
|
||||
---
|
||||
aliases:
|
||||
- ../../data-sources/mssql/
|
||||
description: This document provides instructions for configuring the MSSQL data source.
|
||||
keywords:
|
||||
- grafana
|
||||
- MSSQL
|
||||
- Microsoft
|
||||
- SQL
|
||||
- guide
|
||||
- Azure SQL Database
|
||||
- queries
|
||||
labels:
|
||||
products:
|
||||
- cloud
|
||||
- enterprise
|
||||
- oss
|
||||
menuTitle: Configure
|
||||
title: Configure the Microsoft SQL Server data source
|
||||
weight: 200
|
||||
refs:
|
||||
query-transform-data:
|
||||
- pattern: /docs/grafana/
|
||||
destination: /docs/grafana/<GRAFANA_VERSION>/panels-visualizations/query-transform-data/
|
||||
- pattern: /docs/grafana-cloud/
|
||||
destination: /docs/grafana/<GRAFANA_VERSION>/panels-visualizations/query-transform-data/
|
||||
table:
|
||||
- pattern: /docs/grafana/
|
||||
destination: /docs/grafana/<GRAFANA_VERSION>/panels-visualizations/visualizations/table/
|
||||
- pattern: /docs/grafana-cloud/
|
||||
destination: /docs/grafana/<GRAFANA_VERSION>/panels-visualizations/visualizations/table/
|
||||
configure-standard-options-display-name:
|
||||
- pattern: /docs/grafana/
|
||||
destination: /docs/grafana/<GRAFANA_VERSION>/panels-visualizations/configure-standard-options/#display-name
|
||||
- pattern: /docs/grafana-cloud/
|
||||
destination: /docs/grafana/<GRAFANA_VERSION>/panels-visualizations/configure-standard-options/#display-name
|
||||
annotate-visualizations:
|
||||
- pattern: /docs/grafana/
|
||||
destination: /docs/grafana/<GRAFANA_VERSION>/dashboards/build-dashboards/annotate-visualizations/
|
||||
- pattern: /docs/grafana-cloud/
|
||||
destination: /docs/grafana/<GRAFANA_VERSION>/dashboards/build-dashboards/annotate-visualizations/
|
||||
data-source-management:
|
||||
- pattern: /docs/grafana/
|
||||
destination: /docs/grafana/<GRAFANA_VERSION>/administration/data-source-management/
|
||||
- pattern: /docs/grafana-cloud/
|
||||
destination: /docs/grafana/<GRAFANA_VERSION>/administration/data-source-management/
|
||||
private-data-source-connect:
|
||||
- pattern: /docs/grafana/
|
||||
destination: /docs/grafana-cloud/connect-externally-hosted/private-data-source-connect/
|
||||
- pattern: /docs/grafana-cloud/
|
||||
destination: /docs/grafana-cloud/connect-externally-hosted/private-data-source-connect/
|
||||
configure-pdc:
|
||||
- pattern: /docs/grafana/
|
||||
destination: /docs/grafana-cloud/connect-externally-hosted/private-data-source-connect/configure-pdc/#configure-grafana-private-data-source-connect-pdc
|
||||
- pattern: /docs/grafana-cloud/
|
||||
destination: /docs/grafana-cloud/connect-externally-hosted/private-data-source-connect/configure-pdc/#configure-grafana-private-data-source-connect-pdc
|
||||
provision-grafana:
|
||||
- pattern: /docs/grafana/
|
||||
destination: /docs/grafana/<GRAFANA_VERSION>/administration/provisioning/
|
||||
- pattern: /docs/grafana-cloud/
|
||||
destination: /docs/grafana/<GRAFANA_VERSION>/administration/provisioning/
|
||||
add-template-variables-interval-ms:
|
||||
- pattern: /docs/grafana/
|
||||
destination: /docs/grafana/<GRAFANA_VERSION>/dashboards/variables/add-template-variables/#__interval_ms
|
||||
- pattern: /docs/grafana-cloud/
|
||||
destination: /docs/grafana/<GRAFANA_VERSION>/dashboards/variables/add-template-variables/#__interval_ms
|
||||
add-template-variables-interval:
|
||||
- pattern: /docs/grafana/
|
||||
destination: /docs/grafana/<GRAFANA_VERSION>/dashboards/variables/add-template-variables/#__interval
|
||||
- pattern: /docs/grafana-cloud/
|
||||
destination: /docs/grafana/<GRAFANA_VERSION>/dashboards/variables/add-template-variables/#__interval
|
||||
data-sources:
|
||||
- pattern: /docs/grafana/
|
||||
destination: /docs/grafana/<GRAFANA_VERSION>/datasources/
|
||||
- pattern: /docs/grafana-cloud/
|
||||
destination: /docs/grafana/<GRAFANA_VERSION>/datasources/
|
||||
---
|
||||
|
||||
# Configure the Microsoft SQL Server data source
|
||||
|
||||
This document provides instructions for configuring the Microsoft SQL Server data source and explains available configuration options. For general information on adding and managing data sources, refer to [Grafana data sources](ref:data-sources) and [Data source management](ref:data-source-management).
|
||||
|
||||
## Before you begin
|
||||
|
||||
- Grafana comes with a built-in MSSQL data source plugin, eliminating the need to install a plugin.
|
||||
|
||||
- You must have the `Organization administrator` role to configure the MSSQL data source. Organization administrators can also [configure the data source via YAML](#provision-the-data-source) with the Grafana provisioning system.
|
||||
|
||||
- Familiarize yourself with your MSSQL security configuration and gather any necessary security certificates and client keys.
|
||||
|
||||
- Verify that data from MSSQL is being written to your Grafana instance.
|
||||
|
||||
## Add the MSSQL data source
|
||||
|
||||
To add the MSSQL data source, complete the following steps:
|
||||
|
||||
1. Click **Connections** in the left-side menu.
|
||||
1. Click **Add new connection**
|
||||
1. Type `Microsoft SQL Server` in the search bar.
|
||||
1. Select **Microsoft SQL Server** under data source.
|
||||
1. Click **Add new data source** in the upper right.
|
||||
|
||||
Grafana takes you to the **Settings** tab, where you will set up your Microsoft SQL Server configuration.
|
||||
|
||||
## Configure the data source in the UI
|
||||
|
||||
Following are configuration options for the Microsoft SQL Server data source.
|
||||
|
||||
{{< admonition type="warning" >}}
|
||||
Kerberos is not supported in Grafana Cloud.
|
||||
{{< /admonition >}}
|
||||
|
||||
| **Setting** | **Description** |
|
||||
| ----------- | ------------------------------------------------------------------------------------------------------------------------------------------ |
|
||||
| **Name** | The data source name. Sets the name you use to refer to the data source in panels and queries. Examples: `MSSQL-1`, `MSSQL_Sales1`. |
|
||||
| **Default** | Toggle to select as the default name in dashboard panels. When you go to a dashboard panel, this will be the default selected data source. |
|
||||
|
||||
**Connection:**
|
||||
|
||||
| Setting | Description |
|
||||
| ------------ | ----------------------------------------------------------------------------------------------------------------------------------------------------------------------------------------------------------------------------------------------------------------- |
|
||||
| **Host** | Sets the IP address or hostname (and optional port) of your MSSQL instance. The default port is `0`, which uses the driver's default. <br> You can include additional connection properties (e.g., `ApplicationIntent`) by separating them with semicolons (`;`). |
|
||||
| **Database** | Sets the name of the MSSQL database to connect to. |
|
||||
|
||||
**TLS/SSL Auth:**
|
||||
|
||||
Encrypt - Determines whether or to which extent a secure SSL TCP/IP connection will be negotiated with the server.
|
||||
|
||||
| Encrypt Setting | Description |
|
||||
| --------------- | ------------------------------------------------------------------------------------------------ |
|
||||
| **Disable** | Data sent between the client and server is **not encrypted**. |
|
||||
| **False** | The default setting. Only the login packet is encrypted; **all other data is sent unencrypted**. |
|
||||
| **True** | **All data** sent between the client and server is **encrypted**. |
|
||||
|
||||
{{< admonition type="note" >}}
|
||||
If you're using an older version of Microsoft SQL Server like 2008 and 2008R2, you may need to disable encryption to be able to connect.
|
||||
{{< /admonition >}}
|
||||
|
||||
**Authentication:**
|
||||
|
||||
| Authentication Type | Description | Credentials / Fields |
|
||||
| --------------------------------------------------- | ------------------------------------------------------------------------------------------------------------------------------- | ----------------------------------------------------------------------------------------------------- |
|
||||
| **SQL Server Authentication** | Default method to connect to MSSQL. Use a SQL Server or Windows login in `DOMAIN\User` format. | - **Username**: SQL Server username<br>- **Password**: SQL Server password |
|
||||
| **Windows Authentication**<br>(Integrated Security) | Uses the logged-in Windows user's credentials via single sign-on. Available only when SQL Server allows Windows Authentication. | No input required; uses the logged-in Windows user's credentials |
|
||||
| **Windows AD**<br>(Username/Password) | Authenticates a domain user with their Active Directory username and password. | - **Username**: `user@example.com`<br>- **Password**: Active Directory password |
|
||||
| **Windows AD**<br>(Keytab) | Authenticates a domain user using a keytab file. | - **Username**: `user@example.com`<br>- **Keytab file path**: Path to your keytab file |
|
||||
| **Windows AD**<br>(Credential Cache) | Uses a Kerberos credential cache already loaded in memory (e.g., from a prior `kinit` command). No file needed. | - **Credential cache path**: Path to in-memory credential (e.g., `/tmp/krb5cc_1000`) |
|
||||
| **Windows AD**<br>(Credential Cache File) | Authenticates a domain user using a credential cache file (`.ccache`). | - **Username**: `user@example.com`<br>- **Credential cache file path**: e.g., `/home/grot/cache.json` |
|
||||
|
||||
**Additional settings:**
|
||||
|
||||
Additional settings are optional settings you configure for more control over your data source. This includes connection limits, connection timeout, group-by time interval, and Secure Socks Proxy.
|
||||
|
||||
**Connection limits**:
|
||||
|
||||
| Setting | Description |
|
||||
| ----------------- | -------------------------------------------------------------------------------------------------------------------------------------------------------------------------------------------- |
|
||||
| **Max open** | The maximum number of open connections to the database. If set to `0`, there is no limit. If `max open` is greater than `0` and less than `max idle`, `max idle` is adjusted to match. |
|
||||
| **Auto max idle** | When enabled, automatically sets `max idle` to match `max open`. If `max open` isn’t set, it defaults to `100`. |
|
||||
| **Max idle** | The maximum number of idle connections in the pool. If `max open` is set and is lower than `max idle`, then `max idle` is reduced to match. If set to `0`, no idle connections are retained. |
|
||||
| **Max lifetime** | The maximum time (in seconds) a connection can be reused before being closed and replaced. If set to `0`, connections are reused indefinitely. |
|
||||
|
||||
**Connection details:**
|
||||
|
||||
| **Setting** | **Description** |
|
||||
| ---------------------- | ----------------------------------------------------------------------------------------------------------------------------------------------------------------------------------------------------------------------------------------------------------------- |
|
||||
| **Min time interval** | Specifies the lower bound for the auto-generated `GROUP BY` time interval. Grafana recommends matching this value to your data's write frequency—for example, `1m` if data is written every minute. Refer to [Min time interval](#min-time-interval) for details. |
|
||||
| **Connection timeout** | Specifies the maximum number of seconds to wait when attempting to connect to the database before timing out. A value of `0` (the default) disables the timeout. |
|
||||
|
||||
**Windows ADS Advanced Settings**
|
||||
|
||||
| Setting | Description | Default |
|
||||
| ------------------------- | ----------------------------------------------------------------------------------------------------------------------------------------------------------------------------------------------------------------------- | -------------------- |
|
||||
| **UDP Preference Limit** | Defines the maximum packet size (in bytes) that Kerberos libraries will attempt to send over UDP before retrying with TCP. A value of `1` forces all communication to use TCP. | `1` (always use TCP) |
|
||||
| **DNS Lookup KDC** | Controls whether DNS `SRV` records are used to locate [Key Distribution Centers (KDCs)](https://web.mit.edu/kerberos/krb5-latest/doc/admin/realm_config.html#key-distribution-centers) and other servers for the realm. | `true` |
|
||||
| **krb5 config file path** | Specifies the path to the Kerberos configuration file used by the [MIT krb5 package](https://web.mit.edu/kerberos/krb5-1.12/doc/admin/conf_files/krb5_conf.html). | `/etc/krb5.conf` |
|
||||
|
||||
**Private data source connect** - _Only for Grafana Cloud users._
|
||||
|
||||
Private data source connect, or PDC, allows you to establish a private, secured connection between a Grafana Cloud instance, or stack, and data sources secured within a private network. Click the drop-down to locate the URL for PDC. For more information regarding Grafana PDC refer to [Private data source connect (PDC)](ref:private-data-source-connect) and [Configure Grafana private data source connect (PDC)](ref:configure-pdc) for instructions on setting up a PDC connection.
|
||||
|
||||
Click **Manage private data source connect** to open your PDC connection page and view your configuration details.
|
||||
|
||||
After configuring your MSSQL data source options, click **Save & test** at the bottom to test the connection. You should see a confirmation dialog box that says:
|
||||
|
||||
**Database Connection OK**
|
||||
|
||||
### Min time interval
|
||||
|
||||
The **Min time interval** setting defines a lower limit for the [`$__interval`](ref:add-template-variables-interval) and [`$__interval_ms`][add-template-variables-interval_ms] variables.
|
||||
|
||||
This value _must_ be formatted as a number followed by a valid time identifier:
|
||||
|
||||
| Identifier | Description |
|
||||
| ---------- | ----------- |
|
||||
| `y` | year |
|
||||
| `M` | month |
|
||||
| `w` | week |
|
||||
| `d` | day |
|
||||
| `h` | hour |
|
||||
| `m` | minute |
|
||||
| `s` | second |
|
||||
| `ms` | millisecond |
|
||||
|
||||
Grafana recommends setting this value to match your Microsoft SQL Server write frequency.
|
||||
For example, use `1m` if Microsoft SQL Server writes data every minute.
|
||||
|
||||
You can also override this setting in a dashboard panel under its data source options.
|
||||
|
||||
### Database user permissions
|
||||
|
||||
When adding a data source, ensure the database user you specify has only SELECT permissions on the relevant database and tables. Grafana does not validate the safety of queries, which means they can include potentially harmful SQL statements, such as `USE otherdb`; or `DROP TABLE user;`, which could get executed. To minimize this risk, Grafana strongly recommends creating a dedicated MySQL user with restricted permissions.
|
||||
|
||||
```sql
|
||||
CREATE USER grafanareader WITH PASSWORD 'password'
|
||||
GRANT SELECT ON dbo.YourTable3 TO grafanareader
|
||||
```
|
||||
|
||||
Also, ensure that the user doesn't have any unwanted privileges from the public role.
|
||||
|
||||
### Diagnose connection issues
|
||||
|
||||
If you use older versions of Microsoft SQL Server, such as 2008 and 2008R2, you might need to disable encryption before you can connect the data source.
|
||||
|
||||
Grafana recommends that you use the latest available service pack for optimal compatibility.
|
||||
|
||||
### Provision the data source
|
||||
|
||||
You can define and configure the data source in YAML files as part of the Grafana provisioning system. For more information about provisioning, and for available configuration options, refer to [Provision Grafana](ref:provision-grafana).
|
||||
|
||||
#### Provisioning example
|
||||
|
||||
```yaml
|
||||
apiVersion: 1
|
||||
|
||||
datasources:
|
||||
- name: MSSQL
|
||||
type: mssql
|
||||
url: localhost:1433
|
||||
user: grafana
|
||||
jsonData:
|
||||
database: grafana
|
||||
maxOpenConns: 100
|
||||
maxIdleConns: 100
|
||||
maxIdleConnsAuto: true
|
||||
connMaxLifetime: 14400
|
||||
connectionTimeout: 0
|
||||
encrypt: 'false'
|
||||
secureJsonData:
|
||||
password: 'Password!'
|
||||
```
|
||||
@@ -39,64 +39,96 @@ refs:
|
||||
destination: /docs/grafana/<GRAFANA_VERSION>/dashboards/build-dashboards/annotate-visualizations/
|
||||
- pattern: /docs/grafana-cloud/
|
||||
destination: /docs/grafana/<GRAFANA_VERSION>/dashboards/build-dashboards/annotate-visualizations/
|
||||
explore:
|
||||
- pattern: /docs/grafana/
|
||||
destination: /docs/grafana/<GRAFANA_VERSION>/explore/
|
||||
- pattern: /docs/grafana-cloud/
|
||||
destination: /docs/grafana/<GRAFANA_VERSION>/explore/
|
||||
---
|
||||
|
||||
# Microsoft SQL Server query editor
|
||||
|
||||
You can create queries with the Microsoft SQL Server data source's query editor when editing a panel that uses a MS SQL data source.
|
||||
Grafana provides a query editor for the Microsoft SQL Server data source, which is located on the [Explore page](ref:explore). You can also access the MSSQL query editor from a dashboard panel. Click the menu in the upper right of the panel and select **Edit**.
|
||||
|
||||
This topic explains querying specific to the MS SQL data source.
|
||||
For general documentation on querying data sources in Grafana, see [Query and transform data](ref:query-transform-data).
|
||||
This topic explains querying specific to the MSSQL data source.
|
||||
For general documentation on querying data sources in Grafana, refer to [Query and transform data](ref:query-transform-data). For options and functions common to all query editors, refer to [Query editors](ref:query-transform-data).
|
||||
|
||||
## Choose a query editing mode
|
||||
For more information on writing Transact-SQL statements, refer to [Write Transact-SQL statements](https://learn.microsoft.com/en-us/sql/t-sql/tutorial-writing-transact-sql-statements?view=sql-server-ver17) and [Transact-SQL reference](https://learn.microsoft.com/en-us/sql/t-sql/language-reference?view=sql-server-ver17) in the Microsoft SQL Server documentation.
|
||||
|
||||
You can switch the query editor between two modes:
|
||||
The Microsoft SQL Server query editor has two modes:
|
||||
|
||||
- [Code mode](#code-mode), which provides a feature-rich editor for writing queries
|
||||
- [Builder mode](#builder-mode), which provides a visual query designer
|
||||
- [Builder mode](#builder-mode)
|
||||
- [Code mode](#code-mode)
|
||||
|
||||
To switch between the editor modes, select the corresponding **Builder** and **Code** tabs above the editor.
|
||||
To switch between the editor modes, select the corresponding **Builder** and **Code** tabs in the upper right.
|
||||
|
||||
To run a query, select **Run query** located at the top right corner of the editor.
|
||||

|
||||
|
||||
The query editor also provides:
|
||||
{{< admonition type="warning" >}}
|
||||
When switching from **Code** mode to **Builder** mode, any changes made to your SQL query aren't saved and will not be shown in the builder interface. You can choose to copy your code to the clipboard or discard the changes.
|
||||
{{< /admonition >}}
|
||||
|
||||
- [Macros](#use-macros)
|
||||
To run a query, select **Run query** in the upper right of the editor.
|
||||
|
||||
In addition to writing queries, the query editor also allows you to create and use:
|
||||
|
||||
- [Macros](#macros)
|
||||
- [Annotations](#apply-annotations)
|
||||
- [Stored procedures](#use-stored-procedures)
|
||||
|
||||
## Configure common options
|
||||
## Builder mode
|
||||
|
||||
You can configure a MS SQL-specific response format in the query editor regardless of its mode.
|
||||
**Builder mode** allows you to build queries using a visual interface. This mode is great for users who prefer a guided query experience or are just getting started with SQL.
|
||||
|
||||
### Choose a response format
|
||||
{{< figure alt="MSSQL builder mode>" src="/media/docs/mssql/mssql-builder-mode-v12.png" class="docs-image--no-shadow" >}}
|
||||
|
||||
Grafana can format the response from MS SQL as either a table or as a time series.
|
||||
The following components will help you build a T-SQL query:
|
||||
|
||||
To choose a response format, select either the **Table** or **Time series** formats from the **Format** dropdown.
|
||||
- **Format** - Select a format response from the drop-down for the MSSQL query. The default is **Table**. Refer to [Table queries](#table-queries) and [Time series queries](#time-series-queries) for more information and examples. If you select the **Time series** format option, you must include a `time` column.
|
||||
|
||||
To use the time series format, you must name one of the MS SQL columns `time`.
|
||||
You can use time series queries, but not table queries, in alerting conditions.
|
||||
- **Dataset** - Select a database to query from the drop-down. Grafana automatically populates the drop-down with all databases the user has access to. If a default database is configured in the Data Source Configuration page or via a provisioning file, users will be limited to querying only that predefined database.
|
||||
|
||||
For details about using these formats, refer to [Use table queries](#use-table-queries) and [Use time series queries](#use-time-series-queries).
|
||||
Note that `tempdb`, `model`, `msdb`, and `master` system databases are not included in the query editor drop-down.
|
||||
|
||||
- **Table** - Select a table from the drop-down. After selecting a database, the next drop-down displays all available tables in that database.
|
||||
|
||||
- **Data operations** - _Optional_. Select an aggregation or a macro from the drop-down. You can add multiple data operations by clicking the **+ sign**. Click the **garbage can icon** to remove data operations.
|
||||
|
||||
- **Column** - Select a column on which to run the aggregation.
|
||||
- **Interval** - Select an interval from the drop-down. You'll see this option when you choose a `time group` macro from the drop-down.
|
||||
- **Fill** - _Optional_. Add a `FILL` method to populate missing time intervals with default values (such as NULL, 0, or a specified value) when no data exists for those intervals. This ensures continuity in the time series, avoiding gaps in visualizations.
|
||||
- **Alias** - _Optional_. Add an alias from the drop-down. You can also add your own alias by typing it in the box and clicking **Enter**. Remove an alias by clicking the **X**.
|
||||
|
||||
- **Filter** - Toggle to add filters.
|
||||
|
||||
- **Filter by column value** - _Optional_. If you toggle **Filter** you can add a column to filter by from the drop-down. To filter by additional columns, click the **+ sign** to the right of the condition drop-down. You can choose a variety of operators from the drop-down next to the condition. When multiple filters are added, use the `AND` or `OR` operators to define how conditions are evaluated. `AND` requires all conditions to be true, while `OR` requires any condition to be true. Use the second drop-down to select the filter value. To remove a filter, click the **X icon** next to it. If you select a `date-type` column, you can use macros from the operator list and choose `timeFilter` to insert the `$\_\_timeFilter` macro into your query with the selected date column.
|
||||
|
||||
After selecting a date type column, you can choose Macros from the operators list and select timeFilter which will add the `$\_\_timeFilter` macro to the query with the selected date column. Refer to [Macros](#macros) for more information.
|
||||
|
||||
- **Group** - Toggle to add a `GROUP BY` column.
|
||||
- **Group by column** - Select a column to filter by from the drop-down. Click the **+sign** to filter by multiple columns. Click the **X** to remove a filter.
|
||||
- **Order** - Toggle to add an `ORDER BY` statement.
|
||||
- **Order by** - Select a column to order by from the drop-down. Select ascending (`ASC`) or descending (`DESC`) order.
|
||||
- **Limit** - You can add an optional limit on the number of retrieved results. Default is 50.
|
||||
- **Preview** - Toggle for a preview of the SQL query generated by the query builder. Preview is toggled on by default.
|
||||
|
||||
For additional detail about using formats, refer to [Table queries](#table-queries) and [Time series queries](#time-series-queries).
|
||||
|
||||
## Code mode
|
||||
|
||||
{{< figure src="/static/img/docs/v92/sql_code_editor.png" class="docs-image--no-shadow" >}}
|
||||
|
||||
In **Code mode**, you can write complex queries using a text editor with autocompletion features and syntax highlighting.
|
||||
**Code mode** lets you build complex queries using a text editor with helpful features like autocompletion and syntax highlighting.
|
||||
|
||||
For more information about Transact-SQL (T-SQL), the query language used by Microsoft SQL Server, refer to the [Transact-SQL tutorial](https://learn.microsoft.com/en-us/sql/t-sql/tutorial-writing-transact-sql-statements).
|
||||
This mode is ideal for advanced users who need full control over the SQL query or want to use features not available in visual query mode. It’s especially useful for writing subqueries, using macros, or applying advanced filtering and formatting. You can switch back to visual mode, but note that some custom queries may not be fully compatible.
|
||||
|
||||
### Use toolbar features
|
||||
### Code mode toolbar features
|
||||
|
||||
Code mode has several features in a toolbar located in the editor's lower-right corner.
|
||||
|
||||
To reformat the query, click the brackets button (`{}`).
|
||||
|
||||
To expand the code editor, click the chevron button pointing downward.
|
||||
|
||||
To run the query, click the **Run query** button or use the keyboard shortcut <key>Ctrl</key>/<key>Cmd</key> + <key>Enter</key>/<key>Return</key>.
|
||||
- To reformat the query, click the brackets button (`{}`).
|
||||
- To expand the code editor, click the chevron button pointing downward.
|
||||
- To run the query, click the **Run query** button or use the keyboard shortcut **<key>Ctrl</key>/<key>Cmd</key> + <key>Enter</key>/<key>Return</key>**.
|
||||
|
||||
### Use autocompletion
|
||||
|
||||
@@ -105,94 +137,47 @@ To manually trigger autocompletion, use the keyboard shortcut <key>Ctrl</key>/<k
|
||||
|
||||
Code mode supports autocompletion of tables, columns, SQL keywords, standard SQL functions, Grafana template variables, and Grafana macros.
|
||||
|
||||
> **Note:** You can't autocomplete columns until you've specified a table.
|
||||
{{< admonition type="note" >}}
|
||||
You can't autocomplete columns until you've specified a table.
|
||||
{{< /admonition >}}
|
||||
|
||||
## Builder mode
|
||||
|
||||
{{< figure src="/static/img/docs/v92/mssql_query_builder.png" class="docs-image--no-shadow" >}}
|
||||
|
||||
In **Builder mode**, you can build queries using a visual interface.
|
||||
|
||||
### Dataset and table selection
|
||||
|
||||
In the **Dataset** dropdown, select the MSSQL database to query. Grafana populates the dropdown with all databases that the user can access.
|
||||
Once you select a database, Grafana populates the dropdown with all available tables.
|
||||
|
||||
**Note:** If a default database has been configured through the Data Source Configuration page (or through a provisioning configuration file), the user will only be able to use that single preconfigured database for querying.
|
||||
|
||||
We don't include `tempdb`,`model`,`msdb`,`master` databases in the query editor dropdown.
|
||||
|
||||
### Select columns and aggregation functions (SELECT)
|
||||
|
||||
Select a column from the **Column** dropdown to include it in the data.
|
||||
You can select an optional aggregation function for the column in the **Aggregation** dropdown.
|
||||
|
||||
To add more value columns, click the plus (`+`) button to the right of the column's row.
|
||||
|
||||
{{< docs/shared source="grafana" lookup="datasources/sql-query-builder-macros.md" version="<GRAFANA_VERSION>" >}}
|
||||
|
||||
### Filter data (WHERE)
|
||||
|
||||
To add a filter, toggle the **Filter** switch at the top of the editor.
|
||||
This reveals a **Filter by column value** section with two dropdown selectors.
|
||||
|
||||
Use the first dropdown to choose whether all of the filters need to match (`AND`), or if only one of the filters needs to match (`OR`).
|
||||
Use the second dropdown to choose a filter.
|
||||
|
||||
To filter on more columns, click the plus (`+`) button to the right of the condition dropdown.
|
||||
|
||||
To remove a filter, click the `x` button next to that filter's dropdown.
|
||||
|
||||
After selecting a date type column, you can choose Macros from the operators list and select timeFilter which will add the $\_\_timeFilter macro to the query with the selected date column.
|
||||
|
||||
### Group results
|
||||
|
||||
To group results by column, toggle the **Group** switch at the top of the editor.
|
||||
This reveals a **Group by column** dropdown where you can select which column to group the results by.
|
||||
|
||||
To remove the group-by clause, click the `x` button.
|
||||
|
||||
### Preview the query
|
||||
|
||||
To preview the SQL query generated by Builder mode, toggle the **Preview** switch at the top of the editor.
|
||||
This reveals a preview pane containing the query, and an copy icon at the top right that copies the query to your clipboard.
|
||||
|
||||
## Use macros
|
||||
## Macros
|
||||
|
||||
To simplify syntax and to allow for dynamic components, such as date range filters, you can add macros to your query.
|
||||
|
||||
| Macro example | Replaced by |
|
||||
| ----------------------------------------------------- | ---------------------------------------------------------------------------------------------------------------------------------------------------------------------------------------------------------------------------------------------------------------------- |
|
||||
| `$__time(dateColumn)` | An expression to rename the column to _time_. For example, _dateColumn as time_ |
|
||||
| `$__timeEpoch(dateColumn)` | An expression to convert a DATETIME column type to Unix timestamp and rename it to _time_.<br/>For example, _DATEDIFF(second, '1970-01-01', dateColumn) AS time_ |
|
||||
| `$__timeFilter(dateColumn)` | A time range filter using the specified column name.<br/>For example, _dateColumn BETWEEN '2017-04-21T05:01:17Z' AND '2017-04-21T05:06:17Z'_ |
|
||||
| `$__timeFrom()` | The start of the currently active time selection. For example, _'2017-04-21T05:01:17Z'_ |
|
||||
| `$__timeTo()` | The end of the currently active time selection. For example, _'2017-04-21T05:06:17Z'_ |
|
||||
| `$__timeGroup(dateColumn,'5m'[, fillvalue])` | An expression usable in GROUP BY clause. Providing a _fillValue_ of _NULL_ or _floating value_ will automatically fill empty series in timerange with that value.<br/>For example, _CAST(ROUND(DATEDIFF(second, '1970-01-01', time_column)/300.0, 0) as bigint)\*300_. |
|
||||
| `$__timeGroup(dateColumn,'5m', 0)` | Same as above but with a fill parameter so missing points in that series will be added by grafana and 0 will be used as value. |
|
||||
| `$__timeGroup(dateColumn,'5m', NULL)` | Same as above but NULL will be used as value for missing points. |
|
||||
| `$__timeGroup(dateColumn,'5m', previous)` | Same as above but the previous value in that series will be used as fill value if no value has been seen yet NULL will be used. |
|
||||
| `$__timeGroupAlias(dateColumn,'5m')` | Same as `$__timeGroup` but with an added column alias. |
|
||||
| `$__unixEpochFilter(dateColumn)` | A time range filter using the specified column name with times represented as Unix timestamp. For example, _dateColumn > 1494410783 AND dateColumn < 1494497183_ |
|
||||
| `$__unixEpochFrom()` | The start of the currently active time selection as Unix timestamp. For example, _1494410783_ |
|
||||
| `$__unixEpochTo()` | The end of the currently active time selection as Unix timestamp. For example, _1494497183_ |
|
||||
| `$__unixEpochNanoFilter(dateColumn)` | A time range filter using the specified column name with times represented as nanosecond timestamp. For example, _dateColumn > 1494410783152415214 AND dateColumn < 1494497183142514872_ |
|
||||
| `$__unixEpochNanoFrom()` | The start of the currently active time selection as nanosecond timestamp. For example, _1494410783152415214_ |
|
||||
| `$__unixEpochNanoTo()` | The end of the currently active time selection as nanosecond timestamp. For example, _1494497183142514872_ |
|
||||
| `$__unixEpochGroup(dateColumn,'5m', [fillmode])` | Same as `$__timeGroup` but for times stored as Unix timestamp. |
|
||||
| `$__unixEpochGroupAlias(dateColumn,'5m', [fillmode])` | Same as above but also adds a column alias. |
|
||||
Use macros in the `SELECT` clause to simplify the creation of time series queries.
|
||||
From the **Data operations** drop-down, choose a macro such as `$\_\_timeGroup` or `$\_\_timeGroupAlias`. Then, select a time column from the **Column** drop-down and a time interval from the **Interval** drop-down. This generates a time-series query based on your selected time grouping.
|
||||
|
||||
| **Macro** | **Description** |
|
||||
| ------------------------------------------------------ | ---------------------------------------------------------------------------------------------------------------------------------------------------------------------------------------------------------------------------------------- |
|
||||
| `$__time(dateColumn)` | Renames the specified column to `_time`. <br/>Example: `dateColumn AS time` |
|
||||
| `$__timeEpoch(dateColumn)` | Converts a `DATETIME` column to a Unix timestamp and renames it to `_time`. <br/>Example: `DATEDIFF(second, '1970-01-01', dateColumn) AS time` |
|
||||
| `$__timeFilter(dateColumn)` | Adds a time range filter for the specified column. <br/>Example: `dateColumn BETWEEN '2017-04-21T05:01:17Z' AND '2017-04-21T05:06:17Z'` |
|
||||
| `$__timeFrom()` | Returns the start of the current time range. <br/>Example: `'2017-04-21T05:01:17Z'` |
|
||||
| `$__timeTo()` | Returns the end of the current time range. <br/>Example: `'2017-04-21T05:06:17Z'` |
|
||||
| `$__timeGroup(dateColumn, '5m'[, fillValue])` | Groups the specified time column into intervals (e.g., 5 minutes). Optionally fills gaps with a value like `0`, `NULL`, or `previous`. <br/>Example: `CAST(ROUND(DATEDIFF(second, '1970-01-01', time_column)/300.0, 0) AS bigint) * 300` |
|
||||
| `$__timeGroup(dateColumn, '5m', 0)` | Same as above, with `0` used to fill missing data points. |
|
||||
| `$__timeGroup(dateColumn, '5m', NULL)` | Same as above, with `NULL` used for missing data points. |
|
||||
| `$__timeGroup(dateColumn, '5m', previous)` | Same as above, using the previous value to fill gaps. If no previous value exists, `NULL` is used. |
|
||||
| `$__timeGroupAlias(dateColumn, '5m')` | Same as `$__timeGroup`, but also adds an alias to the resulting column. |
|
||||
| `$__unixEpochFilter(dateColumn)` | Adds a time range filter using Unix timestamps. <br/>Example: `dateColumn > 1494410783 AND dateColumn < 1494497183` |
|
||||
| `$__unixEpochFrom()` | Returns the start of the current time range as a Unix timestamp. <br/>Example: `1494410783` |
|
||||
| `$__unixEpochTo()` | Returns the end of the current time range as a Unix timestamp. <br/>Example: `1494497183` |
|
||||
| `$__unixEpochNanoFilter(dateColumn)` | Adds a time range filter using nanosecond-precision Unix timestamps. <br/>Example: `dateColumn > 1494410783152415214 AND dateColumn < 1494497183142514872` |
|
||||
| `$__unixEpochNanoFrom()` | Returns the start of the current time range as a nanosecond Unix timestamp. <br/>Example: `1494410783152415214` |
|
||||
| `$__unixEpochNanoTo()` | Returns the end of the current time range as a nanosecond Unix timestamp. <br/>Example: `1494497183142514872` |
|
||||
| `$__unixEpochGroup(dateColumn, '5m', [fillMode])` | Same as `$__timeGroup`, but for Unix timestamps. Optional `fillMode` controls how to handle missing points. |
|
||||
| `$__unixEpochGroupAlias(dateColumn, '5m', [fillMode])` | Same as above, but adds an alias to the grouped column. |
|
||||
|
||||
### View the interpolated query
|
||||
|
||||
The query editor also includes a link named **Generated SQL** that appears after running a query while in panel edit mode.
|
||||
To display the raw interpolated SQL string that the data source executed, click on this link.
|
||||
The query editor includes a **Generated SQL** link that appears after you run a query while editing a panel. Click this link to view the raw interpolated SQL that Grafana executed, including any macros that were expanded during query processing.
|
||||
|
||||
## Use table queries
|
||||
## Table queries
|
||||
|
||||
If the **Format** query option is set to **Table** for a [Table panel](ref:table), you can enter any type of SQL query.
|
||||
The Table panel then displays the query results with whatever columns and rows are returned.
|
||||
To create a Table query, set the **Format** option in the query editor to [**Table**](ref:table). This allows you to write any valid SQL query, and the Table panel will display the results using the returned columns and rows.
|
||||
|
||||
**Example database table:**
|
||||
**Example:**
|
||||
|
||||
```sql
|
||||
CREATE TABLE [event] (
|
||||
@@ -220,43 +205,43 @@ SELECT
|
||||
GETDATE(), CAST(GETDATE() AS DATETIME2), CAST(GETDATE() AS SMALLDATETIME), CAST(GETDATE() AS DATE), CAST(GETDATE() AS TIME), SWITCHOFFSET(CAST(GETDATE() AS DATETIMEOFFSET), '-07:00')
|
||||
```
|
||||
|
||||
Query editor with example query:
|
||||
|
||||
{{< figure src="/static/img/docs/v51/mssql_table_query.png" max-width="500px" class="docs-image--no-shadow" >}}
|
||||
|
||||
The query:
|
||||
**Example query with output:**
|
||||
|
||||
```sql
|
||||
SELECT * FROM [mssql_types]
|
||||
```
|
||||
|
||||
To control the name of the Table panel columns, use the standard `AS` SQL column selection syntax.
|
||||
{{< figure src="/static/img/docs/v51/mssql_table_query.png" max-width="500px" class="docs-image--no-shadow" >}}
|
||||
|
||||
For example:
|
||||
Use the keyword `AS` to define an alias in your query to rename a column or table.
|
||||
|
||||
**Example query with output:**
|
||||
|
||||
```sql
|
||||
SELECT
|
||||
c_bit as [column1], c_tinyint as [column2]
|
||||
c_bit AS [column1], c_tinyint AS [column2]
|
||||
FROM
|
||||
[mssql_types]
|
||||
```
|
||||
|
||||
The resulting table panel:
|
||||
|
||||
{{< figure src="/static/img/docs/v51/mssql_table_result.png" max-width="1489px" class="docs-image--no-shadow" >}}
|
||||
|
||||
## Use time series queries
|
||||
## Time series queries
|
||||
|
||||
{{< admonition type="note" >}}
|
||||
Store timestamps in UTC to avoid issues with time shifts in Grafana when using non-UTC timezones.
|
||||
{{< /admonition >}}
|
||||
|
||||
If you set the **Format** setting in the query editor to **Time series**, then the query must have a column named `time` that returns either a SQL datetime or any numeric datatype representing Unix epoch in seconds.
|
||||
Result sets of time series queries must also be sorted by time for panels to properly visualize the result.
|
||||
To create a time series query, set the **Format** option in the query editor to **Time series**. The query must include a column named `time`, which should contain either a SQL `datetime` value or a numeric value representing Unix epoch time in seconds. The result set must be sorted by the `time` column for panels to visualize the data correctly.
|
||||
|
||||
A time series query result is returned in a [wide data frame format](https://grafana.com/developers/plugin-tools/key-concepts/data-frames#wide-format).
|
||||
Any column except time or of type string transforms into value fields in the data frame query result.
|
||||
Any string column transforms into field labels in the data frame query result.
|
||||
A time series query returns results[wide data frame format](https://grafana.com/developers/plugin-tools/key-concepts/data-frames#wide-format).
|
||||
|
||||
- Any column except `time` or of the type `string` transforms into value fields in the data frame query result.
|
||||
- Any string column transforms into field labels in the data frame query result.
|
||||
|
||||
You can enable macro support in the `SELECT` clause to create time series queries more easily. Use the **Data operations** drop-down to choose a macro such as `$\_\_timeGroup` or `$\_\_timeGroupAlias`, then select a time column from the Column drop-down and a time interval from the Interval drop-down. This generates a time-series query based on your selected time grouping.
|
||||
|
||||
{{< docs/shared source="grafana" lookup="datasources/sql-query-builder-macros.md" version="<GRAFANA_VERSION>" >}}
|
||||
|
||||
### Create a metric query
|
||||
|
||||
@@ -294,7 +279,7 @@ Data frame result:
|
||||
|
||||
### Time series query examples
|
||||
|
||||
**Using the fill parameter in the $\_\_timeGroupAlias macro to convert null values to be zero instead:**
|
||||
**Use the fill parameter in the $\_\_timeGroupAlias macro to convert null values to be zero instead:**
|
||||
|
||||
```sql
|
||||
SELECT
|
||||
@@ -325,7 +310,7 @@ Data frame result:
|
||||
+---------------------+---------------------------+---------------------------+
|
||||
```
|
||||
|
||||
**Using multiple columns:**
|
||||
**Use multiple columns:**
|
||||
|
||||
```sql
|
||||
SELECT
|
||||
@@ -354,16 +339,16 @@ Data frame result:
|
||||
## Apply annotations
|
||||
|
||||
[Annotations](ref:annotate-visualizations) overlay rich event information on top of graphs.
|
||||
You can add annotation queries in the Dashboard menu's Annotations view.
|
||||
You can add annotation queries in the Dashboard menu's **Annotations** view.
|
||||
|
||||
**Columns:**
|
||||
|
||||
| Name | Description |
|
||||
| --------- | ----------------------------------------------------------------------------------------------------------------- |
|
||||
| `time` | The name of the date/time field. Could be a column with a native SQL date/time data type or epoch value. |
|
||||
| `timeend` | Optional name of the end date/time field. Could be a column with a native SQL date/time data type or epoch value. |
|
||||
| `text` | Event description field. |
|
||||
| `tags` | Optional field name to use for event tags as a comma separated string. |
|
||||
| `time` | The name of the date/time field. Can be a column with a native SQL date/time data type or epoch value. |
|
||||
| `timeend` | _Optional_ name of the end date/time field. Can be a column with a native SQL date/time data type or epoch value. |
|
||||
| `text` | Field containing the event description. |
|
||||
| `tags` | _Optional_ field used for event tags, formatted as a comma-separated string. |
|
||||
|
||||
**Example database tables:**
|
||||
|
||||
@@ -375,7 +360,7 @@ CREATE TABLE [events] (
|
||||
)
|
||||
```
|
||||
|
||||
We also use the database table defined in [Time series queries](#time-series-queries).
|
||||
The following example also uses the database table defined in the [Time series queries](#time-series-queries) section.
|
||||
|
||||
**Example query using time column with epoch values:**
|
||||
|
||||
@@ -422,16 +407,17 @@ ORDER BY 1
|
||||
|
||||
## Use stored procedures
|
||||
|
||||
Stored procedures have been verified to work.
|
||||
However, please note that we haven't done anything special to support this, so there might be edge cases where it won't work as you would expect.
|
||||
Stored procedures should be supported in table, time series and annotation queries as long as you use the same naming of columns and return data in the same format as describe above under respective section.
|
||||
Stored procedures have been verified to work with Grafana queries. However, note that there is no special handling or extended support for stored procedures, so some edge cases may not behave as expected.
|
||||
|
||||
Please note that any macro function will not work inside a stored procedure.
|
||||
Stored procedures can be used in table, time series, and annotation queries, provided that the returned data matches the expected column names and formats described in the relevant previous sections in this document.
|
||||
|
||||
### Examples
|
||||
{{< admonition type="note" >}}
|
||||
Grafana macro functions do not work inside stored procedures.
|
||||
{{< /admonition >}}
|
||||
|
||||
{{< figure src="/static/img/docs/v51/mssql_metrics_graph.png" class="docs-image--no-shadow docs-image--right" >}}
|
||||
For the following examples, the database table is defined in [Time series queries](#time-series-queries). Let's say that we want to visualize four series in a graph panel, such as all combinations of columns `valueOne`, `valueTwo` and `measurement`. Graph panel to the right visualizes what we want to achieve. To solve this, we need to use two queries:
|
||||
|
||||
For the following examples, the database table is defined in [Time series queries](#time-series-queries). Let's say that we want to visualize four series in a graph panel, such as all combinations of columns `valueOne`, `valueTwo` and `measurement`. Graph panel to the right visualizes what we want to achieve. To solve this, you need to use two queries:
|
||||
|
||||
**First query:**
|
||||
|
||||
@@ -465,14 +451,13 @@ GROUP BY
|
||||
ORDER BY 1
|
||||
```
|
||||
|
||||
#### Stored procedure using time in epoch format
|
||||
### Stored procedure with epoch time format
|
||||
|
||||
We can define a stored procedure that will return all data we need to render 4 series in a graph panel like above.
|
||||
In this case the stored procedure accepts two parameters `@from` and `@to` of `int` data types which should be a timerange (from-to) in epoch format
|
||||
which will be used to filter the data to return from the stored procedure.
|
||||
You can define a stored procedure to return all the data needed to render multiple series (for example, 4) in a graph panel.
|
||||
|
||||
We're mimicking the `$__timeGroup(time, '5m')` in the select and group by expressions, and that's why there are a lot of lengthy expressions needed -
|
||||
these could be extracted to MS SQL functions, if wanted.
|
||||
In the following example, the stored procedure accepts two parameters, `@from` and `@to`, both of type `int`. These parameters represent a time range (from–to) in epoch time format and are used to filter the results returned by the procedure.
|
||||
|
||||
The query inside the procedure simulates the behavior of `$__timeGroup(time, '5m')` by grouping timestamps into 5-minute intervals. While the expressions for time grouping are somewhat verbose, they can be extracted into reusable SQL Server functions to simplify the procedure.
|
||||
|
||||
```sql
|
||||
CREATE PROCEDURE sp_test_epoch(
|
||||
@@ -507,7 +492,7 @@ BEGIN
|
||||
END
|
||||
```
|
||||
|
||||
Then we can use the following query for our graph panel.
|
||||
Then, in your graph panel, you can use the following query to call the stored procedure with the time range dynamically populated by Grafana:
|
||||
|
||||
```sql
|
||||
DECLARE
|
||||
@@ -517,14 +502,15 @@ DECLARE
|
||||
EXEC dbo.sp_test_epoch @from, @to
|
||||
```
|
||||
|
||||
#### Stored procedure using time in datetime format
|
||||
This uses Grafana built-in macros to convert the selected time range into epoch time ($**unixEpochFrom() and $**unixEpochTo()), which are passed to the stored procedure as input parameters.
|
||||
|
||||
We can define a stored procedure that will return all data we need to render 4 series in a graph panel like above.
|
||||
In this case the stored procedure accepts two parameters `@from` and `@to` of `datetime` data types which should be a timerange (from-to)
|
||||
which will be used to filter the data to return from the stored procedure.
|
||||
### Stored procedure with `datetime` format
|
||||
|
||||
We're mimicking the `$__timeGroup(time, '5m')` in the select and group by expressions and that's why there's a lot of lengthy expressions needed -
|
||||
these could be extracted to MS SQL functions, if wanted.
|
||||
You can define a stored procedure to return all the data needed to render four series in a graph panel.
|
||||
|
||||
In the following example, the stored procedure accepts two parameters, `@from` and `@to`, of the type `datetime`. These parameters represent the selected time range and are used to filter the returned data.
|
||||
|
||||
The query within the procedure mimics the behavior of `$__timeGroup(time, '5m')` by grouping data into 5-minute intervals. These expressions can be verbose, but you may extract them into reusable SQL Server functions for improved readability and maintainability.
|
||||
|
||||
```sql
|
||||
CREATE PROCEDURE sp_test_datetime(
|
||||
@@ -560,7 +546,7 @@ END
|
||||
|
||||
```
|
||||
|
||||
Then we can use the following query for our graph panel.
|
||||
To call this stored procedure from a graph panel, use the following query with Grafana built-in macros to populate the time range dynamically:
|
||||
|
||||
```sql
|
||||
DECLARE
|
||||
|
||||
@@ -40,50 +40,60 @@ refs:
|
||||
# Microsoft SQL Server template variables
|
||||
|
||||
Instead of hard-coding details such as server, application, and sensor names in metric queries, you can use variables.
|
||||
Grafana lists these variables in dropdown select boxes at the top of the dashboard to help you change the data displayed in your dashboard.
|
||||
Grafana refers to such variables as template variables.
|
||||
Grafana displays these variables in drop-down select boxes at the top of the dashboard to help you change the data displayed in your dashboard.
|
||||
Grafana refers to such variables as **template variables**.
|
||||
|
||||
For an introduction to templating and template variables, refer to the [Templating](ref:variables) and [Add and manage variables](ref:add-template-variables) documentation.
|
||||
For general information on using variables in Grafana, refer to [Add variables](ref:add-template-variables).
|
||||
|
||||
For an introduction to templating and template variables, refer to [Templating](ref:variables) and [Add and manage variables](ref:add-template-variables).
|
||||
|
||||
## Query variable
|
||||
|
||||
If you add a template variable of the type `Query`, you can write a MS SQL query that can
|
||||
return things like measurement names, key names or key values that are shown as a dropdown select box.
|
||||
A query variable in Grafana dynamically retrieves values from your data source using a query. With a query variable, you can write a SQL query that returns values such as measurement names, key names, or key values that are shown in a drop-down select box.
|
||||
|
||||
For example, you can have a variable that contains all values for the `hostname` column in a table if you specify a query like this in the templating variable **Query** setting.
|
||||
For example, the following query returns all values from the `hostname` column:
|
||||
|
||||
```sql
|
||||
SELECT hostname FROM host
|
||||
```
|
||||
|
||||
A query can return multiple columns and Grafana will automatically create a list from them. For example, the query below will return a list with values from `hostname` and `hostname2`.
|
||||
A query can return multiple columns, and Grafana automatically generates a list using the values from those columns. For example, the following query returns values from both the `hostname` and `hostname2` columns, which are included in the variable's drop-down list.
|
||||
|
||||
```sql
|
||||
SELECT [host].[hostname], [other_host].[hostname2] FROM host JOIN other_host ON [host].[city] = [other_host].[city]
|
||||
```
|
||||
|
||||
Another option is a query that can create a key/value variable. The query should return two columns that are named `__text` and `__value`. The `__text` column value should be unique (if it is not unique then the first value is used). The options in the dropdown will have a text and value that allow you to have a friendly name as text and an id as the value. An example query with `hostname` as the text and `id` as the value:
|
||||
You can also create a key/value variable using a query that returns two columns named `__text` and `__value`.
|
||||
|
||||
- The `__text` column defines the label shown in the drop-down.
|
||||
|
||||
- The `__value` column defines the value passed to panel queries.
|
||||
|
||||
This is useful when you want to display a user-friendly label (like a hostname) but use a different underlying value (like an ID).
|
||||
|
||||
Note that the values in the `_text` column should be unique. If there are duplicates, Grafana uses only the first matching entry.
|
||||
|
||||
```sql
|
||||
SELECT hostname __text, id __value FROM host
|
||||
```
|
||||
|
||||
You can also create nested variables. For example, if you had another variable named `region`. Then you could have
|
||||
the hosts variable only show hosts from the current selected region with a query like this (if `region` is a multi-value variable, then use the `IN` comparison operator rather than `=` to match against multiple values):
|
||||
You can also create nested variables, where one variable depends on the value of another. For example, if you have a variable named `region`, you can configure a `hosts` variable to only show hosts from the selected region. If `region` is a multi-value variable, use the `IN` operator instead of `=` to match against multiple selected values.
|
||||
|
||||
```sql
|
||||
SELECT hostname FROM host WHERE region IN ($region)
|
||||
```
|
||||
|
||||
## Using variables in queries
|
||||
## Use variables in queries
|
||||
|
||||
> Template variable values are only quoted when the template variable is a `multi-value`.
|
||||
Grafana automatically quotes template variable values only when the template variable is a `multi-value`.
|
||||
|
||||
If the variable is a multi-value variable then use the `IN` comparison operator rather than `=` to match against multiple values.
|
||||
When using a multi-value variable, use the `IN` comparison operator instead of `=` to match against multiple values.
|
||||
|
||||
There are two syntaxes:
|
||||
Grafana supports two syntaxes for using variables in queries:
|
||||
|
||||
`$<varname>` Example with a template variable named `hostname`:
|
||||
- **`$<varname>` syntax**
|
||||
|
||||
Example with a template variable named `hostname`:
|
||||
|
||||
```sql
|
||||
SELECT
|
||||
@@ -94,7 +104,9 @@ WHERE $__timeFilter(atimestamp) and hostname in($hostname)
|
||||
ORDER BY atimestamp
|
||||
```
|
||||
|
||||
`[[varname]]` Example with a template variable named `hostname`:
|
||||
- **`[[varname]]` syntax**
|
||||
|
||||
Example with a template variable named `hostname`:
|
||||
|
||||
```sql
|
||||
SELECT
|
||||
@@ -105,10 +117,14 @@ WHERE $__timeFilter(atimestamp) and hostname in([[hostname]])
|
||||
ORDER BY atimestamp
|
||||
```
|
||||
|
||||
### Disabling Quoting for Multi-value Variables
|
||||
### Disable quoting for multi-value variables
|
||||
|
||||
Grafana automatically creates a quoted, comma-separated string for multi-value variables. For example: if `server01` and `server02` are selected then it will be formatted as: `'server01', 'server02'`. To disable quoting, use the csv formatting option for variables:
|
||||
By default, Grafana formats multi-value variables as a quoted, comma-separated string. For example, if `server01` and `server02` are selected, the result will be `'server01'`, `'server02'`. To disable quoting, use the `csv` formatting option for variables:
|
||||
|
||||
`${servers:csv}`
|
||||
```text
|
||||
${servers:csv}
|
||||
```
|
||||
|
||||
Read more about variable formatting options in the [Variables](ref:variable-syntax-advanced-variable-format-options) documentation.
|
||||
This outputs the values as an unquoted comma-separated list.
|
||||
|
||||
Refer to [Advanced variable format options](ref:variable-syntax-advanced-variable-format-options) for additional information.
|
||||
|
||||
@@ -2,10 +2,11 @@
|
||||
aliases:
|
||||
- ../data-sources/mysql/
|
||||
- ../features/datasources/mysql/
|
||||
description: introduction to the MySQL data source in Grafana
|
||||
description: Introduction to the MySQL data source in Grafana
|
||||
keywords:
|
||||
- grafana
|
||||
- mysql
|
||||
- data source
|
||||
- guide
|
||||
labels:
|
||||
products:
|
||||
@@ -45,7 +46,7 @@ refs:
|
||||
|
||||
# MySQL data source
|
||||
|
||||
Grafana ships with a built-in MySQL data source plugin that allows you to query and visualize data from a MySQL-compatible database like MariaDB or Percona Server. You don't need to install a plugin in order to add the MySQL data source to your Grafana instance.
|
||||
Grafana ships with a built-in MySQL data source plugin that allows you to query and visualize data from a MySQL-compatible database like [MariaDB](https://mariadb.org/) or [Percona Server](https://www.percona.com/). You don't need to install a plugin in order to add the MySQL data source to your Grafana instance.
|
||||
|
||||
Grafana offers several configuration options for this data source as well as a visual and code-based query editor.
|
||||
|
||||
|
||||
@@ -45,10 +45,14 @@ This document provides instructions for configuring the MySQL data source and ex
|
||||
You must have the `Organization administrator` role in order to configure the MySQL data source.
|
||||
Administrators can also [configure the data source via YAML](#provision-the-data-source) with Grafana's provisioning system.
|
||||
|
||||
Grafana ships with the MySQL plugin, so no additional installation is required.
|
||||
|
||||
{{< admonition type="note" >}}
|
||||
When adding a data source, ensure the database user you specify has only `SELECT` permissions on the relevant database and tables. Grafana does not validate the safety of queries, which means they can include potentially harmful SQL statements, such as `USE otherdb;` or `DROP TABLE user;`, which could get executed. To minimize this risk, Grafana strongly recommends creating a dedicated MySQL user with restricted permissions.
|
||||
Grafana ships with the MySQL data source by default, so no additional installation is required.
|
||||
{{< /admonition >}}
|
||||
|
||||
{{< admonition type="caution" >}}
|
||||
When adding a data source, ensure the database user you specify has only `SELECT` permissions on the relevant database and tables. Grafana does not validate the safety of queries, which means they can include potentially harmful SQL statements, such as `USE otherdb;` or `DROP TABLE user;`, which could get executed.
|
||||
|
||||
To minimize this risk, Grafana strongly recommends creating a dedicated MySQL user with restricted permissions.
|
||||
{{< /admonition >}}
|
||||
|
||||
Example:
|
||||
@@ -81,7 +85,7 @@ Following is a list of MySQL configuration options:
|
||||
|
||||
**Connection:**
|
||||
|
||||
- **Host URL** - Enter the IP address/hostname and optional port of your MySQL instance. If the port is omitted the default 3306 port will be used.
|
||||
- **Host URL** - Enter the IP address/hostname and optional port of your MySQL instance. If the port is omitted the default `3306` port will be used.
|
||||
- **Database** - Enter the name of your MySQL database.
|
||||
|
||||
**Authentication:**
|
||||
|
||||
@@ -58,6 +58,9 @@ refs:
|
||||
destination: /docs/grafana/<GRAFANA_VERSION>/alerting/alerting-rules/templates/
|
||||
- pattern: /docs/grafana-cloud/
|
||||
destination: /docs/grafana-cloud/alerting-and-irm/alerting/alerting-rules/templates/
|
||||
configure-standard-options:
|
||||
- pattern: /docs/grafana/
|
||||
- destination: /docs/grafana/<GRAFANA_VERSION>/panels-visualizations/configure-standard-options/
|
||||
---
|
||||
|
||||
# MySQL query editor
|
||||
@@ -129,26 +132,26 @@ Changes made to a query in Code mode will not transfer to Builder mode and will
|
||||
|
||||
You can add macros to your queries to simplify the syntax and enable dynamic elements, such as date range filters.
|
||||
|
||||
| Macro example | Description |
|
||||
| ----------------------------------------------------- | ------------------------------------------------------------------------------------------------------------------------------------------------------------------------------------------------------------------------- |
|
||||
| `$__time(dateColumn)` | Replaces the value with an expression to convert to a UNIX timestamp and renames the column to `time_sec`. Example: _UNIX_TIMESTAMP(dateColumn) AS time_sec_. |
|
||||
| `$__timeEpoch(dateColumn)` | Replaces the value with an expression to convert to a UNIX Epoch timestamp and renames the column to `time_sec`. Example: _UNIX_TIMESTAMP(dateColumn) AS time_sec_. |
|
||||
| `$__timeFilter(dateColumn)` | Replaces the value a time range filter using the specified column name. Example: _dateColumn BETWEEN FROM_UNIXTIME(1494410783) AND FROM_UNIXTIME(1494410983)_ |
|
||||
| `$__timeFrom()` | Replaces the value with the start of the currently active time selection. Example: _FROM_UNIXTIME(1494410783)_ |
|
||||
| `$__timeTo()` | Replaces the value with the end of the currently active time selection. Example: _FROM_UNIXTIME(1494410983)_ |
|
||||
| `$__timeGroup(dateColumn,'5m')` | Replaces the value with an expression suitable for use in a GROUP BY clause. Example: *cast(cast(UNIX_TIMESTAMP(dateColumn)/(300) as signed)*300 as signed),\* |
|
||||
| `$__timeGroup(dateColumn,'5m', 0)` | Same as the `$__timeGroup(dateColumn,'5m')` macro, but includes a fill parameter to ensure missing points in the series are added by Grafana, using 0 as the default value. **This applies only to time series queries.** |
|
||||
| `$__timeGroup(dateColumn,'5m', NULL)` | Same as the `$__timeGroup(dateColumn,'5m', 0)` but NULL is used as the value for missing points. **This applies only to time series queries.** |
|
||||
| `$__timeGroup(dateColumn,'5m', previous)` | Same as the `$__timeGroup(dateColumn,'5m', previous)` macro, but uses the previous value in the series as the fill value. If no previous value exists,`NULL` will be used. **This applies only to time series queries.** |
|
||||
| `$__timeGroupAlias(dateColumn,'5m')` | Replaces the value identical to $\_\_timeGroup but with an added column alias. |
|
||||
| `$__unixEpochFilter(dateColumn)` | Replaces the value by a time range filter using the specified column name with times represented as a UNIX timestamp. Example: _dateColumn > 1494410783 AND dateColumn < 1494497183_ |
|
||||
| `$__unixEpochFrom()` | Replaces the value with the start of the currently active time selection as a UNIX timestamp. Example: _1494410783_ |
|
||||
| `$__unixEpochTo()` | Replaces the value with the end of the currently active time selection as UNIX timestamp. Example: _1494497183_ |
|
||||
| `$__unixEpochNanoFilter(dateColumn)` | Replaces the value with a time range filter using the specified column name with time represented as a nanosecond timestamp. Example: _dateColumn > 1494410783152415214 AND dateColumn < 1494497183142514872_ |
|
||||
| `$__unixEpochNanoFrom()` | Replaces the value with the start of the currently active time selection as nanosecond timestamp. Example: _1494410783152415214_ |
|
||||
| `$__unixEpochNanoTo()` | Replaces the value with the end of the currently active time selection as nanosecond timestamp. Example: _1494497183142514872_ |
|
||||
| `$__unixEpochGroup(dateColumn,'5m', [fillmode])` | Same as $\_\_timeGroup but for times stored as Unix timestamp. **Note that `fillMode` only works with time series queries.** |
|
||||
| `$__unixEpochGroupAlias(dateColumn,'5m', [fillmode])` | Same as $\_\_timeGroup but also adds a column alias. **Note that `fillMode` only works with time series queries.** |
|
||||
| Macro example | Description |
|
||||
| ----------------------------------------------------- | ---------------------------------------------------------------------------------------------------------------------------------------------------------------------------------------------------------------------------------------------- |
|
||||
| `$__time(dateColumn)` | Replaces the value with an expression to convert to a UNIX timestamp and renames the column to `time_sec`. It also helps to recognize the `time` column, as required in Time Series format. Example: _UNIX_TIMESTAMP(dateColumn) AS time_sec_. |
|
||||
| `$__timeEpoch(dateColumn)` | Replaces the value with an expression to convert to a UNIX Epoch timestamp and renames the column to `time_sec`. Example: _UNIX_TIMESTAMP(dateColumn) AS time_sec_. |
|
||||
| `$__timeFilter(dateColumn)` | Applies a time range filter using the specified column name and fetches only the data that falls within that range. Example: _dateColumn BETWEEN FROM_UNIXTIME(1494410783) AND FROM_UNIXTIME(1494410983)_ |
|
||||
| `$__timeFrom()` | Replaces the value with the start of the currently active time selection. Example: _FROM_UNIXTIME(1494410783)_ |
|
||||
| `$__timeTo()` | Replaces the value with the end of the currently active time selection. Example: _FROM_UNIXTIME(1494410983)_ |
|
||||
| `$__timeGroup(dateColumn,'5m')` | Replaces the value with an expression suitable for use in a GROUP BY clause and creates the bucket timestamps at a fixed interval. Example: *cast(cast(UNIX_TIMESTAMP(dateColumn)/(300) as signed)*300 as signed),\* |
|
||||
| `$__timeGroup(dateColumn,'5m', 0)` | Same as the `$__timeGroup(dateColumn,'5m')` macro, but includes a fill parameter to ensure missing points in the series are added by Grafana, using 0 as the default value. **This applies only to time series queries.** |
|
||||
| `$__timeGroup(dateColumn,'5m', NULL)` | Same as the `$__timeGroup(dateColumn,'5m', 0)` but NULL is used as the value for missing points. **This applies only to time series queries.** |
|
||||
| `$__timeGroup(dateColumn,'5m', previous)` | Same as the `$__timeGroup(dateColumn,'5m', previous)` macro, but uses the previous value in the series as the fill value. If no previous value exists,`NULL` will be used. **This applies only to time series queries.** |
|
||||
| `$__timeGroupAlias(dateColumn,'5m')` | Replaces the value identical to $\_\_timeGroup but with an added column alias. |
|
||||
| `$__unixEpochFilter(dateColumn)` | Replaces the value by a time range filter using the specified column name with times represented as a UNIX timestamp. Example: _dateColumn > 1494410783 AND dateColumn < 1494497183_ |
|
||||
| `$__unixEpochFrom()` | Replaces the value with the start of the currently active time selection as a UNIX timestamp. Example: _1494410783_ |
|
||||
| `$__unixEpochTo()` | Replaces the value with the end of the currently active time selection as UNIX timestamp. Example: _1494497183_ |
|
||||
| `$__unixEpochNanoFilter(dateColumn)` | Replaces the value with a time range filter using the specified column name with time represented as a nanosecond timestamp. Example: _dateColumn > 1494410783152415214 AND dateColumn < 1494497183142514872_ |
|
||||
| `$__unixEpochNanoFrom()` | Replaces the value with the start of the currently active time selection as nanosecond timestamp. Example: _1494410783152415214_ |
|
||||
| `$__unixEpochNanoTo()` | Replaces the value with the end of the currently active time selection as nanosecond timestamp. Example: _1494497183142514872_ |
|
||||
| `$__unixEpochGroup(dateColumn,'5m', [fillmode])` | Same as $\_\_timeGroup but for times stored as Unix timestamp. **Note that `fillMode` only works with time series queries.** |
|
||||
| `$__unixEpochGroupAlias(dateColumn,'5m', [fillmode])` | Same as $\_\_timeGroup but also adds a column alias. **Note that `fillMode` only works with time series queries.** |
|
||||
|
||||
## Table SQL queries
|
||||
|
||||
@@ -184,106 +187,127 @@ The examples in this section refer to the data in the following table:
|
||||
+---------------------+--------------+---------------------+----------+
|
||||
| time_date_time | value_double | CreatedAt | hostname |
|
||||
+---------------------+--------------+---------------------+----------+
|
||||
| 2020-01-02 03:05:00 | 3.0 | 2020-01-02 03:05:00 | 10.0.1.1 |
|
||||
| 2020-01-02 03:06:00 | 4.0 | 2020-01-02 03:06:00 | 10.0.1.2 |
|
||||
| 2020-01-02 03:10:00 | 6.0 | 2020-01-02 03:10:00 | 10.0.1.1 |
|
||||
| 2020-01-02 03:11:00 | 7.0 | 2020-01-02 03:11:00 | 10.0.1.2 |
|
||||
| 2020-01-02 03:20:00 | 5.0 | 2020-01-02 03:20:00 | 10.0.1.2 |
|
||||
| 2025-01-02 03:05:00 | 3.0 | 2025-01-02 03:05:00 | 10.0.1.1 |
|
||||
| 2025-01-02 03:06:00 | 4.0 | 2025-01-02 03:06:00 | 10.0.1.2 |
|
||||
| 2025-01-02 03:10:00 | 6.0 | 2025-01-02 03:10:00 | 10.0.1.1 |
|
||||
| 2025-01-02 03:11:00 | 7.0 | 2025-01-02 03:11:00 | 10.0.1.2 |
|
||||
| 2025-01-02 03:20:00 | 5.0 | 2025-01-02 03:20:00 | 10.0.1.2 |
|
||||
+---------------------+--------------+---------------------+----------+
|
||||
```
|
||||
|
||||
A time series query result is returned in a [wide data frame format](https://grafana.com/developers/plugin-tools/key-concepts/data-frames#wide-format). Any column except time or of type string transforms into value fields in the data frame query result. Any string column transforms into field labels in the data frame query result.
|
||||
|
||||
{{< admonition type="note" >}}
|
||||
For backward compatibility, an exception to the aforementioned rule applies to queries returning three columns, including a string column named `metric`. Instead of converting the metric column into field labels, it is used as the field name, and the series name is set to the value of the metric column. Refer to the following example with a metric column.
|
||||
{{< /admonition >}}
|
||||
|
||||
**Example with `metric` column:**
|
||||
**Example with `$__time(dateColumn)` Macro:**
|
||||
|
||||
```sql
|
||||
SELECT
|
||||
$__time(time_date_time),
|
||||
value_double
|
||||
FROM my_data
|
||||
ORDER BY time_date_time
|
||||
```
|
||||
|
||||
Table panel result:
|
||||
|
||||
{{< figure alt="output of time macro" src="/media/docs/grafana/data-sources/mysql/screenshot-time-and-timefilter-macro.png" >}}
|
||||
|
||||
In the following example, the result includes two columns, `Time` and `value_double`, which represent the data associated with fixed timestamps. This query does not apply a time range filter and returns all rows from the table.
|
||||
|
||||
**Example with `$__timeFilter(dateColumn)` Macro:**
|
||||
|
||||
```sql
|
||||
SELECT
|
||||
$__time(time_date_time),
|
||||
value_double
|
||||
FROM my_data
|
||||
WHERE $__timeFilter(time_date_time)
|
||||
ORDER BY time_date_time
|
||||
```
|
||||
|
||||
Table panel result:
|
||||
|
||||
{{< figure alt="output of time filter macro" src="/media/docs/grafana/data-sources/mysql/screenshot-time-and-timefilter-macro.png" >}}
|
||||
|
||||
This example returns the same result as the previous one, but adds support for filtering data using the Grafana time picker.
|
||||
|
||||
**Example with `$__timeGroup(dateColumn,'5m')` Macro:**
|
||||
|
||||
```sql
|
||||
SELECT
|
||||
$__timeGroup(time_date_time, '5m') AS time,
|
||||
sum(value_double) AS sum_value
|
||||
FROM my_data
|
||||
WHERE $__timeFilter(time_date_time)
|
||||
GROUP BY time
|
||||
ORDER BY time
|
||||
```
|
||||
|
||||
Table panel result:
|
||||
|
||||
{{< figure alt="output of time group macro" src="/media/docs/grafana/data-sources/mysql/screenshot-timegroup-macro.png" >}}
|
||||
|
||||
Given the result in the following example, the data is grouped and aggregated within buckets with timestamps of fixed interval i.e. 5 mins. To customize the default series name formatting (optional), refer to [Standard options definitions](ref:configure-standard-options).
|
||||
|
||||
**Example with `$__timeGroupAlias(dateColumn,'5m')` Macro:**
|
||||
|
||||
```sql
|
||||
SELECT
|
||||
$__timeGroupAlias(time_date_time,'5m'),
|
||||
min(value_double),
|
||||
'min' as metric
|
||||
FROM test_data
|
||||
FROM my_data
|
||||
WHERE $__timeFilter(time_date_time)
|
||||
GROUP BY time
|
||||
ORDER BY time
|
||||
```
|
||||
|
||||
Data frame result:
|
||||
Table panel result:
|
||||
|
||||
```text
|
||||
+---------------------+-----------------+
|
||||
| Name: time | Name: min |
|
||||
| Labels: | Labels: |
|
||||
| Type: []time.Time | Type: []float64 |
|
||||
+---------------------+-----------------+
|
||||
| 2020-01-02 03:05:00 | 3 |
|
||||
| 2020-01-02 03:10:00 | 6 |
|
||||
| 2020-01-02 03:20:00 | 5 |
|
||||
+---------------------+-----------------+
|
||||
```
|
||||
{{< figure alt="output of time group alias macro" src="/media/docs/grafana/data-sources/mysql/screenshot-timeGroupAlias-macro.png" >}}
|
||||
|
||||
To customize the default series name formatting (optional), refer to [Standard options definitions](ref:configure-standard-options-display-name).
|
||||
The following result is similar to the result of the `$__timeGroup(dateColumn,'5m')` macro, except it uses a built-in alias for the time column.
|
||||
To customize the default series name formatting (optional), refer to [Standard options definitions](ref:configure-standard-options).
|
||||
|
||||
**Example using the fill parameter in the $\_\_timeGroupAlias macro to convert null values to be zero instead:**
|
||||
**Example with `$__timeGroupAlias` Macro to convert null values to zero instead:**
|
||||
|
||||
```sql
|
||||
SELECT
|
||||
$__timeGroupAlias(createdAt,'5m',0),
|
||||
sum(value_double) as value,
|
||||
hostname
|
||||
FROM test_data
|
||||
FROM my_data
|
||||
WHERE
|
||||
$__timeFilter(createdAt)
|
||||
GROUP BY time, hostname
|
||||
ORDER BY time
|
||||
```
|
||||
|
||||
Given the data frame result in the following example and using the graph panel, you will get two series named _value 10.0.1.1_ and _value 10.0.1.2_. To render the series with a name of _10.0.1.1_ and _10.0.1.2_ , use a [Standard options definitions](ref:configure-standard-options-display-name) display value of `${__field.labels.hostname}`.
|
||||
Table panel result:
|
||||
|
||||
Data frame result:
|
||||
{{< figure alt="output of null values to zero case, for time group alias macro" src="/media/docs/grafana/data-sources/mysql/screenshot-timeGroupAlias-macro-conv-null-to-zero.png" >}}
|
||||
|
||||
```text
|
||||
+---------------------+---------------------------+---------------------------+
|
||||
| Name: time | Name: value | Name: value |
|
||||
| Labels: | Labels: hostname=10.0.1.1 | Labels: hostname=10.0.1.2 |
|
||||
| Type: []time.Time | Type: []float64 | Type: []float64 |
|
||||
+---------------------+---------------------------+---------------------------+
|
||||
| 2020-01-02 03:05:00 | 3 | 4 |
|
||||
| 2020-01-02 03:10:00 | 6 | 7 |
|
||||
| 2020-01-02 03:15:00 | 0 | 0 |
|
||||
| 2020-01-02 03:20:00 | 0 | 5 |
|
||||
+---------------------+---------------------------+---------------------------+
|
||||
```
|
||||
Given the result in the following example, null values within bucket timestamps are replaced by zero and also add the `Time` column alias by default. To customize the default series name formatting (optional), refer to [Standard options definitions](ref:configure-standard-options) to display the value of `${__field.labels.hostname}`.
|
||||
|
||||
**Example with multiple columns:**
|
||||
**Example with multiple columns for `$__timeGroupAlias(dateColumn,'5m')` Macro:**
|
||||
|
||||
```sql
|
||||
SELECT
|
||||
$__timeGroupAlias(time_date_time,'5m'),
|
||||
min(value_double) as min_value,
|
||||
max(value_double) as max_value
|
||||
FROM test_data
|
||||
FROM my_data
|
||||
WHERE $__timeFilter(time_date_time)
|
||||
GROUP BY time
|
||||
ORDER BY time
|
||||
```
|
||||
|
||||
Data frame result:
|
||||
Table panel result:
|
||||
|
||||
```text
|
||||
+---------------------+-----------------+-----------------+
|
||||
| Name: time | Name: min_value | Name: max_value |
|
||||
| Labels: | Labels: | Labels: |
|
||||
| Type: []time.Time | Type: []float64 | Type: []float64 |
|
||||
+---------------------+-----------------+-----------------+
|
||||
| 2020-01-02 03:05:00 | 3 | 4 |
|
||||
| 2020-01-02 03:10:00 | 6 | 7 |
|
||||
| 2020-01-02 03:20:00 | 5 | 5 |
|
||||
+---------------------+-----------------+-----------------+
|
||||
```
|
||||
{{< figure alt="output with multiple colummns for time group alias macro" src="/media/docs/grafana/data-sources/mysql/screenshot-timeGroupAlias-macro-multiple-columns.png" >}}
|
||||
|
||||
The query returns multiple columns representing minimum and maximum values within the defined range.
|
||||
|
||||
## Templating
|
||||
|
||||
@@ -396,6 +420,21 @@ WHERE
|
||||
$__unixEpochFilter(epoch_time)
|
||||
```
|
||||
|
||||
You may use one or more tags to show them as annotations in a common-separate string.
|
||||
|
||||
**Example query using a `time` column with epoch values for a single tag:**
|
||||
|
||||
```sql
|
||||
SELECT
|
||||
epoch_time as time,
|
||||
metric1 as text,
|
||||
tag1 as tag
|
||||
FROM
|
||||
my_data
|
||||
WHERE
|
||||
$__unixEpochFilter(epoch_time)
|
||||
```
|
||||
|
||||
**Example region query using `time` and `timeend` columns with epoch values:**
|
||||
|
||||
```sql
|
||||
|
||||
@@ -9,7 +9,7 @@ labels:
|
||||
- cloud
|
||||
- enterprise
|
||||
- oss
|
||||
menuTitle: Configure the PostgreSQL data source
|
||||
menuTitle: Configure
|
||||
title: Configure the PostgreSQL data source
|
||||
weight: 10
|
||||
refs:
|
||||
@@ -51,10 +51,14 @@ This document provides instructions for configuring the PostgreSQL data source a
|
||||
|
||||
## Before you begin
|
||||
|
||||
You must have the `Organization administrator` role to configure the Postgres data source.
|
||||
Organization administrators can also [configure the data source via YAML](#provision-the-data-source) with the Grafana provisioning system.
|
||||
- You must have the `Organization administrator` role to configure the Postgres data source.
|
||||
Organization administrators can also [configure the data source via YAML](#provision-the-data-source) with the Grafana provisioning system.
|
||||
|
||||
Grafana comes with a built-in PostgreSQL data source plugin, eliminating the need to install a plugin.
|
||||
- Grafana comes with a built-in PostgreSQL data source plugin, eliminating the need to install a plugin.
|
||||
|
||||
- Familiarize yourself with your PostgreSQL security configuration and gather any necessary security certificates, client certificates, and client keys.
|
||||
|
||||
- Know which version of PostgreSQL you are running. You will be prompted for this information during the configuration process.
|
||||
|
||||
{{< admonition type="note" >}}
|
||||
When adding a data source, the database user you specify should have only `SELECT` permissions on the relevant database and tables. Grafana does not validate the safety of queries, which means they can include potentially harmful SQL statements, such as `USE otherdb;` or `DROP TABLE user;`, that could be executed. To mitigate this risk, Grafana strongly recommends creating a dedicated PostgreSQL user with restricted permissions.
|
||||
@@ -84,56 +88,76 @@ You are taken to the **Settings** tab where you will configure the data source.
|
||||
|
||||
Following is a list of PostgreSQL configuration options:
|
||||
|
||||
- **Name** - Sets the name you use to refer to the data source in panels and queries. Examples: `PostgreSQL-DB-1`.
|
||||
- **Default** - Toggle to set this specific PostgreSQL data source as the default pre-selected data source in panels and visualizations.
|
||||
| Setting | Description |
|
||||
| ------- | ------------------------------------------------------------------------------------------------------------------------ |
|
||||
| Name | Sets the name you use to refer to the data source in panels and queries. Examples: `PostgreSQL-DB-1`. |
|
||||
| Default | Toggle to set this specific PostgreSQL data source as the default pre-selected data source in panels and visualizations. |
|
||||
|
||||
**Connection section:**
|
||||
|
||||
- **Host URL** - The IP address/hostname and optional port of your PostgreSQL instance.
|
||||
- **Database name** - The name of your PostgreSQL database.
|
||||
| Setting | Description |
|
||||
| ------------- | ---------------------------------------------------------------------- |
|
||||
| Host URL | The IP address/hostname and optional port of your PostgreSQL instance. |
|
||||
| Database name | The name of your PostgreSQL database. |
|
||||
|
||||
**Authentication section:**
|
||||
|
||||
- **Username** - Enter the username used to connect to your PostgreSQL database.
|
||||
- **Password** - Enter the password used to connect to the PostgreSQL database.
|
||||
- **TLS/SSL Mode** - Determines whether or with what priority a secure SSL TCP/IP connection will be negotiated with the server. When **TLS/SSL Mode** is disabled, **TLS/SSL Method** and **TLS/SSL Auth Details** aren't visible options.
|
||||
- **TLS/SSL Method** - Determines how TLS/SSL certificates are configured.
|
||||
- **File system path** - This option allows you to configure certificates by specifying paths to existing certificates on the local file system where Grafana is running. Ensure this file is readable by the user executing the Grafana process.
|
||||
- **Certificate content** - This option allows you to configure certificate by specifying their content. The content is stored and encrypted in the Grafana database. When connecting to the database, the certificates are saved as files, on the local filesystem, in the Grafana data path.
|
||||
| Setting | Description |
|
||||
| --------------------- | ------------------------------------------------------------------------------------------------------------------------------------------------------------------------------------------------------------------------------------------------------------------ |
|
||||
| Username | Enter the username used to connect to your PostgreSQL database. |
|
||||
| Password | Enter the password used to connect to the PostgreSQL database. |
|
||||
| TLS/SSL Mode | Determines whether or with what priority a secure SSL TCP/IP connection will be negotiated with the server. When TLS/SSL Mode is disabled, TLS/SSL Method and TLS/SSL Auth Details aren’t visible options. |
|
||||
| TLS/SSL Method | Determines how TLS/SSL certificates are configured. |
|
||||
| - File system path | This option allows you to configure certificates by specifying paths to existing certificates on the local file system where Grafana is running. Ensure this file is readable by the user executing the Grafana process. |
|
||||
| - Certificate content | This option allows you to configure certificate by specifying their content. The content is stored and encrypted in the Grafana database. When connecting to the database, the certificates are saved as files, on the local filesystem, in the Grafana data path. |
|
||||
|
||||
**TLS/SSL Auth Details**
|
||||
**TLS/SSL Auth Details:**
|
||||
|
||||
If you select the TLS/SSL Mode options **require**, **verify-ca** or **verify-full** and **file system path** the following are required:
|
||||
|
||||
- **TLS/SSL Root Certificate** - Specify the path to the root certificate file.
|
||||
- **TLS/SSL Client Certificate** - Specify the path to the client certificate and ensure the file is accessible to the user running the Grafana process.
|
||||
- **TLS/SSL Client Key** - Specify the path to the client key file and ensure the file is accessible to the user running the Grafana process.
|
||||
| Setting | Description |
|
||||
| -------------------------- | --------------------------------------------------------------------------------------------------------------------- |
|
||||
| TLS/SSL Root Certificate | Specify the path to the root certificate file. |
|
||||
| TLS/SSL Client Certificate | Specify the path to the client certificate and ensure the file is accessible to the user running the Grafana process. |
|
||||
| TLS/SSL Client Key | Specify the path to the client key file and ensure the file is accessible to the user running the Grafana process. |
|
||||
|
||||
If you select the TLS/SSL Mode option **require** and TLS/SSL Method certificate content the following are required:
|
||||
|
||||
- **TLS/SSL Client Certificate** - Provide the client certificate.
|
||||
- **TLS/SSL Client Key** - Provide the client key.
|
||||
| Setting | Description |
|
||||
| -------------------------- | ------------------------------- |
|
||||
| TLS/SSL Client Certificate | Provide the client certificate. |
|
||||
| TLS/SSL Client Key | Provide the client key. |
|
||||
|
||||
If you select the TLS/SSL Mode options **verify-ca** or **verify-full** with the TLS/SSL Method certificate content the following are required:
|
||||
|
||||
- **TLS/SSL Client Certificate** - Provide the client certificate.
|
||||
- **TLS/SSL Root Certificate** - Provide the root certificate.
|
||||
- **TLS/SSL Client Key** - Provide the client key.
|
||||
| Setting | Description |
|
||||
| -------------------------- | ------------------------------- |
|
||||
| TLS/SSL Client Certificate | Provide the client certificate. |
|
||||
| TLS/SSL Root Certificate | Provide the root certificate. |
|
||||
| TLS/SSL Client Key | Provide the client key. |
|
||||
|
||||
**PostgreSQL Options:**
|
||||
|
||||
- **Version** - Determines which functions are available in the query builder. The default is the current version.
|
||||
- **Min time interval** - Defines a lower limit for the auto group by by time interval. Grafana recommends aligning this setting with the data write frequency. For example, set it to `1m` if your data is written every minute. Refer to [Min time interval](#min-time-interval) for format examples.
|
||||
- **TimescaleDB** - A time-series database built as a PostgreSQL extension. When enabled, Grafana uses `time_bucket` in the `$__timeGroup` macro to display TimescaleDB specific aggregate functions in the query builder. For more information, refer to [TimescaleDB documentation](https://docs.timescale.com/timescaledb/latest/tutorials/grafana/grafana-timescalecloud/#connect-timescaledb-and-grafana).
|
||||
| Setting | Description |
|
||||
| ----------------- | ------------------------------------------------------------------------------------------------------------------------------------------------------------------------------------------------------------------------------------------------------------------------------------------------------------------------------------------------------------------------------------------- |
|
||||
| Version | Determines which functions are available in the query builder. The default is the current version. |
|
||||
| Min time interval | Defines a lower limit for the auto group by time interval. Grafana recommends aligning this setting with the data write frequency. For example, set it to `1m` if your data is written every minute. Refer to [Min time interval](#min-time-interval) for format examples. |
|
||||
| TimescaleDB | A time-series database built as a PostgreSQL extension. When enabled, Grafana uses `time_bucket` in the `$__timeGroup` macro to display TimescaleDB-specific aggregate functions in the query builder. For more information, refer to [TimescaleDB documentation](https://docs.timescale.com/timescaledb/latest/tutorials/grafana/grafana-timescalecloud/#connect-timescaledb-and-grafana). |
|
||||
|
||||
**Connection limits:**
|
||||
|
||||
- **Max open** - The maximum number of open connections to the database. The default `100`.
|
||||
- **Auto max idle** - Toggle to set the maximum number of idle connections to the number of maximum open connections. This setting is toggled on by default.
|
||||
- **Max idle** - The maximum number of connections in the idle connection pool. The default `100`.
|
||||
- **Max lifetime** - The maximum amount of time in seconds a connection may be reused. The default is `14400`, or 4 hours.
|
||||
| Setting | Description |
|
||||
| ------------- | -------------------------------------------------------------------------------------------------------------------------------------- |
|
||||
| Max open | The maximum number of open connections to the database. The default is `100`. |
|
||||
| Auto max idle | Toggle to set the maximum number of idle connections to the number of maximum open connections. This setting is toggled on by default. |
|
||||
| Max idle | The maximum number of connections in the idle connection pool. The default is `100`. |
|
||||
| Max lifetime | The maximum amount of time in seconds a connection may be reused. The default is `14400`, or 4 hours. |
|
||||
|
||||
**Private data source connect** - _Only for Grafana Cloud users._ Private data source connect, or PDC, allows you to establish a private, secured connection between a Grafana Cloud instance, or stack, and data sources secured within a private network. Click the drop-down to locate the URL for PDC. For more information regarding Grafana PDC refer to [Private data source connect (PDC)](https://grafana.com/docs/grafana-cloud/connect-externally-hosted/private-data-source-connect/).
|
||||
**Private data source connect:**
|
||||
|
||||
| Setting | Description |
|
||||
| --------------------------- | ------------------------------------------------------------------------------------------------------------------------------------------------------------------------------------------------------------------------------------------------------------------------------------------------------------------------------------------------------------------------------------------------------------------------------------------- |
|
||||
| Private data source connect | _Only for Grafana Cloud users._ Private data source connect, or PDC, allows you to establish a private, secured connection between a Grafana Cloud instance, or stack, and data sources secured within a private network. Click the drop-down to locate the URL for PDC. For more information, refer to [Private data source connect (PDC)](https://grafana.com/docs/grafana-cloud/connect-externally-hosted/private-data-source-connect/). |
|
||||
|
||||
Click **Manage private data source connect** to be taken to your PDC connection page, where you’ll find your PDC configuration details.
|
||||
|
||||
@@ -191,4 +215,4 @@ datasources:
|
||||
If you encounter metric request errors or other issues:
|
||||
|
||||
- Ensure that the parameters in your data source YAML file precisely match the example provided, including parameter names and the correct use of quotation marks.
|
||||
- Verify that the database name _isn't_ included in the URL.
|
||||
- Verify that the database name **IS NOT** included in the URL.
|
||||
|
||||
@@ -9,7 +9,7 @@ labels:
|
||||
- cloud
|
||||
- enterprise
|
||||
- oss
|
||||
menuTitle: PostgreSQL query editor
|
||||
menuTitle: Query editor
|
||||
title: PostgreSQL query editor
|
||||
weight: 20
|
||||
refs:
|
||||
@@ -17,22 +17,27 @@ refs:
|
||||
- pattern: /docs/grafana/
|
||||
destination: /docs/grafana/<GRAFANA_VERSION>/dashboards/variables/
|
||||
- pattern: /docs/grafana-cloud/
|
||||
destination: /docs/grafana/<GRAFANA_VERSION>/dashboards/variables/
|
||||
destination: /docs/grafana-cloud/visualizations/dashboards/variables/
|
||||
add-template-variables-interval:
|
||||
- pattern: /docs/grafana/
|
||||
destination: /docs/grafana/<GRAFANA_VERSION>/dashboards/variables/add-template-variables/#__interval
|
||||
- pattern: /docs/grafana-cloud/
|
||||
destination: /docs/grafana/<GRAFANA_VERSION>/dashboards/variables/add-template-variables/#__interval
|
||||
destination: /docs/grafana-cloud/visualizations/dashboards/variables/add-template-variables/#__interval
|
||||
explore:
|
||||
- pattern: /docs/grafana/
|
||||
destination: /docs/grafana/<GRAFANA_VERSION>/explore/
|
||||
- pattern: /docs/grafana-cloud/
|
||||
destination: /docs/grafana/<GRAFANA_VERSION>/explore/
|
||||
destination: /docs/grafana-cloud/visualizations/explore/
|
||||
query-transform-data:
|
||||
- pattern: /docs/grafana/
|
||||
destination: /docs/grafana/<GRAFANA_VERSION>/panels-visualizations/query-transform-data/
|
||||
- pattern: /docs/grafana-cloud/
|
||||
destination: /docs/grafana-cloud/visualizations/panels-visualizations/query-transform-data/
|
||||
configure-standard-options-display-name:
|
||||
- pattern: /docs/grafana/
|
||||
destination: /docs/grafana/<GRAFANA_VERSION>/panels-visualizations/configure-standard-options/#display-name
|
||||
- pattern: /docs/grafana-cloud/
|
||||
destination: /docs/grafana-cloud/panels-visualizations/configure-standard-options/#display-name
|
||||
query-editor:
|
||||
- pattern: /docs/grafana/
|
||||
destination: /docs/grafana/<GRAFANA_VERSION>/panels-visualizations/query-transform-data/#query-editors
|
||||
@@ -53,6 +58,11 @@ refs:
|
||||
destination: /docs/grafana/<GRAFANA_VERSION>/dashboards/variables/#templates
|
||||
- pattern: /docs/grafana-cloud/
|
||||
destination: /docs/grafana-cloud/visualizations/dashboards/variables/#templates
|
||||
annotate-visualizations:
|
||||
- pattern: /docs/grafana/
|
||||
destination: /docs/grafana/<GRAFANA_VERSION>/dashboards/build-dashboards/annotate-visualizations/
|
||||
- pattern: /docs/grafana-cloud/
|
||||
destination: /docs/grafana-cloud/visualizations/dashboards/build-dashboards/annotate-visualizations/
|
||||
---
|
||||
|
||||
# PostgreSQL query editor
|
||||
|
||||
@@ -47,7 +47,7 @@ refs:
|
||||
provisioning-data-sources:
|
||||
- pattern: /docs/grafana/
|
||||
destination: /docs/grafana/<GRAFANA_VERSION>/administration/provisioning/#data-sources
|
||||
- pattern: /docs/grafana-cloud/provision
|
||||
- pattern: /docs/grafana-cloud/
|
||||
destination: /docs/grafana/<GRAFANA_VERSION>/administration/provisioning/#data-sources
|
||||
explore:
|
||||
- pattern: /docs/grafana/
|
||||
@@ -81,6 +81,13 @@ Refer to [Provision the data source](#provision-the-data-source) for next steps.
|
||||
|
||||
You can use these procedures to configure a new Tempo data source or to edit an existing one.
|
||||
|
||||
{{< admonition type="note" >}}
|
||||
You can't modify a provisioned data source using the Tempo data source settings in Grafana Cloud.
|
||||
|
||||
If you want to modify any capabilities of a provisioned data source, you can clone the provisioned data source and then edit the new data source in the Grafana UI.
|
||||
Refer to [Clone a provisioned data source for Grafana Cloud](#clone-a-provisioned-data-source-for-grafana-cloud) for more information.
|
||||
{{< /admonition >}}
|
||||
|
||||
### Add a new data source
|
||||
|
||||
Follow these steps to set up a new Tempo data source:
|
||||
@@ -414,3 +421,21 @@ datasources:
|
||||
streamingEnabled:
|
||||
search: true
|
||||
```
|
||||
|
||||
### Clone a provisioned data source for Grafana Cloud
|
||||
|
||||
If you have a data source that is provisioned by a configuration file in Grafana Cloud, you can clone that provisioned data source and then edit the new data source in the Grafana UI.
|
||||
|
||||
For example, let's say you want to edit the **Trace to log**s settings in your Tempo data source that is provisioned on Grafana Cloud.
|
||||
You'd like to enable traceID and spanID but you can't because the data source is provisioned.
|
||||
By cloning the data source, you'd be able to edit these capabilities.
|
||||
|
||||
To clone a provisioned data source, follow these steps:
|
||||
|
||||
1. Create a viewer [Cloud Access Policy token](https://grafana.com/docs/grafana-cloud/security-and-account-management/authentication-and-permissions/access-policies/) in the Grafana Cloud Portal, making sure it has read permissions at least for the data types you are trying to clone.
|
||||
1. [Create a new data source](#add-a-new-data-source) of the same type you want to clone.
|
||||
1. Copy all of the settings from the existing provisioned data source into the new data source while replacing the password with the API key you created.
|
||||
|
||||
The easiest way to do this is to open separate browser windows with the provisioned data source in one and the newly created data source in another.
|
||||
|
||||
Of course, after copying the HTTP and Auth section details, pasting the Cloud Access Policy token into the Password field, and changing any of the other options that you want, you can save and test the data source.
|
||||
|
||||
@@ -14,13 +14,24 @@ labels:
|
||||
- enterprise
|
||||
- oss
|
||||
title: Folder HTTP API
|
||||
refs:
|
||||
apis:
|
||||
- pattern: /docs/grafana/
|
||||
destination: /docs/grafana/<GRAFANA_VERSION>/developers/http_api/apis/
|
||||
- pattern: /docs/grafana-cloud/
|
||||
destination: /docs/grafana-cloud/developer-resources/api-reference/http-api/apis/
|
||||
alerting:
|
||||
- pattern: /docs/grafana/
|
||||
destination: /docs/grafana/<GRAFANA_VERSION>/alerting
|
||||
- pattern: /docs/grafana-cloud/
|
||||
destination: /docs/grafana-cloud/alerting-and-irm/alerting/
|
||||
---
|
||||
|
||||
# New Folders APIs
|
||||
|
||||
> If you are running Grafana Enterprise, for some endpoints you'll need to have specific permissions. Refer to [Role-based access control permissions](/docs/grafana/latest/administration/roles-and-permissions/access-control/custom-role-actions-scopes/) for more information.
|
||||
|
||||
> To view more about the new api structure, refer to [API overview]({{< ref "apis" >}}).
|
||||
> To view more about the new api structure, refer to [API overview](ref:apis).
|
||||
|
||||
### Get all folders
|
||||
|
||||
@@ -28,7 +39,7 @@ title: Folder HTTP API
|
||||
|
||||
Returns all folders that the authenticated user has permission to view within the given organization. Use the `limit` query parameter to control the maximum number of dashboards returned. To retrieve additional dashboards, utilize the `continue` token provided in the response to fetch the next page.
|
||||
|
||||
- namespace: to read more about the namespace to use, see the [API overview]({{< ref "apis" >}}).
|
||||
- namespace: to read more about the namespace to use, see the [API overview](ref:apis).
|
||||
|
||||
**Required permissions**
|
||||
|
||||
@@ -94,7 +105,7 @@ Status Codes:
|
||||
Content-Type: application/json
|
||||
{
|
||||
```
|
||||
|
||||
|
||||
Note the annotation `grafana.app/folder` which contains the uid of the parent folder.
|
||||
|
||||
Status Codes:
|
||||
@@ -156,7 +167,7 @@ Status Codes:
|
||||
- **409** – Conflict (folder with the same uid already exists)
|
||||
|
||||
### Update folder
|
||||
|
||||
|
||||
`PUT /apis/folder.grafana.app/v1beta1/namespaces/:namespace/folders/:uid`
|
||||
|
||||
Updates an existing folder identified by uid.
|
||||
@@ -238,7 +249,7 @@ Status Codes:
|
||||
Accept: application/json
|
||||
Content-Type: application/json
|
||||
Authorization: Bearer eyJrIjoiT0tTcG1pUlY2RnVKZTFVaDFsNFZXdE9ZWmNrMkZYbk
|
||||
|
||||
|
||||
```
|
||||
|
||||
**Example Response**:
|
||||
@@ -328,9 +339,9 @@ Content-Length: 97
|
||||
**Example Response**:
|
||||
|
||||
```http
|
||||
HTTP/1.1 200
|
||||
HTTP/1.1 200
|
||||
Content-Type: application/json
|
||||
|
||||
|
||||
```
|
||||
|
||||
If nested folders are enabled, and the folder is nested (lives under another folder), then the response additionally contains:
|
||||
|
||||
@@ -204,5 +204,5 @@ Now that you are familiar with Explore you can:
|
||||
- [Build dashboards](https://grafana.com/docs/grafana/<GRAFANA_VERSION>/dashboards/build-dashboards/)
|
||||
- Create a wide variety of [visualizations](https://grafana.com/docs/grafana/<GRAFANA_VERSION>/panels-visualizations/visualizations/)
|
||||
- [Work with logs](https://grafana.com/docs/grafana/<GRAFANA_VERSION>/explore/logs-integration/)
|
||||
- [Work with traces](https://grafana.com/docs/grafana/<GRAFANA_VERSION>)
|
||||
- [Work with traces](https://grafana.com/docs/grafana/<GRAFANA_VERSION>/explore/trace-integration/)
|
||||
- [Create and use correlations](https://grafana.com/docs/grafana/<GRAFANA_VERSION>/explore/correlations-editor-in-explore/)
|
||||
|
||||
@@ -19,7 +19,7 @@ To learn more about Grafana Enterprise, refer to [our product page](/enterprise)
|
||||
|
||||
## Enterprise features in Grafana Cloud
|
||||
|
||||
Many Grafana Enterprise features are also available in [Grafana Cloud](/docs/grafana-cloud) Free, Pro, and Advanced accounts. For details, refer to [Grafana Cloud pricing](/pricing/#featuresTable).
|
||||
Many Grafana Enterprise features are also available in paid [Grafana Cloud](/docs/grafana-cloud) accounts. For details, refer to [Grafana Cloud features](/docs/grafana-cloud/introduction/understand-grafana-cloud-features/). For pricing and plans, refer to [Grafana Cloud pricing](https://grafana.com/pricing/).
|
||||
|
||||
To migrate to Grafana Cloud, refer to [Migrate from Grafana Enterprise to Grafana Cloud](/docs/grafana/<GRAFANA_VERSION>/administration/migration-guide/)
|
||||
|
||||
|
||||
@@ -20,87 +20,279 @@ The [Grafana Foundation SDK](https://github.com/grafana/grafana-foundation-sdk)
|
||||
- **Enhance version control:** Track changes seamlessly using standard version control systems like Git.
|
||||
- **Automate deployments:** Integrate dashboard provisioning into your CI/CD pipelines for consistent and repeatable setups.
|
||||
|
||||
The SDK supports multiple programming languages, including Go, Java, PHP, Python, and TypeScript, allowing you to choose the one that best fits your development environment.
|
||||
The SDK supports multiple programming languages, including Go, TypeScript, Python, PHP, and Java, so you can choose the one that best fits your development environment.
|
||||
|
||||
{{< youtube id="_OKQoABmg0Q" >}}
|
||||
|
||||
## Before you begin
|
||||
|
||||
Ensure you have the following prerequisites:
|
||||
|
||||
- **Programming environment:** Set up for your chosen language (for example, Node.js for TypeScript, Python 3.x for Python).
|
||||
- **Programming environment:** Set up for your chosen language. For example: Go, Node.js for TypeScript, or Python 3.x for Python.
|
||||
- **Grafana instance:** A running Grafana instance compatible with the SDK version you’re using (refer to the [compatibility matrix](https://github.com/grafana/grafana-foundation-sdk#navigating-the-sdk)).
|
||||
- **Package manager:** Appropriate for your language (for example, `npm` or `yarn` for JavaScript or TypeScript, `pip` for Python).
|
||||
- **Package manager:** Appropriate for your language, for example, `npm` or `yarn` for TypeScript or `pip` for Python.
|
||||
|
||||
To get started, clone the [intro-to-foundation-sdk repository](https://github.com/grafana/intro-to-foundation-sdk) to access examples and a `docker-compose` stack.
|
||||
|
||||
## Install the Grafana Foundation SDK
|
||||
|
||||
### TypeScript
|
||||
Select the `go` or `typescript` tab to view instructions to install the SDK.
|
||||
For other languages, refer to the Grafana Foundation SDK documentation for installation instructions.
|
||||
{{< code >}}
|
||||
|
||||
For TypeScript, install the SDK package via `npm`:
|
||||
```go
|
||||
go get github.com/grafana/grafana-foundation-sdk/go@next+cog-v0.0.x
|
||||
```
|
||||
|
||||
```bash
|
||||
```typescript
|
||||
npm install @grafana/grafana-foundation-sdk
|
||||
```
|
||||
|
||||
Or use `yarn`:
|
||||
{{< /code >}}
|
||||
|
||||
```bash
|
||||
yarn add @grafana/grafana-foundation-sdk
|
||||
```
|
||||
## Grafana Foundation SDK Overview
|
||||
|
||||
### Go
|
||||
Here's a quick overview of how the Grafana Foundation SDK works:
|
||||
|
||||
For Go, install the SDK package via `go get`:
|
||||
- **Builder pattern:** The SDK uses a chainable builder pattern to let you define dashboards fluently. You start with a `DashboardBuilder`, then add panels, queries, and other components step by step.
|
||||
- **Strong typing:** Everything in the SDK is strongly typed. This gives you autocompletion in your IDE, catches mistakes early, and helps ensure you're always using valid configuration values.
|
||||
- **Structured options:** When a configuration get complex (like data reduction or display settings), the SDK uses typed option builders to keep things readable and predictable.
|
||||
|
||||
```go
|
||||
go get github.com/grafana/grafana-foundation-sdk/go
|
||||
```
|
||||
|
||||
### Python
|
||||
|
||||
For Python, install the SDK using `pip`:
|
||||
|
||||
```bash
|
||||
pip install grafana-foundation-sdk
|
||||
```
|
||||
|
||||
For other languages, refer to the Grafana Foundation SDK documentation for detailed installation instructions.
|
||||
You'll see these concepts in action in the next example. These concepts are explained in more detail afterwards.
|
||||
|
||||
## Create a dashboard
|
||||
|
||||
The following example demonstrates how you can create a simple dashboard using TypeScript:
|
||||
The following example demonstrates how you can create a simple dashboard:
|
||||
|
||||
```typescript
|
||||
import { DashboardBuilder, RowBuilder } from '@grafana/grafana-foundation-sdk/dashboard';
|
||||
import { DataqueryBuilder } from '@grafana/grafana-foundation-sdk/prometheus';
|
||||
import { PanelBuilder } from '@grafana/grafana-foundation-sdk/timeseries';
|
||||
const builder = new DashboardBuilder('Sample Dashboard')
|
||||
.uid('sample-dashboard')
|
||||
.tags(['example', 'typescript'])
|
||||
.refresh('1m')
|
||||
.time({ from: 'now-30m', to: 'now' })
|
||||
.timezone('browser')
|
||||
.withRow(new RowBuilder('Overview'))
|
||||
.withPanel(
|
||||
new PanelBuilder()
|
||||
.title('Network Received')
|
||||
.unit('bps')
|
||||
.min(0)
|
||||
.withTarget(
|
||||
new DataqueryBuilder()
|
||||
.expr('rate(node_network_receive_bytes_total{job="example-job", device!="lo"}[$__rate_interval]) * 8')
|
||||
.legendFormat('{{ device }}')
|
||||
)
|
||||
);
|
||||
console.log(JSON.stringify(builder.build(), null, 2));
|
||||
{{< code >}}
|
||||
|
||||
```go
|
||||
package main
|
||||
|
||||
// Import the appropriate Grafana Foundation SDK packages
|
||||
import (
|
||||
"encoding/json"
|
||||
"log"
|
||||
|
||||
"github.com/grafana/grafana-foundation-sdk/go/cog"
|
||||
"github.com/grafana/grafana-foundation-sdk/go/common"
|
||||
"github.com/grafana/grafana-foundation-sdk/go/dashboard"
|
||||
"github.com/grafana/grafana-foundation-sdk/go/stat"
|
||||
"github.com/grafana/grafana-foundation-sdk/go/testdata"
|
||||
"github.com/grafana/grafana-foundation-sdk/go/timeseries"
|
||||
)
|
||||
|
||||
func main() {
|
||||
// Define a data source reference for our testdata data source
|
||||
testdataRef := dashboard.DataSourceRef{
|
||||
Type: cog.ToPtr("grafana-testdata-datasource"),
|
||||
Uid: cog.ToPtr("testdata"),
|
||||
}
|
||||
|
||||
// Define our dashboard as strongly typed code
|
||||
builder := dashboard.NewDashboardBuilder("My Dashboard").
|
||||
WithPanel(
|
||||
stat.NewPanelBuilder().
|
||||
Title("Version").
|
||||
Datasource(testdataRef).
|
||||
ReduceOptions(common.NewReduceDataOptionsBuilder().
|
||||
Calcs([]string{"lastNotNull"}).
|
||||
Fields("/.*/")).
|
||||
WithTarget(
|
||||
testdata.NewDataqueryBuilder().
|
||||
ScenarioId("csv_content").
|
||||
CsvContent("version\nv1.2.3"),
|
||||
),
|
||||
).
|
||||
WithPanel(
|
||||
timeseries.NewPanelBuilder().
|
||||
Title("Random Time Series").
|
||||
Datasource(testdataRef).
|
||||
WithTarget(
|
||||
testdata.NewDataqueryBuilder().
|
||||
ScenarioId("random_walk"),
|
||||
),
|
||||
)
|
||||
|
||||
// Build the dashboard - errors in configuration will be thrown here
|
||||
dashboard, err := builder.Build()
|
||||
if err != nil {
|
||||
log.Fatalf("failed to build dashboard: %v", err)
|
||||
}
|
||||
|
||||
// Output the generated dashboard as JSON
|
||||
dashboardJson, err := json.MarshalIndent(dashboard, "", " ")
|
||||
if err != nil {
|
||||
log.Fatalf("failed to marshal dashboard: %v", err)
|
||||
}
|
||||
|
||||
log.Printf("Dashboard JSON:\n%s", dashboardJson)
|
||||
}
|
||||
```
|
||||
|
||||
This code defines a dashboard titled “Sample Dashboard” with a single panel displaying data received on the network.
|
||||
```typescript
|
||||
// Import the appropriate Grafana Foundation SDK packages
|
||||
import * as common from '@grafana/grafana-foundation-sdk/common';
|
||||
import * as dashboard from '@grafana/grafana-foundation-sdk/dashboard';
|
||||
import * as stat from '@grafana/grafana-foundation-sdk/stat';
|
||||
import * as testdata from '@grafana/grafana-foundation-sdk/testdata';
|
||||
import * as timeseries from '@grafana/grafana-foundation-sdk/timeseries';
|
||||
|
||||
// Define a data source reference for our testdata data source
|
||||
const testDataRef: dashboard.DataSourceRef = {
|
||||
type: 'grafana-testdata-datasource',
|
||||
uid: 'testdata',
|
||||
};
|
||||
|
||||
// Define our dashboard as strongly typed code
|
||||
const builder = new dashboard.DashboardBuilder('My Dashboard')
|
||||
.withPanel(
|
||||
new stat.PanelBuilder()
|
||||
.title('Version')
|
||||
.reduceOptions(new common.ReduceDataOptionsBuilder().calcs(['lastNotNull']).fields('/.*/'))
|
||||
.datasource(testdataRef)
|
||||
.withTarget(new testdata.DataqueryBuilder().scenarioId('csv_content').csvContent('version\nv1.2.3'))
|
||||
)
|
||||
.withPanel(
|
||||
new timeseries.PanelBuilder()
|
||||
.title('Random Time Series')
|
||||
.datasource(testdataRef)
|
||||
.withTarget(new testdata.DataqueryBuilder().scenarioId('random_walk'))
|
||||
);
|
||||
|
||||
// Build the dashboard - errors in configuration will be thrown here
|
||||
const dashboard = builder.build();
|
||||
|
||||
// Output the generated dashboard as JSON
|
||||
console.log(JSON.stringify(dashboard, null, 2));
|
||||
```
|
||||
|
||||
{{< /code >}}
|
||||
|
||||
This code defines a dashboard titled “My Dashboard” with a two panels:
|
||||
|
||||
- a simple stat panel displaying a version number, and
|
||||
- a time series panel displaying randomized data from the `testdata` data source `random_walk` scenario.
|
||||
|
||||
## Export and use the JSON
|
||||
|
||||
The `build()` method generates a JSON representation of your dashboard, which you can:
|
||||
After you've defined your dashboard as code, build the final dashboard representation using the dashboard builder (typically using the `build()` function depending on language choice) and output the result as a JSON.
|
||||
|
||||
With the JSON payload, you can:
|
||||
|
||||
- **Manually import:** Paste into Grafana’s dashboard import feature.
|
||||
- **Automate:** Use Grafana’s API to programmatically upload the dashboard JSON.
|
||||
- **Automate:** Use [Grafana’s API](../../developers/http_api/) or the [Grafana CLI](../grafana-cli/) to programmatically upload the dashboard JSON.
|
||||
|
||||
## Concepts
|
||||
|
||||
Now that you've seen how to define a basic dashboard using code, let's take a moment to explain how it all works behind the scenes. The Grafana Foundation SDK is built around a few core concepts that make your dashboards structured, reusable, and strongly typed.
|
||||
|
||||
### Builders
|
||||
|
||||
The SDK follows a builder pattern, which lets you compose dashboards step-by-step using chained method calls.
|
||||
Almost every piece of the dashboard, including dashboards, panels, rows, queries, and variables, has its own `Builder` class.
|
||||
|
||||
Here are a few you've already seen:
|
||||
|
||||
- `DashboardBuilder` - Starts the dashboard definition and sets global configuration settings like title, UID, refresh interval, time range, etc.
|
||||
- `PanelBuilder` - Creates individual visualizations like time series panels, stat panels, or log panels.
|
||||
- `DataqueryBuilder` - Defines how a panel fetches data, for example, from Prometheus or the `testdata` plugin.
|
||||
|
||||
Builders are chainable, so you can fluently compose dashboards in a readable, structured way:
|
||||
|
||||
{{< code >}}
|
||||
|
||||
```go
|
||||
stat.NewPanelBuilder().
|
||||
Title("Version").
|
||||
Datasource(testdataRef).
|
||||
ReduceOptions(common.NewReduceDataOptionsBuilder().
|
||||
Calcs([]string{"lastNotNull"}).
|
||||
Fields("/.*/")).
|
||||
WithTarget(
|
||||
testdata.NewDataqueryBuilder().
|
||||
ScenarioId("csv_content").
|
||||
CsvContent("version\nv1.2.3"),
|
||||
)
|
||||
```
|
||||
|
||||
```typescript
|
||||
new stat.PanelBuilder()
|
||||
.title('Version')
|
||||
.reduceOptions(new common.ReduceDataOptionsBuilder().calcs(['lastNotNull']).fields('/.*/'))
|
||||
.datasource(testdataRef)
|
||||
.withTarget(new testdata.DataqueryBuilder().scenarioId('csv_content').csvContent('version\nv1.2.3'));
|
||||
```
|
||||
|
||||
{{< /code >}}
|
||||
|
||||
### Types
|
||||
|
||||
The Grafana Foundation SDK uses strong types under the hood to help catch mistakes before you deploy a broken dashboard.
|
||||
|
||||
For example:
|
||||
|
||||
- When setting a unit, you'll get autocomplete suggestions for valid Grafana units like `"percent"` or `"bps"`.
|
||||
- When defining a time range, you'll be guided to provide the correct structure, like `from` and `to` values.
|
||||
- When referencing data sources, you'll use a structured `DataSourceRef` object with defined `type` and `uid` fields.
|
||||
|
||||
This helps you:
|
||||
|
||||
- Avoid typos or unsupported configuration values
|
||||
- Get full autocomplete and inline documentation in your IDE
|
||||
- Write dashboards that are less error-prone and easier to maintain
|
||||
|
||||
Strong typing also makes it easier to build reusable patterns and components with confidence, especially in large codebases or teams.
|
||||
|
||||
### Options
|
||||
|
||||
Most builder methods accept simple values like strings or numbers, but others expect more structured option objects. These are used for things like:
|
||||
|
||||
- `ReduceDataOptions` - How to reduce time series data into single values (e.g. last, avg).
|
||||
- `VizLegendOptions` - Configure how the legend of a panel is displayed.
|
||||
- `CanvasElementOptions` - Define how the the various components of a Canvas panel should be displayed.
|
||||
|
||||
Example using options:
|
||||
|
||||
{{< code >}}
|
||||
|
||||
```go
|
||||
stat.NewPanelBuilder().
|
||||
ReduceOptions(common.NewReduceDataOptionsBuilder().
|
||||
Calcs([]string{"lastNotNull"}).
|
||||
Fields("/.*/"))
|
||||
)
|
||||
```
|
||||
|
||||
```typescript
|
||||
new stat.PanelBuilder().reduceOptions(new common.ReduceDataOptionsBuilder().calcs(['lastNotNull']).fields('/.*/'));
|
||||
```
|
||||
|
||||
{{< /code >}}
|
||||
|
||||
By using option builders, you don't need to manually construct deeply nested configuration objects. Instead, the SDK gives you a typed and guided API that mirrors a dashboards internal structure, making it easier to configure complex options without guesswork or referring back to the JSON schema.
|
||||
|
||||
## Explore a real-world example
|
||||
|
||||
If you want to explore further and see a more real-world example of using the Grafana Foundation SDK, watch the following walkthrough:
|
||||
|
||||
{{< youtube id="ZjWdGVsrCiQ" >}}
|
||||
|
||||
In this video, we generate a dashboard from code and deploy it using the Grafana API, covering patterns and practices you'd use in production environments. It also includes a working example of a web service that emits metrics and logs, and shows how to deploy a dashboard alongside it using Docker Compose.
|
||||
|
||||
You can find the full source code for this example in the [intro-to-foundation-sdk repository](https://github.com/grafana/intro-to-foundation-sdk/tree/main/generate-and-deploy-example).
|
||||
|
||||
## Summary
|
||||
|
||||
The Grafana Foundation SDK is designed to make dashboard creation:
|
||||
|
||||
- **Composable** through the use of chainable builders
|
||||
- **Safe** with strong typing and clear APIs
|
||||
- **Configurable** using structured options for fine control
|
||||
|
||||
As you build more advanced dashboards, you’ll work with additional builders and types to support richer functionality.
|
||||
The SDK supports not just panels and queries, but also variables, thresholds, field overrides, transformations, and more.
|
||||
Refer to [the full API reference](https://grafana.github.io/grafana-foundation-sdk/) to explore what's possible.
|
||||
|
||||
## Next steps
|
||||
|
||||
@@ -108,4 +300,4 @@ Now that you understand the basics of using the Grafana Foundation SDK, here are
|
||||
|
||||
- **Explore more features:** Check out the [full API reference](https://grafana.github.io/grafana-foundation-sdk/) to learn about advanced dashboard configurations.
|
||||
- **Version control your dashboards:** Store your dashboard code in a Git repository to track changes over time.
|
||||
- **Automate dashboard provisioning with CI/CD:** Integrate the SDK into your CI/CD pipeline to deploy dashboards automatically.
|
||||
- **Automate dashboard provisioning with CI/CD:** [Integrate the SDK into your CI/CD pipeline](./dashboard-automation) to deploy dashboards automatically.
|
||||
|
||||
@@ -29,6 +29,10 @@ This guide walks through:
|
||||
|
||||
By the end, every change to your dashboard code will be automatically created or updated in your Grafana instance without manual intervention.
|
||||
|
||||
{{< youtube id="cFnO8kVOaAI" >}}
|
||||
|
||||
You can find the full example source code in the [intro-to-foundation-sdk repository](https://github.com/grafana/intro-to-foundation-sdk/tree/main/github-actions-example).
|
||||
|
||||
## 1. Generating the dashboard JSON
|
||||
|
||||
Before deploying a dashboard, we need to define it in code using the Grafana Foundation SDK. We ran through an example of this in the Getting Started guide, however, in order to comply with the Kubernetes resource compatible API that Grafana exposes, we’ll make some changes to the code to output the dashboard JSON in the appropriate format.
|
||||
|
||||
@@ -278,6 +278,17 @@ When linking to another dashboard that uses template variables, select variable
|
||||
|
||||
If you want to add all of the current dashboard's variables to the URL, then use `${__all_variables}`.
|
||||
|
||||
When you link to another dashboard, ensure that:
|
||||
|
||||
- The target dashboard has the same variable name. If it doesn't (for example, `server` in the source dashboard and `host` in the target), you must align them or explicitly map values (for example, `&var-host=${server}`).
|
||||
- You use the variable _name_, and not the label. Labels are only used as display text and aren't recognized in URLs.
|
||||
|
||||
For example, if you have a variable with the name `var-server` and the label `ChooseYourServer`, you must use `var-server` in the URL, as shown in the following table:
|
||||
|
||||
| Correct link | Incorrect link |
|
||||
| ---------------------------------------------- | -------------------------------------------------------- |
|
||||
| `/d/xxxx/dashboard-b?orgId=1&var-server=web02` | `/d/xxxx/dashboard-b?orgId=1&var-ChooseYourServer=web02` |
|
||||
|
||||
## Add data links or actions {#add-a-data-link}
|
||||
|
||||
The following tasks describe how to configure data links and actions.
|
||||
@@ -296,9 +307,7 @@ To add a data link, follow these steps:
|
||||
This is a human-readable label for the link displayed in the UI. This is a required field.
|
||||
|
||||
1. Enter the **URL** to which you want to link.
|
||||
|
||||
To add a data link variable, click in the **URL** field and enter `$` or press Ctrl+Space or Cmd+Space to see a list of available variables. This is a required field.
|
||||
|
||||
1. (Optional) To add a data link variable, click in the **URL** field and enter `$` or press Ctrl+Space or Cmd+Space to see a list of available variables.
|
||||
1. If you want the link to open in a new tab, toggle the **Open in a new tab** switch.
|
||||
1. If you want the data link to open with a single click on the visualization, toggle the **One click** switch.
|
||||
|
||||
|
||||
@@ -7,6 +7,7 @@ aliases:
|
||||
- ../panels/reference-standard-field-definitions/
|
||||
- ../panels/standard-field-definitions/
|
||||
- ../panels/working-with-panels/format-standard-fields/
|
||||
- ../panels/field-configuration-options/ # /docs/grafana/latest/panels/field-configuration-options/
|
||||
keywords:
|
||||
- panel
|
||||
- dashboard
|
||||
|
||||
@@ -1473,17 +1473,19 @@ If you have multiple types it will default to string type.
|
||||
|
||||
{{< figure src="/media/docs/grafana/transformations/screenshot-grafana-11-2-transpose-transformation.png" class="docs-image--no-shadow" max-width= "1100px" alt="Before and after transpose transformation" >}}
|
||||
|
||||
### Regression analysis
|
||||
### Trendline
|
||||
|
||||
Use this transformation to create a new data frame containing values predicted by a statistical model. This is useful for finding a trend in chaotic data. It works by fitting a mathematical function to the data, using either linear or polynomial regression. The data frame can then be used in a visualization to display a trendline.
|
||||
|
||||
There are two different models:
|
||||
|
||||
- **Linear regression** - Fits a linear function to the data.
|
||||
- **Linear** - Fits a linear function to the data.
|
||||
{{< figure src="/static/img/docs/transformations/linear-regression.png" class="docs-image--no-shadow" max-width= "1100px" alt="A time series visualization with a straight line representing the linear function" >}}
|
||||
- **Polynomial regression** - Fits a polynomial function to the data.
|
||||
- **Polynomial** - Fits a polynomial function to the data.
|
||||
{{< figure src="/static/img/docs/transformations/polynomial-regression.png" class="docs-image--no-shadow" max-width= "1100px" alt="A time series visualization with a curved line representing the polynomial function" >}}
|
||||
|
||||
> **Note:** This transformation was previously called regression analysis.
|
||||
|
||||
[Table panel]: ref:table-panel
|
||||
[Calculation types]: ref:calculation-types
|
||||
[sparkline cell type]: ref:sparkline-cell-type
|
||||
|
||||
@@ -53,7 +53,7 @@ Geomaps allow you to view and customize the world map using geospatial data. It'
|
||||
|
||||
You can configure and overlay [map layers](#layer-type), like heatmaps and networks, and blend included basemaps or your own custom maps. This helps you to easily focus on the important location-based characteristics of the data.
|
||||
|
||||
{{< figure src="/static/img/docs/geomap-panel/geomap-example-8-1-0.png" max-width="1200px" alt="Geomap visualization" >}}
|
||||
{{< figure src="/static/img/docs/geomap-panel/geomap-example-8-1-0.png" max-width="750px" alt="Geomap visualization" >}}
|
||||
|
||||
When a geomap is in focus, in addition to typical mouse controls, you can pan around using the arrow keys or zoom in and out using the plus (`+`) and minus (`-`) keys or icons.
|
||||
|
||||
@@ -277,7 +277,7 @@ The markers layer allows you to display data points as different marker shapes s
|
||||
| Symbol Horizontal Align | Configures the horizontal alignment of the symbol relative to the data point. Note that the symbol's rotation angle is applied first around the data point, then the horizontal alignment is applied relative to the rotation of the symbol. |
|
||||
| Color | Configures the color of the markers. The default `Fixed color` sets all markers to a specific color. There is also an option to have conditional colors depending on the selected field data point values and the color scheme set in the `Standard options` section. |
|
||||
| Fill opacity | Configures the transparency of each marker. |
|
||||
| Rotation angle | Configures the rotation angle of each marker. The default is `Fixed value`, which makes all markers rotate to the same angle regardless of the data; however, there is also an option to set the rotation of the markers based on data corresponding to a selected field. |
|
||||
| Rotation angle | Configures the rotation angle of each marker in degrees. The default is `Fixed value`, which makes all markers rotate to the same angle regardless of the data; however, there is also an option to set the rotation of the markers based on data corresponding to a selected field. |
|
||||
| Text label | Configures a text label for each marker. |
|
||||
| Show legend | Allows you to toggle the legend for the layer. |
|
||||
| Display tooltip | Allows you to toggle tooltips for the layer. |
|
||||
@@ -341,7 +341,7 @@ Styles can be set within the "properties" object of the GeoJSON with support for
|
||||
|
||||
The Night / Day layer displays night and day regions based on the current time range.
|
||||
|
||||
{{< figure src="/static/img/docs/geomap-panel/geomap-day-night-9-1-0.png" max-width="1200px" alt="Geomap panel Night / Day" >}}
|
||||
{{< figure src="/static/img/docs/geomap-panel/geomap-day-night-9-1-0.png" max-width="600px" alt="Geomap panel Night / Day" >}}
|
||||
|
||||
<!-- prettier-ignore-start -->
|
||||
| Option | Description |
|
||||
@@ -364,11 +364,11 @@ The Route layer is currently in [public preview](/docs/release-life-cycle/). Gra
|
||||
|
||||
The Route layer renders data points as a route.
|
||||
|
||||
{{< figure src="/media/docs/grafana/geomap-route-layer-basic-9-4-0.png" max-width="1200px" alt="Geomap panel Route" >}}
|
||||
{{< figure src="/media/docs/grafana/geomap-route-layer-basic-9-4-0.png" max-width="600px" alt="Geomap panel Route" >}}
|
||||
|
||||
The layer can also render a route with arrows.
|
||||
|
||||
{{< figure src="/media/docs/grafana/geomap-route-layer-arrow-size-9-4-0.png" max-width="1200px" alt="Geomap panel Route arrows with size" >}}
|
||||
{{< figure src="/media/docs/grafana/geomap-route-layer-arrow-size-9-4-0.png" max-width="600px" alt="Geomap panel Route arrows with size" >}}
|
||||
|
||||
<!-- prettier-ignore-start -->
|
||||
| Option | Description |
|
||||
@@ -393,7 +393,7 @@ The Photos layer is currently in [public preview](/docs/release-life-cycle/). Gr
|
||||
|
||||
The Photos layer renders a photo at each data point.
|
||||
|
||||
{{< figure src="/static/img/docs/geomap-panel/geomap-photos-9-3-0.png" max-width="1200px" alt="Geomap panel Photos" >}}
|
||||
{{< figure src="/static/img/docs/geomap-panel/geomap-photos-9-3-0.png" max-width="600px" alt="Geomap panel Photos" >}}
|
||||
|
||||
<!-- prettier-ignore-start -->
|
||||
| Option | Description |
|
||||
@@ -444,7 +444,7 @@ You can convert node graph data to a network layer:
|
||||
| Symbol | Allows you to choose the symbol, icon, or graphic to aid in providing additional visual context to your data. Choose from assets that are included with Grafana such as simple symbols or the Unicon library. You can also specify a URL containing an image asset. The image must be a scalable vector graphic (SVG). |
|
||||
| Color | Configures the color of the nodes. The default `Fixed color` sets all nodes to a specific color. There is also an option to have conditional colors depending on the selected field data point values and the color scheme set in the `Standard options` section. |
|
||||
| Fill opacity | Configures the transparency of each node. |
|
||||
| Rotation angle | Configures the rotation angle of each node. The default is `Fixed value`, which makes all nodes rotate to the same angle regardless of the data; however, there is also an option to set the rotation of the nodes based on data corresponding to a selected field. |
|
||||
| Rotation angle | Configures the rotation angle of each node in degrees. The default is `Fixed value`, which makes all nodes rotate to the same angle regardless of the data; however, there is also an option to set the rotation of the nodes based on data corresponding to a selected field. |
|
||||
| Text label | Configures a text label for each node. |
|
||||
<!-- prettier-ignore-end -->
|
||||
|
||||
@@ -463,7 +463,7 @@ You can convert node graph data to a network layer:
|
||||
|
||||
A map from a collaborative free geographic world database.
|
||||
|
||||
{{< figure src="/static/img/docs/geomap-panel/geomap-osm-9-1-0.png" max-width="1200px" alt="Geomap panel Open Street Map" >}}
|
||||
{{< figure src="/static/img/docs/geomap-panel/geomap-osm-9-1-0.png" max-width="600px" alt="Geomap panel Open Street Map" >}}
|
||||
|
||||
- **Opacity** from 0 (transparent) to 1 (opaque)
|
||||
- **Display tooltip** - allows you to toggle tooltips for the layer.
|
||||
@@ -477,9 +477,9 @@ A CARTO layer is from CARTO Raster basemaps.
|
||||
- **Theme**
|
||||
- Auto
|
||||
- Light
|
||||
{{< figure src="/static/img/docs/geomap-panel/geomap-carto-light-9-1-0.png" max-width="1200px" alt="Geomap panel CARTO light example" >}}
|
||||
{{< figure src="/static/img/docs/geomap-panel/geomap-carto-light-9-1-0.png" max-width="600px" alt="Geomap panel CARTO light example" >}}
|
||||
- Dark
|
||||
{{< figure src="/static/img/docs/geomap-panel/geomap-carto-dark-9-1-0.png" max-width="1200px" alt="Geomap panel CARTO dark example" >}}
|
||||
{{< figure src="/static/img/docs/geomap-panel/geomap-carto-dark-9-1-0.png" max-width="600px" alt="Geomap panel CARTO dark example" >}}
|
||||
- **Show labels** shows the Country details on top of the map.
|
||||
- **Opacity** from 0 (transparent) to 1 (opaque)
|
||||
- **Display tooltip** - allows you to toggle tooltips for the layer.
|
||||
@@ -492,17 +492,17 @@ An ArcGIS layer is a layer from an ESRI ArcGIS MapServer.
|
||||
|
||||
- **Server Instance** to select the map type.
|
||||
- World Street Map
|
||||
{{< figure src="/static/img/docs/geomap-panel/geomap-arcgis-wsm-9-1-0.png" max-width="1200px" alt="Geomap panel ArcGIS World Street Map" >}}
|
||||
{{< figure src="/static/img/docs/geomap-panel/geomap-arcgis-wsm-9-1-0.png" max-width="600px" alt="Geomap panel ArcGIS World Street Map" >}}
|
||||
- World Imagery
|
||||
{{< figure src="/static/img/docs/geomap-panel/geomap-arcgis-wi-9-1-0.png" max-width="1200px" alt="Geomap panel ArcGIS World Imagery" >}}
|
||||
{{< figure src="/static/img/docs/geomap-panel/geomap-arcgis-wi-9-1-0.png" max-width="600px" alt="Geomap panel ArcGIS World Imagery" >}}
|
||||
- World Physical
|
||||
{{< figure src="/static/img/docs/geomap-panel/geomap-arcgis-wp-9-1-0.png" max-width="1200px" alt="Geomap panel ArcGIS World Physical" >}}
|
||||
{{< figure src="/static/img/docs/geomap-panel/geomap-arcgis-wp-9-1-0.png" max-width="600px" alt="Geomap panel ArcGIS World Physical" >}}
|
||||
- Topographic
|
||||
{{< figure src="/static/img/docs/geomap-panel/geomap-arcgis-topographic-9-1-0.png" max-width="1200px" alt="Geomap panel ArcGIS Topographic" >}}
|
||||
{{< figure src="/static/img/docs/geomap-panel/geomap-arcgis-topographic-9-1-0.png" max-width="600px" alt="Geomap panel ArcGIS Topographic" >}}
|
||||
- USA Topographic
|
||||
{{< figure src="/static/img/docs/geomap-panel/geomap-arcgis-usa-topographic-9-1-0.png" max-width="1200px" alt="Geomap panel ArcGIS USA Topographic" >}}
|
||||
{{< figure src="/static/img/docs/geomap-panel/geomap-arcgis-usa-topographic-9-1-0.png" max-width="600px" alt="Geomap panel ArcGIS USA Topographic" >}}
|
||||
- World Ocean
|
||||
{{< figure src="/static/img/docs/geomap-panel/geomap-arcgis-ocean-9-1-0.png" max-width="1200px" alt="Geomap panel ArcGIS World Ocean" >}}
|
||||
{{< figure src="/static/img/docs/geomap-panel/geomap-arcgis-ocean-9-1-0.png" max-width="600px" alt="Geomap panel ArcGIS World Ocean" >}}
|
||||
- Custom MapServer (see [XYZ](#xyz-tile-layer) for formatting)
|
||||
- URL template
|
||||
- Attribution
|
||||
@@ -518,7 +518,7 @@ An ArcGIS layer is a layer from an ESRI ArcGIS MapServer.
|
||||
|
||||
The XYZ Tile layer is a map from a generic tile layer.
|
||||
|
||||
{{< figure src="/static/img/docs/geomap-panel/geomap-xyz-9-1-0.png" max-width="1200px" alt="Geomap panel xyz example" >}}
|
||||
{{< figure src="/static/img/docs/geomap-panel/geomap-xyz-9-1-0.png" max-width="600px" alt="Geomap panel xyz example" >}}
|
||||
|
||||
- **URL template** - Set a valid tile server url, with {z}/{x}/{y} for example: https://tile.openstreetmap.org/{z}/{x}/{y}.png
|
||||
- **Attribution** sets the reference string for the layer if displayed in [map controls](#show-attribution)
|
||||
@@ -639,7 +639,7 @@ The map controls section contains various options for map information and tool o
|
||||
|
||||
Displays zoom controls in the upper left corner. This control can be useful when using systems that don't have a mouse.
|
||||
|
||||
{{< figure src="/static/img/docs/geomap-panel/geomap-map-controls-zoom-9-1-0.png" max-width="1200px" alt="Geomap panel zoom" >}}
|
||||
{{< figure src="/static/img/docs/geomap-panel/geomap-map-controls-zoom-9-1-0.png" max-width="300px" alt="Geomap panel zoom" >}}
|
||||
|
||||
#### Mouse wheel zoom
|
||||
|
||||
@@ -649,19 +649,19 @@ Enables the mouse wheel to be used for zooming in or out.
|
||||
|
||||
Displays attribution for basemap layers.
|
||||
|
||||
{{< figure src="/static/img/docs/geomap-panel/geomap-map-controls-attribution-9-1-0.png" max-width="1200px" alt="Geomap panel attribution" >}}
|
||||
{{< figure src="/static/img/docs/geomap-panel/geomap-map-controls-attribution-9-1-0.png" max-width="400px" alt="Geomap panel attribution" >}}
|
||||
|
||||
#### Show scale
|
||||
|
||||
Displays scale information in the bottom left corner in meters (m) or kilometers (km).
|
||||
|
||||
{{< figure src="/static/img/docs/geomap-panel/geomap-map-controls-scale-9-1-0.png" max-width="1200px" alt="Geomap panel scale" >}}
|
||||
{{< figure src="/static/img/docs/geomap-panel/geomap-map-controls-scale-9-1-0.png" max-width="400px" alt="Geomap panel scale" >}}
|
||||
|
||||
#### Show measure tools
|
||||
|
||||
Displays measure tools in the upper right corner. Measurements appear only when this control is open.
|
||||
|
||||
{{< figure src="/static/img/docs/geomap-panel/geomap-map-controls-measure-9-1-0.png" max-width="1200px" alt="Geomap panel measure" >}}
|
||||
{{< figure src="/static/img/docs/geomap-panel/geomap-map-controls-measure-9-1-0.png" max-width="400px" alt="Geomap panel measure" >}}
|
||||
|
||||
- **Click** to start measuring
|
||||
- **Continue clicking** to continue measurement
|
||||
@@ -678,7 +678,7 @@ Get the spherical length of a geometry. This length is the sum of the great circ
|
||||
- **Miles (mi)**
|
||||
- **Nautical miles (nmi)**
|
||||
|
||||
{{< figure src="/static/img/docs/geomap-panel/geomap-map-controls-measure-length-9-1-0.png" max-width="1200px" alt="Geomap panel measure length" >}}
|
||||
{{< figure src="/static/img/docs/geomap-panel/geomap-map-controls-measure-length-9-1-0.png" max-width="400px" alt="Geomap panel measure length" >}}
|
||||
|
||||
##### Area
|
||||
|
||||
@@ -691,7 +691,7 @@ Get the spherical area of a geometry. This area is calculated assuming that poly
|
||||
- **Acres (acre)**
|
||||
- **Hectare (ha)**
|
||||
|
||||
{{< figure src="/static/img/docs/geomap-panel/geomap-map-controls-measure-area-9-1-0.png" max-width="1200px" alt="Geomap panel measure area" >}}
|
||||
{{< figure src="/static/img/docs/geomap-panel/geomap-map-controls-measure-area-9-1-0.png" max-width="550px" alt="Geomap panel measure area" >}}
|
||||
|
||||
#### Show debug
|
||||
|
||||
@@ -700,13 +700,31 @@ Displays debug information in the upper right corner. This can be useful for deb
|
||||
- **Zoom** displays current zoom level of the map.
|
||||
- **Center** displays the current **longitude**, **latitude** of the map center.
|
||||
|
||||
{{< figure src="/static/img/docs/geomap-panel/geomap-map-controls-debug-9-1-0.png" max-width="1200px" alt="Geomap panel debug" >}}
|
||||
{{< figure src="/static/img/docs/geomap-panel/geomap-map-controls-debug-9-1-0.png" max-width="400px" alt="Geomap panel debug" >}}
|
||||
|
||||
#### Tooltip
|
||||
|
||||
Tooltips are supported for the **Markers**, **Heatmap**, **Photos** (beta) layers.
|
||||
For these layer types, choose from the following tooltip options:
|
||||
|
||||
- **None** displays tooltips only when a data point is clicked.
|
||||
- **Details** displays tooltips when a mouse pointer hovers over a data point.
|
||||
|
||||
When a data point on the geomap represents one row—that is, only a single row of response data is relevant to that point—the tooltip displays a grid with the row's names and values:
|
||||
|
||||
{{< figure src="/media/docs/grafana/panels-visualizations/screenshot-single-row-marker-v12.1.png" max-width="750px" alt="A data point with one row of associated data" >}}
|
||||
|
||||
When a data point represents more than one row—that is, different rows but with the same geographical information—then each row appears as a single entry:
|
||||
|
||||
{{< figure src="/media/docs/grafana/panels-visualizations/screenshot-multiple-row-marker-v12.1.png" max-width="750px" alt="A data point with mulitple rows of associated data" >}}
|
||||
|
||||
The text displayed in each tooltip row is associated with the first field value in each data row.
|
||||
Click it to expand and display the full details of the data row.
|
||||
|
||||
{{< admonition type="note" >}}
|
||||
The data appearing in each detail row is determined by the underlying query and transformations applied to the query's results, and can't be directly controlled using tooltip options.
|
||||
{{< /admonition >}}
|
||||
|
||||
### Standard options
|
||||
|
||||
{{< docs/shared lookup="visualizations/standard-options.md" source="grafana" version="<GRAFANA_VERSION>" >}}
|
||||
|
||||
@@ -73,7 +73,7 @@ The data is converted as follows:
|
||||
|
||||
#### Basic numerical table
|
||||
|
||||
| Gender | Height (kg) | Weight (lbs) |
|
||||
| Gender | Height (in) | Weight (lbs) |
|
||||
| ------ | ----------- | ------------ |
|
||||
| Male | 73.8 | 242 |
|
||||
| Male | 68.8 | 162 |
|
||||
|
||||
@@ -59,6 +59,11 @@ refs:
|
||||
destination: /docs/grafana/<GRAFANA_VERSION>/panels-visualizations/query-transform-data/
|
||||
- pattern: /docs/grafana-cloud/
|
||||
destination: /docs/grafana-cloud/visualizations/panels-visualizations/query-transform-data/
|
||||
graph-styles:
|
||||
- pattern: /docs/grafana/
|
||||
destination: /docs/grafana/<GRAFANA_VERSION>/panels-visualizations/visualizations/time-series/#graph-styles-options
|
||||
- pattern: /docs/grafana-cloud/
|
||||
destination: /docs/grafana-cloud/visualizations/panels-visualizations/visualizations/time-series/#graph-styles-options
|
||||
---
|
||||
|
||||
# Table
|
||||
@@ -170,6 +175,22 @@ Columns with filters applied have a blue filter displayed next to the title.
|
||||
|
||||
To remove the filter, click the blue filter icon and then click **Clear filter**.
|
||||
|
||||
<!-- vale Grafana.WordList = NO -->
|
||||
<!-- vale Grafana.Spelling = NO -->
|
||||
|
||||
### Apply ad hoc filters from the table
|
||||
|
||||
In table visualizations, you can apply ad hoc filters from the visualization with one click.
|
||||
|
||||
Hover your cursor over the cell with the value you want to filter for to display the filter icons:
|
||||
|
||||
{{< figure src="/media/docs/grafana/panels-visualizations/screenshot-table-adhoc-filter-v12.2.png" max-width="500px" alt="Table with ad hoc filter icon displayed on a cell" >}}
|
||||
|
||||
For more information about applying ad hoc filters this way, refer to [Dashboard drilldown with ad hoc filters](https://grafana.com/docs/grafana/<GRAFANA_VERSION>/dashboards/variables/add-template-variables/#dashboard-drilldown-with-ad-hoc-filters).
|
||||
|
||||
<!-- vale Grafana.Spelling = YES -->
|
||||
<!-- vale Grafana.WordList = YES -->
|
||||
|
||||
## Sort columns
|
||||
|
||||
Click a column title to change the sort order from default to descending to ascending.
|
||||
@@ -217,11 +238,8 @@ After you activate the table footer, make selections for the following options:
|
||||
### Cell options
|
||||
|
||||
Cell options allow you to control how data is displayed in a table.
|
||||
The options are:
|
||||
|
||||
- [Cell type](#cell-type) - Control the default cell display settings.
|
||||
- [Wrap text](#wrap-text) - Wrap text in the cell that contains the longest content in your table.
|
||||
- [Cell value inspect](#cell-value-inspect) - Enables value inspection from table cells.
|
||||
The options are differ based on the cell type that you select and are outlined within the descriptions of each cell type.
|
||||
The following table provides short descriptions for each cell type and links to a longer description and the cell type options.
|
||||
|
||||
#### Cell type
|
||||
|
||||
@@ -231,50 +249,88 @@ Additional configuration is available for some cell types.
|
||||
|
||||
If you want to apply a cell type to only some fields instead of all fields, you can do so using the **Cell options > Cell type** field override.
|
||||
|
||||
| Cell type | Description |
|
||||
| ----------------------------------------- | --------------------------------------------------------------------------------------------------------------------------------------------------------------------------------------------------------------------------------------------------------------------------------------------------------------------------------------------- |
|
||||
| Auto | Automatically displays values with sensible defaults applied. |
|
||||
| [Sparkline](#sparkline) | Shows values rendered as a sparkline. |
|
||||
| [Colored text](#colored-text) | If thresholds are set, then the field text is displayed in the appropriate threshold color. |
|
||||
| [Colored background](#colored-background) | If thresholds are set, then the field background is displayed in the appropriate threshold color. |
|
||||
| [Gauge](#gauge) | Cells can be displayed as a graphical gauge, with several different presentation types. You can set the [Gauge display mode](#gauge-display-mode) and the [Value display](#value-display) options. |
|
||||
<!-- prettier-ignore-start -->
|
||||
| Cell type | Description |
|
||||
| ----------------------------------------- | -------------------------------------------------------------------------------------------------------------------------- |
|
||||
| [Auto](#auto) | A basic text and number cell. |
|
||||
| [Sparkline](#sparkline) | Shows values rendered as a sparkline. |
|
||||
| [Colored text](#colored-text) | If thresholds, value mappings, or color schemes are set, then the cell text is displayed in the appropriate color. |
|
||||
| [Colored background](#colored-background) | If thresholds, value mappings, or color schemes are set, then the cell background is displayed in the appropriate color. |
|
||||
| [Gauge](#gauge) | Values are displayed as a horizontal bar gauge. You can set the [Gauge display mode](#gauge-display-mode) and the [Value display](#value-display) options. |
|
||||
| Data links | If you've configured data links, when the cell type is **Auto**, the cell text becomes clickable. If you change the cell type to **Data links**, the cell text reflects the titles of the configured data links. To control the application of data link text more granularly, use a **Cell option > Cell type > Data links** field override. |
|
||||
| [JSON View](#json-view) | Shows values formatted as code. |
|
||||
| [Image](#image) | If the field value is an image URL or a base64 encoded image, the table displays the image. |
|
||||
| [Actions](#actions) | The cell displays a button that triggers a basic, unauthenticated API call when clicked. |
|
||||
| [JSON View](#json-view) | Shows values formatted as code. |
|
||||
| [Image](#image) | Displays an image when the value is a URL or a base64 encoded image. |
|
||||
| [Actions](#actions) | The cell displays a button that triggers a basic, unauthenticated API call when clicked. |
|
||||
<!-- prettier-ignore-end -->
|
||||
|
||||
##### Sparkline
|
||||
#### Auto
|
||||
|
||||
This is a basic text and number cell.
|
||||
|
||||
It has the following cell options:
|
||||
|
||||
{{< docs/shared lookup="visualizations/cell-options.md" source="grafana" version="<GRAFANA_VERSION>" >}}
|
||||
|
||||
#### Sparkline
|
||||
|
||||
This cell type shows values rendered as a sparkline.
|
||||
To show sparklines on data with multiple time series, use the [Time series to table transformation](ref:time-series-to-table-transformation) to process it into a format the table can show.
|
||||
|
||||

|
||||
|
||||
You can customize sparklines with many of the same options as the [time series visualization](ref:time-series-panel) including line style and width, fill opacity, gradient mode, and more.
|
||||
You can also change the color of the sparkline by updating the [color scheme](ref:color-scheme) in the **Standard options** section of the panel configuration.
|
||||
The sparkline cell type options are described in the following table.
|
||||
For more detailed information about all of the sparkline styling options (except **Hide value**), refer to the [time series graph styles documentation](ref:graph-styles).
|
||||
|
||||
##### Colored text
|
||||
<!-- prettier-ignore-start -->
|
||||
| Option | Description |
|
||||
| ------------------- | --------------------------------------------------------------------------------------------- |
|
||||
| Hide value | Toggle the switch on or off to display or hide the cell value on the sparkline. |
|
||||
| Style | Choose whether to display your time-series data as **Lines**, **Bars**, or **Points**. You can use overrides to combine multiple styles in the same graph. |
|
||||
| Line interpolation | How the graph interpolates the series line. Choose from:<ul><li>**Linear** - Points are joined by straight lines.</li><li>**Smooth** - Points are joined by curved lines that smooths transitions between points.</li><li>**Step before** - The line is displayed as steps between points. Points are rendered at the end of the step.</li><li>**Step after** - The line is displayed as steps between points. Points are rendered at the beginning of the step.</li></ul> |
|
||||
| Line width | The thickness of the series lines or the outline for bars using the **Line width** slider. |
|
||||
| Fill opacity | The series area fill color using the **Fill opacity** slider. |
|
||||
| Gradient mode | Gradient mode controls the gradient fill, which is based on the series color. Gradient appearance is influenced by the **Fill opacity** setting. To change the color, use the standard color scheme field option. For more information, refer to [Color scheme](ref:color-scheme). Choose from:<ul><li>**None** - No gradient fill. This is the default setting.</li><li>**Opacity** - An opacity gradient where the opacity of the fill increases as y-axis values increase.</li><li>**Hue** - A subtle gradient that's based on the hue of the series color.</li></ul> |
|
||||
| Line style | Choose from:<ul><li>**Solid**</li><li>**Dash** - Select the length and gap for the line dashes. Default dash spacing is 10, 10.</li><li>**Dots** - Select the gap for the dot spacing. Default dot spacing is 0, 10.</li></ul> |
|
||||
| Connect null values | How null values, which are gaps in the data, appear on the graph. Null values can be connected to form a continuous line or set to a threshold above which gaps in the data are no longer connected. Choose from:<ul><li>**Never** - Time series data points with gaps in the data are never connected.</li><li>**Always** - Time series data points with gaps in the data are always connected.</li><li>**Threshold** - Specify a threshold above which gaps in the data are no longer connected. This can be useful when the connected gaps in the data are of a known size or within a known range, and gaps outside this range should no longer be connected.</li></ul> |
|
||||
| Show points | Whether to show data points to lines or bars. Choose from: <ul><li>**Auto** - Grafana determines a point's visibility based on the density of the data. If the density is low, then points appear.</li><li>**Always** - Show the points regardless of how dense the dataset is.</li><li>**Never** - Don't show points.</li></ul> |
|
||||
| Point size | Set the size of the points, from 1 to 40 pixels in diameter. |
|
||||
| Bar alignment | Set the position of the bar relative to a data point. |
|
||||
<!-- prettier-ignore-end -->
|
||||
|
||||
If thresholds are set, with this cell type, the field text is displayed in the appropriate threshold color.
|
||||
#### Colored text
|
||||
|
||||
If thresholds, value mappings, or color schemes are set, the cell text is displayed in the appropriate color.
|
||||
|
||||

|
||||
|
||||
{{< admonition type="note" >}}
|
||||
This is an experimental feature.
|
||||
{{< /admonition >}}
|
||||
The colored text cell type has the following options:
|
||||
|
||||
##### Colored background
|
||||
{{< docs/shared lookup="visualizations/cell-options.md" source="grafana" version="<GRAFANA_VERSION>" >}}
|
||||
|
||||
If thresholds are set, with this cell type, the field background is displayed in the appropriate threshold color.
|
||||
#### Colored background
|
||||
|
||||
If thresholds, value mappings, or color schemes are set, the cell background is displayed in the appropriate color.
|
||||
|
||||

|
||||
|
||||
- **Background display mode** - Choose between **Basic** and **Gradient**.
|
||||
- **Apply to entire row** - Toggle the switch on to apply the background color that's configured for the cell to the whole row.
|
||||
You can also set background cell color by row:
|
||||
|
||||

|
||||
|
||||
##### Gauge
|
||||
The colored background cell type has the following options:
|
||||
|
||||
<!-- prettier-ignore-start -->
|
||||
| Option | Description |
|
||||
| ------ | ----------- |
|
||||
| Background display mode | Choose between **Basic** and **Gradient**. |
|
||||
| Apply to entire row | Toggle the switch on to apply the background color that's configured for the cell to the whole row. |
|
||||
| Wrap text | <p>Toggle the **Wrap text** switch to wrap text in the cell that contains the longest content in your table. To wrap the text _in a specific column only_, use a **Fields with name** [field override](ref:field-override), select the **Cell options > Cell type** override property, and toggle on the **Wrap text** switch.</p><p>Text wrapping is in [public preview](https://grafana.com/docs/release-life-cycle/#public-preview), however, it’s available to use by default.</p> |
|
||||
| Cell value inspect | <p>Enables value inspection from table cells. When the switch is toggled on, clicking the inspect icon in a cell opens the **Inspect value** drawer which contains two tabs: **Plain text** and **Code editor**.</p><p>Grafana attempts to automatically detect the type of data in the cell and opens the drawer with the associated tab showing. However, you can switch back and forth between tabs.</p> |
|
||||
<!-- prettier-ignore-end -->
|
||||
|
||||
<!-- The wrap text and cell value inspect descriptions above should be copied from docs/sources/shared/visualizations/cell-options.md -->
|
||||
|
||||
#### Gauge
|
||||
|
||||
With this cell type, cells can be displayed as a graphical gauge, with several different presentation types controlled by the [gauge display mode](#gauge-display-mode) and the [value display](#value-display).
|
||||
|
||||
@@ -283,53 +339,58 @@ The maximum and minimum values of the gauges are configured automatically from t
|
||||
If you don't want the max/min values to be pulled from the whole dataset, you can configure them for each column using [field overrides](#field-overrides).
|
||||
{{< /admonition >}}
|
||||
|
||||
###### Gauge display mode
|
||||
##### Gauge display mode
|
||||
|
||||
You can set three gauge display modes.
|
||||
|
||||
<!-- prettier-ignore-start -->
|
||||
|
||||
| Option | Description |
|
||||
| ------ | ----------- |
|
||||
| Basic | Shows a simple gauge with the threshold levels defining the color of gauge. {{< figure src="/media/docs/grafana/panels-visualizations/screenshot-gauge-mode-basic-v11.3.png" alt="Table cell with basic gauge mode" >}} |
|
||||
| Gradient | The threshold levels define a gradient. {{< figure src="/media/docs/grafana/panels-visualizations/screenshot-gauge-mode-gradient-v11.3.png" alt="Table cell with gradient gauge mode" >}} |
|
||||
| Retro LCD | The gauge is split up in small cells that are lit or unlit. {{< figure src="/media/docs/grafana/panels-visualizations/screenshot-gauge-mode-retro-v11.3.png" alt="Table cell with retro LCD gauge mode" >}} |
|
||||
|
||||
<!-- prettier-ignore-end -->
|
||||
|
||||
###### Value display
|
||||
##### Value display
|
||||
|
||||
Labels displayed alongside of the gauges can be set to be colored by value, match the theme text color, or be hidden.
|
||||
|
||||
<!-- prettier-ignore-start -->
|
||||
|
||||
| Option | Description |
|
||||
| ------ | ----------- |
|
||||
| Value color | Labels are colored by value. {{< figure src="/media/docs/grafana/panels-visualizations/screenshot-labels-value-color-v11.3.png" alt="Table with labels in value color" >}} |
|
||||
| Text color | Labels match the theme text color. {{< figure src="/media/docs/grafana/panels-visualizations/screenshot-labels-text-color-v11.3.png" alt="Table with labels in theme color" >}} |
|
||||
| Hidden | Labels are hidden. {{< figure src="/media/docs/grafana/panels-visualizations/screenshot-labels-hidden-v11.3.png" alt="Table with labels hidden" >}} |
|
||||
|
||||
<!-- prettier-ignore-end -->
|
||||
|
||||
##### JSON View
|
||||
#### JSON View
|
||||
|
||||
This cell type shows values formatted as code.
|
||||
If a value is an object the JSON view allowing browsing the JSON object will appear on hover.
|
||||
|
||||
{{< figure src="/static/img/docs/tables/json-view.png" max-width="350px" alt="JSON view" class="docs-image--no-shadow" >}}
|
||||
|
||||
##### Image
|
||||
For the JSON view cell type, you can set enable **Cell value inspect**.
|
||||
This enables value inspection from table cells.
|
||||
When the switch is toggled on, clicking the inspect icon in a cell opens the **Inspect value** drawer which contains two tabs: **Plain text** and **Code editor**.
|
||||
|
||||
Grafana attempts to automatically detect the type of data in the cell and opens the drawer with the associated tab showing.
|
||||
However, you can switch back and forth between tabs
|
||||
|
||||
#### Image
|
||||
|
||||
If you have a field value that is an image URL or a base64 encoded image, this cell type displays it as an image.
|
||||
|
||||

|
||||
|
||||
Set the following options:
|
||||
It has the following options:
|
||||
|
||||
- **Alt text** - Set the alternative text of an image. The text will be available for screen readers and in cases when images can't be loaded.
|
||||
- **Title text** - Set the text that's displayed when the image is hovered over with a cursor.
|
||||
| Option | Description |
|
||||
| ---------- | ----------------------------------------------------------------------------------------------------------------------------- |
|
||||
| Alt text | Set the alternative text of an image. The text will be available for screen readers and in cases when images can't be loaded. |
|
||||
| Title text | Set the text that's displayed when the image is hovered over with a cursor. |
|
||||
|
||||
##### Actions
|
||||
#### Actions
|
||||
|
||||
The cell displays a button that triggers a basic, unauthenticated API call when clicked.
|
||||
Configure the API call with the following options:
|
||||
@@ -343,34 +404,8 @@ Configure the API call with the following options:
|
||||
| Query parameters | Enter as many **Key**, **Value** pairs as you need. |
|
||||
| Header parameters | Enter as many **Key**, **Value** pairs as you need. |
|
||||
| Payload | Enter the body of the API call. |
|
||||
|
||||
<!-- prettier-ignore-end -->
|
||||
|
||||
#### Wrap text
|
||||
|
||||
{{< admonition type="note" >}}
|
||||
Text wrapping is in [public preview](https://grafana.com/docs/release-life-cycle/#public-preview), however, it’s available to use by default.
|
||||
We’d love hear from you about how this new feature is working. To provide feedback, you can open an issue in the [Grafana GitHub repository](https://github.com/grafana/grafana).
|
||||
{{< /admonition >}}
|
||||
|
||||
Toggle the **Wrap text** switch to wrap text in the cell that contains the longest content in your table.
|
||||
|
||||
To wrap the text _in a specific column only_, use a **Fields with name** [field override](ref:field-override), select the **Cell options > Cell type** override property, and toggle on the **Wrap text** switch.
|
||||
|
||||
This option is available for the following cell types: **Auto**, **Colored text**, and **Colored background**.
|
||||
|
||||
#### Cell value inspect
|
||||
|
||||
Enables value inspection from table cells. When the **Cell inspect value** switch is toggled on, clicking the inspect icon in a cell opens the **Inspect value** drawer.
|
||||
|
||||
The **Inspect value** drawer has two tabs, **Plain text** and **Code editor**.
|
||||
Grafana attempts to automatically detect the type of data in the cell and opens the drawer with the associated tab showing.
|
||||
However, you can switch back and forth between tabs.
|
||||
|
||||
This option is available for the following cell types: **Auto**, **Colored text**, **Colored background**, and **JSON View**.
|
||||
|
||||
If you want to apply this setting to only some fields instead of all fields, you can do so using the **Cell options > Cell value inspect** field override.
|
||||
|
||||
### Standard options
|
||||
|
||||
{{< docs/shared lookup="visualizations/standard-options.md" source="grafana" version="<GRAFANA_VERSION>" >}}
|
||||
|
||||
@@ -15,10 +15,7 @@ weight: 300
|
||||
Custom branding enables you to replace the Grafana Labs brand and logo with your corporate brand and logo.
|
||||
|
||||
{{< admonition type="note" >}}
|
||||
Available in [Grafana Enterprise](../../../introduction/grafana-enterprise/) and [Grafana Cloud](/docs/grafana-cloud). For Cloud Advanced and Enterprise customers, please provide custom elements and logos to our Support team. We will help you host your images and update your custom branding.
|
||||
|
||||
This feature is not available for Grafana Free and Pro tiers.
|
||||
For more information on feature availability across plans, refer to our [feature comparison page](/docs/grafana-cloud/cost-management-and-billing/understand-grafana-cloud-features/)
|
||||
Available in [Grafana Enterprise](../../../introduction/grafana-enterprise/) and to customers on select Grafana Cloud plans. For pricing information, visit [pricing](https://grafana.com/pricing/) or contact our sales team. For Cloud customers, please provide custom elements and logos to our Support team. We will help you host your images and update your custom branding.
|
||||
|
||||
{{< /admonition >}}
|
||||
|
||||
@@ -79,6 +76,17 @@ The configuration file in Grafana Enterprise contains the following options. For
|
||||
;hide_edition =
|
||||
```
|
||||
|
||||
{{< admonition type="note" >}}
|
||||
For the `login_logo` option, Grafana recommends using SVG files that are 48 pixels by 48 pixels or smaller. You also don't need to use the `url()` function for `login_logo`.
|
||||
|
||||
Additionally, you can copy images to the local Grafana image directory, `/usr/share/grafana/public/img/`, and set `login_logo` to the stored image. For example:
|
||||
|
||||
```ini
|
||||
login_logo = /public/img/<YOUR_LOGO.svg>
|
||||
```
|
||||
|
||||
{{< /admonition >}}
|
||||
|
||||
You have the option of adding custom links in place of the default footer links (Documentation, Support, Community). Below is an example of how to replace the default footer and help links with custom links.
|
||||
|
||||
```ini
|
||||
|
||||
@@ -198,6 +198,14 @@ List of enabled loggers.
|
||||
|
||||
Keep dashboard content in the logs (request or response fields). This can significantly increase the size of your logs.
|
||||
|
||||
### log_datasource_query_request_body
|
||||
|
||||
Whether to record data source queries' request body. This can significantly increase the size of your logs. Enabled by default.
|
||||
|
||||
### log_datasource_query_response_body
|
||||
|
||||
Whether to record data source queries' response body. This can significantly increase the size of your logs. Enabled by default.
|
||||
|
||||
### verbose
|
||||
|
||||
Log all requests and keep requests and responses body. This can significantly increase the size of your logs.
|
||||
|
||||
@@ -38,6 +38,7 @@ Most [generally available](https://grafana.com/docs/release-life-cycle/#general-
|
||||
| `pluginsDetailsRightPanel` | Enables right panel for the plugins details page | Yes |
|
||||
| `recordedQueriesMulti` | Enables writing multiple items from a single query within Recorded Queries | Yes |
|
||||
| `logsExploreTableVisualisation` | A table visualisation for logs in Explore | Yes |
|
||||
| `awsDatasourcesTempCredentials` | Support temporary security credentials in AWS plugins for Grafana Cloud customers | Yes |
|
||||
| `transformationsRedesign` | Enables the transformations redesign | Yes |
|
||||
| `awsAsyncQueryCaching` | Enable caching for async queries for Redshift and Athena. Requires that the datasource has caching and async query support enabled | Yes |
|
||||
| `dashgpt` | Enable AI powered features in dashboards | Yes |
|
||||
@@ -82,7 +83,7 @@ Most [generally available](https://grafana.com/docs/release-life-cycle/#general-
|
||||
| `alertingMigrationUI` | Enables the alerting migration UI, to migrate data source-managed rules to Grafana-managed rules | Yes |
|
||||
| `alertingImportYAMLUI` | Enables a UI feature for importing rules from a Prometheus file to Grafana-managed rules | Yes |
|
||||
| `unifiedNavbars` | Enables unified navbars | |
|
||||
| `tabularNumbers` | Use fixed-width numbers globally in the UI | Yes |
|
||||
| `tabularNumbers` | Use fixed-width numbers globally in the UI | |
|
||||
|
||||
## Public preview feature toggles
|
||||
|
||||
|
||||
@@ -371,6 +371,10 @@ enabled = false
|
||||
loggers = file
|
||||
# Keep dashboard content in the logs (request or response fields); this can significantly increase the size of your logs.
|
||||
log_dashboard_content = false
|
||||
# Whether to record data source queries' request body. This can significantly increase the size of your logs. Enabled by default.
|
||||
log_datasource_query_request_body = true
|
||||
# Whether to record data source queries' response body. This can significantly increase the size of your logs. Enabled by default.
|
||||
log_datasource_query_response_body = true
|
||||
# Keep requests and responses body; this can significantly increase the size of your logs.
|
||||
verbose = false
|
||||
# Write an audit log for every status code.
|
||||
@@ -420,9 +424,11 @@ tenant_id =
|
||||
|
||||
If you have multiple Grafana instances sending logs to the same Loki service or if you are using Loki for non-audit logs, audit logs come with additional labels to help identifying them:
|
||||
|
||||
- **host** - OS hostname on which the Grafana instance is running.
|
||||
- **grafana_instance** - Application URL.
|
||||
- **kind** - `auditing`
|
||||
| Label | Value |
|
||||
| ---------------- | ---------------------------------------------------- |
|
||||
| host | OS hostname on which the Grafana instance is running |
|
||||
| grafana_instance | Application URL |
|
||||
| kind | `auditing` |
|
||||
|
||||
When basic authentication is needed to ingest logs in your Loki instance, you can specify credentials in the URL field. For example:
|
||||
|
||||
|
||||
@@ -239,7 +239,8 @@ If the user is deleted from Grafana, the user will be not be able to login and r
|
||||
### Team Sync
|
||||
|
||||
{{< admonition type="note" >}}
|
||||
Only available in [Grafana Enterprise](https://grafana.com/docs/grafana/<GRAFANA_VERSION>/introduction/grafana-enterprise/) and [Grafana Cloud Advanced](https://grafana.com/docs/grafana-cloud/).
|
||||
Available in [Grafana Enterprise](https://grafana.com/docs/grafana/<GRAFANA_VERSION>/introduction/grafana-enterprise/) and to customers on select Grafana Cloud plans. For pricing information, visit [pricing](https://grafana.com/pricing/) or contact our sales team.
|
||||
|
||||
{{< /admonition >}}
|
||||
|
||||
With Team Sync, it's possible to set up synchronization between teams in your authentication provider and Grafana. You can send Grafana values as part of an HTTP header and have Grafana map them to your team structure. This allows you to put users into specific teams automatically.
|
||||
|
||||
@@ -421,7 +421,7 @@ auto_login = true
|
||||
### Team Sync
|
||||
|
||||
{{< admonition type="note" >}}
|
||||
Only available in [Grafana Enterprise](https://grafana.com/docs/grafana/<GRAFANA_VERSION>/introduction/grafana-enterprise/) and [Grafana Cloud Advanced](https://grafana.com/docs/grafana-cloud/).
|
||||
Available in [Grafana Enterprise](https://grafana.com/docs/grafana/<GRAFANA_VERSION>/introduction/grafana-enterprise/) and to customers on select Grafana Cloud plans. For pricing information, visit [pricing](https://grafana.com/pricing/) or contact our sales team.
|
||||
{{< /admonition >}}
|
||||
|
||||
With Team Sync you can map your Entra ID groups to teams in Grafana so that your users will automatically be added to
|
||||
@@ -469,7 +469,7 @@ You can make Grafana always get group information from the Microsoft Graph API b
|
||||
1. Under the **GroupMember** section, select **GroupMember.Read.All**.
|
||||
1. Click **Add permissions**.
|
||||
1. Select **Microsoft Graph** from the list of APIs.
|
||||
1. Select **Delegated permissions**..
|
||||
1. Select **Delegated permissions**.
|
||||
1. In the **Select permissions** pane, under the **User** section, select **User.Read**.
|
||||
1. Click the **Add permissions** button at the bottom of the page.
|
||||
|
||||
@@ -479,9 +479,10 @@ Admin consent may be required for this permission.
|
||||
|
||||
### Force fetching groups from Microsoft Graph API
|
||||
|
||||
To force fetching groups from Microsoft Graph API instead of the `id_token`. You can use the `force_use_graph_api` config option.
|
||||
To force fetching groups from Microsoft Graph API instead of the `id_token`, you can use the `force_use_graph_api` configuration option.
|
||||
|
||||
```
|
||||
```ini
|
||||
[auth.azuread]
|
||||
force_use_graph_api = true
|
||||
```
|
||||
|
||||
|
||||
@@ -320,7 +320,7 @@ org_mapping = org_foo:org_foo:Viewer org_bar:org_bar:Editor *:org_baz:Editor
|
||||
## Configure team synchronization
|
||||
|
||||
{{< admonition type="note" >}}
|
||||
Only available in [Grafana Enterprise](https://grafana.com/docs/grafana/<GRAFANA_VERSION>/introduction/grafana-enterprise/) and [Grafana Cloud Advanced](https://grafana.com/docs/grafana-cloud/).
|
||||
Available in [Grafana Enterprise](https://grafana.com/docs/grafana/<GRAFANA_VERSION>/introduction/grafana-enterprise/) and to customers on select Grafana Cloud plans. For pricing information, visit [pricing](https://grafana.com/pricing/) or contact our sales team.
|
||||
{{< /admonition >}}
|
||||
|
||||
By using Team Sync, you can link your OAuth2 groups to teams within Grafana. This will automatically assign users to the appropriate teams.
|
||||
|
||||
@@ -211,7 +211,7 @@ role_attribute_path = [login=='octocat'][0] && 'GrafanaAdmin' || 'Viewer'
|
||||
## Configure team synchronization
|
||||
|
||||
{{< admonition type="note" >}}
|
||||
Only available in [Grafana Enterprise](https://grafana.com/docs/grafana/<GRAFANA_VERSION>/introduction/grafana-enterprise/) and [Grafana Cloud Advanced](https://grafana.com/docs/grafana-cloud/).
|
||||
Available in [Grafana Enterprise](https://grafana.com/docs/grafana/<GRAFANA_VERSION>/introduction/grafana-enterprise/) and to customers on select Grafana Cloud plans. For pricing information, visit [pricing](https://grafana.com/pricing/) or contact our sales team.
|
||||
{{< /admonition >}}
|
||||
|
||||
By using Team Sync, you can map teams from your GitHub organization to teams within Grafana. This will automatically assign users to the appropriate teams.
|
||||
|
||||
@@ -237,7 +237,7 @@ use_refresh_token = true
|
||||
## Configure team synchronization
|
||||
|
||||
{{< admonition type="note" >}}
|
||||
Only available in [Grafana Enterprise](https://grafana.com/docs/grafana/<GRAFANA_VERSION>/introduction/grafana-enterprise/) and [Grafana Cloud Advanced](https://grafana.com/docs/grafana-cloud/).
|
||||
Available in [Grafana Enterprise](https://grafana.com/docs/grafana/<GRAFANA_VERSION>/introduction/grafana-enterprise/) and to customers on select Grafana Cloud plans. For pricing information, visit [pricing](https://grafana.com/pricing/) or contact our sales team.
|
||||
{{< /admonition >}}
|
||||
|
||||
By using Team Sync, you can map GitLab groups to teams within Grafana. This will automatically assign users to the appropriate teams.
|
||||
|
||||
@@ -160,7 +160,7 @@ auto_login = true
|
||||
### Configure team synchronization
|
||||
|
||||
{{< admonition type="note" >}}
|
||||
Only available in [Grafana Enterprise](https://grafana.com/docs/grafana/<GRAFANA_VERSION>/introduction/grafana-enterprise/) and [Grafana Cloud Advanced](https://grafana.com/docs/grafana-cloud/).
|
||||
Available in [Grafana Enterprise](https://grafana.com/docs/grafana/<GRAFANA_VERSION>/introduction/grafana-enterprise/) and to customers on select Grafana Cloud plans. For pricing information, visit [pricing](https://grafana.com/pricing/) or contact our sales team.
|
||||
{{< /admonition >}}
|
||||
|
||||
With team sync, you can easily add users to teams by utilizing their Google groups. To set up team sync for Google OAuth, refer to the following example.
|
||||
|
||||
@@ -109,7 +109,7 @@ viewer
|
||||
## Team sync
|
||||
|
||||
{{< admonition type="note" >}}
|
||||
Only available in [Grafana Enterprise](https://grafana.com/docs/grafana/<GRAFANA_VERSION>/introduction/grafana-enterprise/) and [Grafana Cloud Advanced](https://grafana.com/docs/grafana-cloud/).
|
||||
Available in [Grafana Enterprise](https://grafana.com/docs/grafana/<GRAFANA_VERSION>/introduction/grafana-enterprise/) and to customers on select Grafana Cloud plans. For pricing information, visit [pricing](https://grafana.com/pricing/) or contact our sales team.
|
||||
{{< /admonition >}}
|
||||
|
||||
[Teamsync](https://grafana.com/docs/grafana/<GRAFANA_VERSION>/setup-grafana/configure-security/configure-team-sync/) is a feature that allows you to map groups from your identity provider to Grafana teams. This is useful if you want to give your users access to specific dashboards or folders based on their group membership.
|
||||
|
||||
@@ -238,7 +238,7 @@ org_mapping = ["Group 1:org_foo:Viewer", "Group 2:org_bar:Editor", "*:3:Editor"]
|
||||
### Configure team synchronization
|
||||
|
||||
{{< admonition type="note" >}}
|
||||
Only available in [Grafana Enterprise](https://grafana.com/docs/grafana/<GRAFANA_VERSION>/introduction/grafana-enterprise/) and [Grafana Cloud Advanced](https://grafana.com/docs/grafana-cloud/).
|
||||
Available in [Grafana Enterprise](https://grafana.com/docs/grafana/<GRAFANA_VERSION>/introduction/grafana-enterprise/) and to customers on select Grafana Cloud plans. For pricing information, visit [pricing](https://grafana.com/pricing/) or contact our sales team.
|
||||
{{< /admonition >}}
|
||||
|
||||
By using Team Sync, you can link your Okta groups to teams within Grafana. This will automatically assign users to the appropriate teams.
|
||||
|
||||
@@ -12,7 +12,7 @@ weight: 540
|
||||
# Configure team sync for SAML
|
||||
|
||||
{{< admonition type="note" >}}
|
||||
Only available in [Grafana Enterprise](https://grafana.com/docs/grafana/<GRAFANA_VERSION>/introduction/grafana-enterprise/) and [Grafana Cloud Advanced](https://grafana.com/docs/grafana-cloud/).
|
||||
Available in [Grafana Enterprise](https://grafana.com/docs/grafana/<GRAFANA_VERSION>/introduction/grafana-enterprise/) and to customers on select Grafana Cloud plans. For pricing information, visit [pricing](https://grafana.com/pricing/) or contact our sales team.
|
||||
{{< /admonition >}}
|
||||
|
||||
To use SAML Team sync, set [`assertion_attribute_groups`](https://grafana.com/docs/grafana/<GRAFANA_VERSION>/setup-grafana/configure-grafana/enterprise-configuration/#assertion_attribute_groups) to the attribute name where you store user groups. Then Grafana will use attribute values extracted from SAML assertion to add user into the groups with the same name configured on the External group sync tab.
|
||||
|
||||
@@ -124,7 +124,7 @@ This app registration will be used as a Service Account to retrieve more informa
|
||||
1. In the **Request API permissions** pane, select **Microsoft Graph**, and click **Delegated permissions**.
|
||||
1. In the **Select permissions** pane, under the **User** section, select **User.Read**.
|
||||
1. Click the **Add permissions** button at the bottom of the page.
|
||||
1. In the **API permissions** section, select **Grant admin consent for <your-organization>**.
|
||||
1. In the **API permissions** section, select **Grant admin consent for `<directory-name>`**.
|
||||
|
||||
The following table shows what the permissions look like from the Entra ID portal:
|
||||
|
||||
@@ -135,3 +135,5 @@ The following table shows what the permissions look like from the Entra ID porta
|
||||
| `User.Read.All` | Application | Yes | Granted |
|
||||
|
||||
{{< figure src="/media/docs/grafana/saml/graph-api-app-permissions.png" caption="Screen shot of the permissions listed in Entra ID for the App registration" >}}
|
||||
|
||||
To test that Graph API has the correct permissions, refer to the [Troubleshoot Graph API calls](../troubleshoot-saml/#troubleshoot-graph-api-calls) section.
|
||||
|
||||
@@ -14,7 +14,7 @@ weight: 510
|
||||
# Configure SAML authentication using the Grafana user interface
|
||||
|
||||
{{< admonition type="note" >}}
|
||||
Available in [Grafana Enterprise](https://grafana.com/docs/grafana/<GRAFANA_VERSION>/introduction/grafana-enterprise/) version 10.0 and later, and [Grafana Cloud Pro or Advanced](https://grafana.com/docs/grafana/<GRAFANA_VERSION>/introduction/grafana-cloud/).
|
||||
Available in [Grafana Enterprise](https://grafana.com/docs/grafana/<GRAFANA_VERSION>/introduction/grafana-enterprise/) version 10.0 and later, and to customers on select Grafana Cloud plans. For pricing information, visit [pricing](https://grafana.com/pricing/) or contact our sales team.
|
||||
{{< /admonition >}}
|
||||
|
||||
You can configure SAML authentication in Grafana through the user interface (UI) or the Grafana configuration file. For instructions on how to set up SAML using the Grafana configuration file, refer to [Configure SAML authentication using the configuration file](../#configure-saml-using-the-grafana-config-file).
|
||||
@@ -40,7 +40,7 @@ To follow this guide, you need:
|
||||
These permissions are granted by `fixed:authentication.config:writer` role.
|
||||
By default, this role is granted to Grafana server administrator in self-hosted instances and to Organization admins in Grafana Cloud instances.
|
||||
|
||||
- Grafana instance running Grafana version 10.0 or later with [Grafana Enterprise](https://grafana.com/docs/grafana/<GRAFANA_VERSION>/introduction/grafana-enterprise/) or [Grafana Cloud Pro or Advanced](https://grafana.com/docs/grafana/<GRAFANA_VERSION>/introduction/grafana-cloud/) license.
|
||||
- Grafana instance running Grafana version 10.0 or later with [Grafana Enterprise](https://grafana.com/docs/grafana/<GRAFANA_VERSION>/introduction/grafana-enterprise/) and to customers on select Grafana Cloud plans. For pricing information, visit [pricing](https://grafana.com/pricing/) or contact our sales team.
|
||||
|
||||
## Steps To Configure SAML Authentication
|
||||
|
||||
|
||||
Some files were not shown because too many files have changed in this diff Show More
Reference in New Issue
Block a user